What you need to replace the wiring in the apartment. Partial replacement of electrical wiring in the apartment. Can you do without papers?
Replacing wiring in an apartment is a fairly common event. The need for this process is most often due to the fact that old cables include an aluminum core that is not adapted to modern capacities. Such systems are not always able to withstand the loads exerted on them by a large number of electrical appliances. Before replacing the wiring, it is necessary to familiarize yourself with the sequence of work and recommendations for each item.
In what cases is it necessary to replace the electrical wiring in the apartment?
Most often, this operation is performed if the electrical system does not meet modern requirements. Today, the load on the network has increased several times, since almost every family uses powerful electrical appliances ( washing machine, boiler, etc.).

Until recently, cables in electrical systems included aluminum cores. Although this metal is a good conductor, it has many disadvantages. For example, it has poor corrosion resistance. And also in the process of operation, changes occur in the very structure of aluminum. Metal wear increases the likelihood of a fire as a result of a short circuit.
The service life of aluminum wiring does not exceed 15 years, while copper cables can be in operation for up to 30 years. From a safety point of view, copper wires are the most acceptable. The most common problems of old electrical networks made of aluminum:
- neutrals have deaf grounding (instead of protective);
- outdated version of cabling by branching;
- lack of automatic switches;
- minimum number of sockets.

It is necessary to think about replacing the electrics in the apartment when the old system has been in operation for more than 20 years, as well as when signs of deterioration of the network are identified. Among these criteria, one can single out those that are easiest to detect. For example, sparkling rosettes are a warning that you should not turn a blind eye to.
Note! The problem can be solved in two ways. The first of these is the partial replacement of electrical wiring. However, this option is recommended only when it is necessary to eliminate a break in the network. In other situations, experts advise a complete replacement of the system.
Other signs that signal a system malfunction are all kinds of breakdowns of sockets and switches. Often, when electrical appliances fail, you can smell the burnt insulating material. In this case, it is also necessary to replace the wiring.
How much does it cost to change the wiring in the apartment? The cost of replacing an electrical system primarily depends on the area of \u200b\u200bthe living space. The following factors are also very important: the number of rooms, the layout, the number of electrical appliances that will be used after the repair. The minimum cost of replacing electrical wiring for one-room apartments is 15,000 rubles. For two-room dwellings, the price is slightly higher - 20,000 rubles.

How to conduct wiring in the apartment: two popular ways
To date, electricians use two methods of laying electrical wiring in a room: external and internal. All subsequent work depends on the choice of the desired option, so you need to familiarize yourself with the advantages and disadvantages of each of these methods.
The internal method of laying electrical wiring is also called hidden. It involves the location of cables and other elements of the electrical network in special channels (gates). For their organization, a perforator is used. The main advantage of this laying option is that the usable area of the apartment is saved. And also the mounted system has no effect on appearance premises.
Another plus of hidden wiring in a house or apartment is the absence of the need to protect cables from mechanical damage. The location of the wires inside the walls allows you to increase the degree of tolerance for load and overload of the system.
However, this method of laying cables has its drawbacks. First of all, it is worth noting that the hidden method involves carrying out large amounts of work. The complexity of this option leads to the fact that with self-laying, the open method is more often chosen. Cabling problems in walls are more difficult to diagnose. Repair of individual elements of the electrical network in this case is a rather complicated undertaking.

An open do-it-yourself wiring method consists in pulling cables in skirting boards or installing special external boxes (channels). There are other options for laying the electrical network outside the walls, however, for private construction, their use is not appropriate.
The main advantage of the external method lies in the relatively simple implementation of installation tasks. And also (as opposed to the hidden network) open system easier to diagnose, which makes it easy to identify the problem and fix it in the shortest possible time. Thus, the repair of electricians in the apartment is simplified if it is done outside the walls and other surfaces.
Useful information! Among other things, the wiring carried out in an open way allows you to make changes to it as needed. For example, if desired, it will not be difficult to extend an additional line for new equipment.
This method also has some disadvantages. Cable channels laid on the surface can serve as an obstacle when installing furniture. Another disadvantage of this option for laying wires is the restrictions on their number during baseboard installation. Boxes occupy a useful area of the apartment and do not always look appropriate in the interior of the premises.

For open wiring, experts recommend paying special attention to protecting cables from mechanical damage. It is also important to follow fire safety rules and ensure that each wire is provided with reliable insulation.
How to draw up a wiring diagram in an apartment
Before proceeding to replace the wiring in the room, it is necessary to choose the most suitable electrical circuit. This document is compiled taking into account the location of all network elements. It indicates the sockets, switches, lighting fixtures located in each room. The scheme must necessarily contain paths (lines) corresponding to the places where cables are laid.
When drawing up the wiring diagram of the apartment, you will need to calculate the following parameters:
- required power (for each room separately);
- power reserve (for each room);
- power of household electrical appliances.

The scheme is the most important document when installing a new electrician in a home. When it comes to writing, every little detail counts. Therefore, experts advise to be careful when creating this drawing.
The diagram should include information on the number of sockets and switches, as well as their location. The places where important electrical appliances will be installed must be marked on the drawing without fail. Installation points are selected depending on the individual characteristics of the apartment or private house.
The location of the fixtures and their number is also indicated when drawing up the electrical wiring diagram of a house or apartment. It is important to remember that the shortcomings made during the creation of this document lead to a lack of necessary electrical network elements or, conversely, their overabundance. And the most unfavorable outcome in this case is a faulty system.

The location of all individual elements of the electrical network, as well as the placement of household appliances, should be selected as competently as possible. Sockets, switches and devices that produce light must not interfere with other interior components (for example, furniture).
The choice of the type of wiring is made depending on the individual characteristics of the room. This is influenced by the following factors: the number of rooms, the layout, the number and power of household electrical appliances. For the most powerful equipment, as a rule, installation of a separate line is provided.
Features of drawing up a wiring diagram
It is recommended to pay special attention to drawing up a bathroom layout. Electrical appliances in this situation are located in close proximity to the water source, so you need to be careful and follow safety rules. The placement of sockets in this case is carried out taking into account that the distance to the water source is at least 100 cm.

For each group of wiring, a separate power cable is laid, coming directly from the electrical panel
Note! It is important to remember that for the convenience of drawing up a diagram, it is recommended to divide all the electrics in the home into separate groups (for example, wiring leading to lighting devices or household appliances). This will allow you to draw up a diagram as competently and concisely as possible and avoid confusion when installing electricians in the house with your own hands.
For each of the groups, a separate power cable is laid, coming directly from the electrical panel. This installation option allows you to properly distribute the load throughout the apartment. In addition to the lighting and electrical group, it is traditionally customary to lay separate branches for the bathroom and kitchen.
Each group usually has different indicators power. Therefore, to connect the bath and toilet, a cable with a cross section that differs from the size of the wire intended for household appliances can be used. The division of wiring into groups has the following advantages: cost savings (due to the selection optimal size cables for each line) and the independence of one branch from another. Such autonomy allows, in case of failure of one group, to use others without any harm to the system as a whole.

Replacing the wiring in the apartment with your own hands: necessary tools
Before starting work on dismantling the old wiring, it is necessary to calculate the materials that will be required to organize the system and purchase them. And also it is necessary to prepare tools for performing all types of work. Let us consider in more detail what tools will be needed to replace electricity in a home.
Related article:

Drawing up a wiring diagram. Installation of electrical appliances and cables. Programs for drawing up a diagram.
First of all, you need to prepare a perforator. This device is needed to dismantle old wiring and organize new channels (if necessary). For work, you will need to purchase several nozzles for chasing concrete walls with a cross section of 16-20 mm, a drill in the form of a crown of 90-100 mm and a chisel of 25-30 mm.

To connect the wires, you need to prepare soldering equipment. The power of the device in this case must be at least 40 watts. For the installation of wiring in the home will need tools: a grinder with a stone circle, pliers, side cutters, a set of screwdrivers, a building level, a cord, a lantern and a knife. For finishing, you need to buy a spatula. In addition, you should acquire such devices for checking the readings of the electrical circuit, such as a multitester and a phase indicator.
Replacing the wiring in the apartment: calculation of materials
The calculation of the wires is quite simple. The most common way to determine the exact amount of cable required to connect an electrical element is to measure the distance to it from the shield. To do this, you need to use a regular tape measure. It is important to remember that during manual measurements, all surface irregularities, protrusions and recesses are taken into account.
After calculating the wiring in an apartment or a private house, it is advisable to add another 10-15% of the cable to the resulting figure. The stock is needed to meet installation needs, since a certain amount of damaged material is always present during operation.

Note! Cable laying is carried out only at right angles. Thus, the wires are mounted horizontally or vertically. Diagonal arrangement of lines is not recommended, as it is much more difficult to arrange. Knowing how to do the wiring in the house with your own hands, it is much easier to make a plan for future work.
There is another option for calculating the materials needed to organize an electrical network in a home. It is simpler, but at the same time less accurate, because the calculation uses generalized values. To carry out such a calculation, you need to find out the area of \u200b\u200bthe apartment and multiply this figure by 2. The resulting number is approximate, but this calculation is used quite often. Two thirds of the wires in this case will go to laying outlet lines, and one third to connecting lighting fixtures.
After calculating the amount of cable, other elements of the electrical system should be calculated. To install the network, you will need to buy at least 3 sections of terminal blocks, and they must include 10 contacts each. Experts do not recommend buying parts with a polyethylene case. This is due to the fact that this material does not have high technical specifications and the required degree of protection.

In order to answer the question of how to conduct wiring in the house, it is recommended to watch instructional videos that can be easily found on the Internet. It is important to determine how and how the cables will be fixed in the system. The option of fixing the wires depends on the personal preferences of the master. Experts note that it is more convenient and reliable in this case to use clamping plates. In turn, screw fasteners are less functional.
When choosing socket boxes, you need to pay attention to whether these elements are equipped with external protrusions that allow you to increase adhesion to the alabaster. For wiring, VVG and PUNP cables are best suited. You will also need to buy an inlet shield, corrugated pipes and insulating material.
Replacing the wiring in the house with your own hands: dismantling of the old line
Before you start laying new wiring, you will need to dismantle the old system. This work is done with safety in mind, so rubber gloves should be purchased as a precaution. The first thing to do to dismantle the electrical network is to de-energize the house or apartment.

Then all wires are checked using a phase indicator. If the device did not register the voltage, you can proceed directly to the dismantling of the line. Most often, it is in old-style buildings that the wiring is replaced. In Khrushchev, old wiring diagrams cannot cope with the current level of voltage. This is not only fraught with power outages, but also poses a direct threat to the lives of residents, as a fire can occur in a faulty system.
Useful information! Each element of the system is first checked by a phase indicator - and only after that it is allowed to proceed with its removal.
First, the sockets and switches are dismantled. Old cables can not be removed at all, leaving them in the walls, but in this case you need to disconnect them from the network. If you still decide to remove the old wiring from the walls, then you will need to buy a tester. This device is used to detect old cables. Then the places in which they are laid are ditched, followed by the removal of wires.
How to change the wiring in the apartment: flush-mounted features
As mentioned above, the installation of a hidden system is carried out inside the walls. If necessary, the cables can be placed in the floor or covered with plasterboard boxes. To date, the option that involves hiding cables behind a stretch ceiling is very popular.

The most difficult way is the organization of channels in the walls. The amount of "dirty" work in this case increases several times. Laying wiring in an apartment on the floor has some advantages. For example, this option allows you not to go around the walls. However, the installation of electrical cables in the floor requires the dismantling of the old coating and its complete replacement with a new one. Before laying the wiring yourself, experts recommend that you read the step-by-step instructions for the work.
First of all, you will need to make channels in the walls into which the electrical wiring will fit. To do this, it is customary to use a special tool - a wall chaser. In its absence, a conventional puncher will do. As a result of such work, a lot of dust is raised in the room, so protective measures must be taken by wearing goggles and a respirator.
When choosing the optimal depth for the channels, one important rule should be remembered: the thickness of the plaster applied over them should not exceed 10 mm. As for the width of the strobe, there are no restrictions in this case. If it is possible to stretch the wiring in the house with your own hands in the ceilings, then you need to give preference this method. This will simplify the process of installing a new network.

At the second stage, it is necessary to prepare holes for sockets. In this case, a perforator is used. To work, you will need to equip it with a crown-shaped nozzle. With it, niches for junction boxes are made. Next, cables are laid in pre-prepared strobes. During this process, you must strictly follow the scheme drawn up before starting the installation of the electrical network.
Then you need to join the wires in the junction boxes. For this purpose, connecting clamps (PPE) are used, which also perform an insulating function. Then switches and sockets are mounted. After the installation of electrical appliances, wires are connected to their contacts. At this stage, the wiring in the apartment ends. The control of the performed work is carried out using a special tester.
The final stage includes two points: the activation of the electricity supply from the shield and the termination of the channels with cables. If the wiring was laid in plasterboard structures, then it must be protected with corrugated tubes, which are attached to the surfaces with clips.

Installation of electrical wiring in the house: public method
An open way of wiring electricians in a home involves the use of special plastic boxes. This method is less complicated, so it is often used for self-installation of electricity. In order to answer the question of how to make wiring in a house in an open way, you should familiarize yourself with the algorithm of actions in more detail.
First you need to fix the skirting boards. If the voids of these elements are used as a wiring box, then they must be indicated in the diagram before starting direct work. At the second stage, it is required to lay boxes from the baseboards to electrical appliances (sockets, switches). Next, the cables are pulled through them.
Replacing wiring in a panel house or Khrushchev is the same. It should be remembered that the boxes must have sufficient physical properties to resist mechanical stress.
Note! Low-quality channels are not always able to protect the wires from damage, which is fraught with an emergency in the room.

Then you need to install the outdoor junction boxes and connect the cables inside them. Docking of wires, as in the case of closed lines, is carried out using PPE. Next, you need to mount sockets and switches and connect cables to them. At the final stage, all elements of the network are checked by means of a tester.
Thus, there are several signs by which you can easily determine whether your electrical wiring needs to be replaced. Self-assembly This system will save you money. However, it is not recommended to conduct it if you do not have special knowledge and skills in this area.
There can be many reasons to change the wiring. The first and main one is that the wiring diagram and cable properties in Soviet houses are not designed for a large number of powerful electrical equipment. And the blessings of civilization are added and added in our homes. It doesn't go unnoticed. Aluminum wiring, the cross section of which is not designed for the total power of modern consumers, begins to quickly fail, overheating. The second reason is the venerable age of the wiring. The warranty period of the wire is 20 years. After that, the rapid destruction of the insulation begins, which leads to sparking and a short circuit. The third reason is the lack of grounding in the old wiring. All this together can lead to a major overhaul and replacement of electrical wiring, which entails enormous waste. But do not despair. In order to save on the work of specialists, we will tell you how the wiring is replaced with your own hands.
Replacing old wiring or laying a new one
I would like to note right away that partially replacing the wiring does not make any sense. If you already decided to change, then change completely, to the very shield, with the replacement of all sockets and switches. There is only one exception - a temporary measure. If there is a wire break in a particular place, and you are not going to make repairs, then it is quite possible to repair and replace the wiring only in this area.
Before proceeding with the replacement of wiring in the entire apartment or house, it is necessary to find out the scheme of its laying. After all, it may be that no “replacement” of the old with a new one will work, but you will have to cut off the old lines and completely make a new wiring. It depends on how the old wiring was implemented.
In some typical houses, the wiring diverges into different rooms. on the floor in special strobes made at the factory. A wooden or parquet floor on logs is laid on top. To switches and sockets, wires rise either under plaster, or in strobes, or in the voids of the ceilings. To lighting fixtures - in the voids of the ceilings. If you are not going to rip off the flooring, then you will have to forget about wiring replacement. It will be necessary to “cut off” it and lay a new one to the devices and consumers in a different, more accessible way.
If the wiring initially passes in the grooves of the walls, then it will not be possible to replace it big puzzle, but you have to sweat to get it out of the plaster.
Replacement open wiring- the most simple work. You may not even need to do repairs.
After we figured out which ways the wiring goes through the apartment, you can decide which ready-made strobes or installation locations for junction boxes we can use when replacing electrical wiring, and which ones we can’t.
New wiring diagram

A complete replacement of electrical wiring begins with the preparation of a new wiring diagram. To begin with, we determine how we will mount the wiring: open, closed or combined (in cable channels). Next, you need to draw a plan of the apartment on paper, indicate on it the places where household appliances are located, where it is planned to install sockets and switches, lighting fixtures, where junction boxes will be needed.
Sockets should be mounted in places where there are powerful electrical appliances. Their number for living rooms is calculated according to the following rule: for every 6 m2 of the room there should be 1 socket. This rule does not work for the kitchen: it must have at least 3 sockets per 6 m2. After all, remember that it is in the kitchen that the greatest amount of equipment is concentrated: a refrigerator, freezer, microwave oven, induction cooker, electric kettle and others. By the way, the electric stove requires a separate socket with a power cable of at least 4 mm2, 6 mm2 may be needed, it depends on the power of the stove. All other sockets in the kitchen are best placed next to the permanently installed appliances.
The height of the installation of sockets is not strictly regulated. It can be installed at a distance of 20 - 30 cm from the floor, or higher - 80 cm or 1 m. It depends on convenience. The only limitation is that sockets cannot be mounted too close to the floor, otherwise problems may arise during flooding. In the toilet, the installation of sockets is prohibited, in the bathroom - it is allowed only through a special distribution transformer.
switches are installed immediately at the entrance to the room near the door, no closer than 15 cm from the doorway. So that the door does not interfere with their use, they mount it from the side of the porch, and not the hinges. The height of the switches is also not strictly regulated, someone installs it 0.9 m from the floor, someone 1.5 m - as it is more convenient for someone.

If there are many powerful devices in the same room, separate lines with automatic shutdowns must be connected to them.
We look at the layout of sockets and switches, where it will be convenient for us to place the distribution boxes so that they are accessible. Let's put them on the plan. The direction of the wire laying must be strictly vertical or horizontal, it is not allowed to lay it diagonally or at an angle other than 90 °.
- socket group.
- Group "lighting" - separately for the two halves of the apartment.
- The "kitchen" group, where sockets for powerful appliances will be located.
- Group "powerful consumers" - induction cooker, household air conditioner, etc.
- A group of "dangerous powerful consumers", such as a jacuzzi, a bathroom, and others.
We plan separate power cables for each. This should be indicated on the diagram: type, section, material.
We check the scheme for the last time, go through the rooms, figure it out. If you are satisfied with the result, then we apply the location of objects on the walls and ceiling. If hidden wiring is planned, then for this you will have to remove all Decoration Materials, clean the walls and draw on them with a marker or with a simple pencil cable laying lines, installation locations for distribution boxes, sockets and switches. Now let's go buy materials.
We buy wires, a shield, junction boxes, RCDs and machines
If you are interested in the question of how much it costs to replace electrical wiring, then let's try to discuss it. First of all, it depends whether you will do it yourself or hire electricians, and then builders to close up the work of electricians. The second point is how you plan to make the gasket. If in cable channels, then there will be no particularly dusty work. You just have to spend money on materials. If you are going to do hidden wiring in strobes, then this is the most expensive and dirty option.
The cost of replacing electrical wiring with your own hands depends on the size of the apartment and the amount of materials that need to be purchased. On average, only wires, sockets, switches and other related materials will have to spend about 700 USD.

Wires. For laying a cable to lighting devices, we purchase a three-core copper wire VVG 1.5 mm2 with a cross section. We calculate the length as follows: we measure all the marks that we made on the walls and ceiling and add 10 - 15 cm for each intermediate junction box and switches. For laying wiring for sockets, we buy a three-core cable VVG 2.5 mm2 with a cross section. We calculate the length in the same way. For an electric stove, you will need VVGng 5 * 6 - a five-core wire with a cross section of 6 mm2.
UZO and machines. Let us immediately distinguish between these concepts.
RCD- residual current device, necessary for protection against leakage currents.

Automatic shutdown used for short circuit protection.
You can use differential automata, they perform the functions of both devices at once.
For the "socket" group, we purchase an RCD for 30 mA of class A and an automatic machine for 16 - 20 A.
For the "lighting" group - a 10 A machine. This will be quite enough.
For the group "powerful appliances", "kitchen" and "dangerous powerful appliances" - automatic machines for 25 A and RCDs for 30 mA.
Junction boxes we buy in the required quantity, based on the scheme.

Sockets and switches we select depending on whether the wiring will be open or hidden, as well as for aesthetic reasons. They can be built-in or overhead. You can buy illuminated switches for some areas, such as a corridor or hallway. But this is optional.

Electrical panel You can buy a metal one, but you can also buy a plastic one. We select the size of the shield depending on the number of machines and RCDs that we will connect. There are shields for 2 machines and up to 16 or more pieces. We take a shield with a margin for 2 machines, just in case, during the subsequent operation, we need to create a separate line for another powerful device.

Connecting insulating elements for connecting wires in junction boxes. We buy in excess.
You will also need electrical tape and dowel-nails, self-tapping screws, corrugation, clips for corrugations and more.
You can proceed to installation.
Installing the switchboard

Replacing the old electrical wiring begins with the installation of a new shield. In new buildings, a special niche is provided for it, to which a power cable is connected. In this case, it is only necessary to install all the machines and RCDs in it, fix it in a niche and connect it to the cable.
If the house is old, then the shield should be made hinged. To do this, we select a convenient place to have free access to it. We hang the shield on the dowel. Since we don’t have a wire in our apartment, we drill a hole in the wall and stretch the VVGng 5 * 6 cable, connect it to the shield in the entrance.
Inside, the standard shield looks like this: at the top - zero terminals, at the bottom - ground, in the middle - machines. We clean the input cable, connect the blue wire to zero, yellow to ground, and white to the upper contact on the machine, and install a jumper to the neighboring machine there. Wires VVGng 3 * 2.5 and VVGng 3 * 1.5 are connected as follows: phase - to the terminal of the machine at the bottom, zero and ground - in the same way as the input power cable.
If RCDs are used, then first the phase and zero are connected to the RCD and only then go to the machine and the zero terminal.
Now we can proceed to the wiring.
Installation of hidden electrical wiring

Hidden electrical wiring can be laid in strobes, ceiling voids, under flooring, behind drywall or under plaster.
Cable laying in strobes and under plaster is the most dusty option. Sometimes, in order not to go around all the walls, the wires lead along the floor. But in this case, you will need to completely dismantle the old flooring and lay a new one.

To make a strobe in walls made of concrete or brick, you will need a strobe cutter or, in extreme cases, a grinder with a diamond disc and a perforator with a diamond crown. It is necessary to work in a respirator and glasses, as there will be a lot of dust.
Important! Please note that the chasing of concrete panel ceilings in standard panel houses for electrical wiring is prohibited by Decree of the Government of Moscow No. 508-PP dated 10/25/2011
We make the depth of the strobe based on the fact that the layer of plaster on top will not exceed 10 mm. The width is not limited. We cut out places for junction boxes and sockets using a special crown.
If it is possible to lay a cable in the voids of the floors, then we try to do so so as not to violate the integrity of the walls and ceiling. This is especially true for the lighting cable, since most often it is located in the voids of the slab that protrudes from the ceiling in your apartment.
When all the strobes are ready, according to the previously executed scheme, we lay the wires in the required quantity and the required section. To do this, cut them into segments required length. Sometimes, for convenience, they are pulled through the corrugation, so that later it would be easier to replace the site without violating the wall finish. Sometimes a bundle of wires is pulled together with special clamps and attached to the wall with fasteners.

In the distribution boxes, we connect the wires with the help of SZ, close them with a lid. Install sockets and switches. We connect the wires to the contacts. Using the tester, we check the performance of the system. If all is well, you can call an electrician to connect electricity from the power shield.
Then all the strobes should be sealed with plaster. For a one-room apartment for similar work on the replacement of electrical wiring, the price in electrical installation companies starts from 300 USD. Ordinary construction crews may ask for less - about 120 USD.

If you lay the wire under drywall panels, then the technology is different - you must definitely hide the wires in the corrugation, attach it to the walls with clips.
Installation of electrical wiring in cable channels

This method is much lighter than the previous one, less dusty, but also less aesthetic in places where wiring is connected to switches and sockets. The purchase of material must include skirting boards with cable channels and boxes for supply to consumers. Connecting the shield is no different.
According to the developed scheme, we fix the plinth to the floor. From it we lead boxes to sockets and switches. We put wires in them. If it is required to install external junction boxes, we mount them and connect them inside the wire using PPE.
All sockets and switches will be overhead, we fix them to the walls and lead the wires inside, connect them. We check with a tester and invite an electrician. That's all. Then we close the plinth and the box. No other finishing is needed.
Basically, the method of installing electrical wiring in cable channels is used in places where it is not possible to perform hidden wiring and in office and commercial premises. But in fact, he has an undeniable advantage. If you need to repair the wiring or connect an additional group, you will not need to make repairs and hammer the walls. As for aesthetics: modern market offers cable channels and boxes of a wide variety of colors that can not only not disturb the interior, but also complement it.
You can find everything for replacing electrical wiring, including differential circuit breakers, RCDs, and circuit breakers here, in the online electrical store 220pro.ru.
Do-it-yourself wiring replacement: video - instructions
Replacing electrical wiring in an apartment with your own hands, as a rule, is timed to coincide with a major overhaul. And it is perhaps the most difficult part of it. Accordingly, the price. In a regional city in the middle zone of the Russian Federation, a professional wiring replacement costs about 1000 rubles. per 1 sq.m of the total area of housing. You only need to take on the independent replacement of wiring if repairs are necessary, and you are short of money.
Copper, earth and doses
Replacing electrical wiring in a residential area rests on three pillars:
- Replacing aluminum wires with copper ones.
- Switching from a TN-C power supply circuit (solidly grounded neutral) to TN-C-S (with protective earthing of consumers).
- Transition from wiring by branching to connecting groups with separate branches.
Let's explain in order:
Aluminum wiring due to its low cost and environmental friendliness (copper mining and smelting were then extremely harmful industries) became widespread in the world in the 30s - 60s. However, over time it turned out that aluminum is unsuitable for electrical wires:
- Within 20 years, changes occur in the circuits under current in the metal, the essence of which is still not completely clear; First of all, aluminum becomes very brittle, and it is literally impossible to breathe on the wiring from it.
- At the slightest ingress of moisture, aluminum is subject to electrocorrosion, which spreads under the shell; a whole-looking wire turns out to be thinned to a hair; hence - sudden failures, the most emergency.
Aluminum is a soft metal. It is squeezed out from under the screws of the terminals, the twists are weakened, and the soldering of aluminum is difficult, expensive and is one of the hazardous industries. Therefore, aluminum contacts are unreliable.
Power transmission line wires have a service life of less than 20 years, and aluminum defects do not affect there. But aluminum is now prohibited in residential wiring.
The Soviet TN-C power supply scheme was forced to be used, due to the need for mass electrification with an acute shortage of non-ferrous metals and a large length of communications in a vast country. Since 1997, the Russian Federation has adopted the TN-C-S power supply system, which ensures the safety of consumers, regardless of the state of the power grid. A lot of ungrounded high-rise buildings remained from the USSR, but since there is a problem, it needs to be solved; not "from above", but on their own.
The branching wiring scheme was also used involuntarily, and for the same reasons as TN-C. At the same time, branches to groups were connected to more powerful wires of the apartment input along their length. Branches were made in junction boxes - electric dispensers (doses); the main apartment dose is located next to the counter.
Each branch - stripped insulation and twisting or terminals: unreliable and sensitive to jamming. Now it has not yet been legalized (but things are moving towards that), but branch wiring is common: from the input to each group of connections there is a separate single piece of cable in double or triple insulation. No twists and terminals, moisture is not afraid.
Stages of work
Wiring costs can be cut in half or more. The fact is that the replacement of electrical wiring is carried out in five stages:
- Development of a power supply scheme for an apartment (house).
- Drawing up a wiring plan, its approval and registration together with the power supply scheme.
- Repair facility.
- Electrical wiring.
- Installation of mechanisms (switches, automatic devices), connection points (sockets) and stationary electrical appliances (lighting devices, floor heating, washing machine, air conditioner, electric oven, etc.).
Prior to the start of work on the replacement of electrical wiring, protective grounding or protective grounding should be provided, if possible. However, his device is .
Wiring by points is carried out at the last stage during the installation of mechanisms, automation, connection points and electrical appliances.
At each stage of the replacement of electrical wiring, you can save. In general, you can reduce costs by half or more - up to 650-450 rubles / square, depending on what you can do on your own and what you have to entrust to specialists.
Power supply scheme
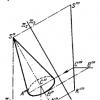
Take a look at the picture in the section. For now, just take a look. Let's give some explanations. First: kWA - electricity meter; RCD is a residual current device. Secondly, the power supply circuit is single-line.

Pay attention to the two slashes that cross out the wire designation. This means that in real life there are two wires - phase L and zero N (neutral), laid together. The PE protective wire is not crossed out, which means it comes separately. If the input is three-phase, then there will be three dashes on the designations of its wires. Systems with an isolated neutral, which are not used in everyday life, do not touch.
Now look at the drawing carefully. This is a single-line power supply scheme for a luxury apartment of 200 sq. m. If you understand everything in it in general, you will be able to draw your own power supply scheme, even if you do not have an electrical engineering education and you do not know how to draw.
In the worst case, you will end up with a clumsy sketch. But according to him, an undergraduate student looking for a part-time job or a retired electrician will be able to draw the correct scheme in half an evening and inexpensively. And if you entrust the scheme to a practicing specialist with a decent salary already, then it will cost a pretty penny. The hassle will not decrease for you: after all, he needs the initial data.
We think over the power supply
Proper wiring in the house depends primarily on the power consumption. In cottage settlements, they give a consumption limit of 10-20 kW for housing, but in a city apartment this is unrealistic: either the machine in the entrance will always knock out, or, even worse, the house wiring will burn out. And in old houses, where most often the replacement of wiring is required, the "Khrushchev" limit of 1.3 kW is laid down; at the limit - 2 kW.
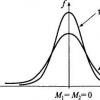
However, no one turns everything on at once. Even in summer, when the air conditioners are on, they turn on out of time. Here, chance works for the consumer: with an average power consumption of 4.3 kW, house wiring is holding up. This limit is the basis for the calculation. True, if you start washing or ironing in the summer, you will have to turn off the air conditioner with the boiler, otherwise the main machine will cut down the entire apartment. But you will have to come to terms with this.
Without going into the details of the calculation, we will immediately give data for an average city apartment of 40-100 square meters. m of total area:
- The main machine - from 25 to 32 A, depending on the area. For the meticulous: the current safety factor is 1.3-1.5. It is impossible to give 2 in apartment buildings: the general wiring is “stunted”.
- Apartment RCD - 50 A 30 μA unbalance.
- Kitchen - two wiring branches of 4 square meters. mm; on each - an automatic machine for 25 A and an RCD of 30 A 30 μA. Washing the bathroom - from the kitchen; not indicated on the diagram, see below.
- Air conditioning - a branch of 2.5 sq. mm; automatic - 16 A, RCD - 20 A 30 μA.
- Socket circuits and lighting circuits - one and the other in each room, except for the bathroom and the bathroom; in them - only lighting; the bathroom is yet to be discussed. The cross section of the prodods is 2.5 sq. mm; automatic shutdown is not needed, the general apartment is enough.
That's all the source code for a single-line power supply circuit for an apartment. You can draw.
Figure: graphic diagrams for “visibility”:

We draw a diagram
As a basis, you can take the diagram given. Its top, from the exit from the counter, remains unchanged, you only need to change the numerical data. The brand of RCD does not matter: if you end up putting others instead of ASTRO-RCD, this does not violate anything.
In case of doubt regarding the designations, see the Appendix to the EMP (Consumer Electrical Installation Rules) or GOST 2.755-87(CT SEV 5720-86). Just keep an eye on the GOST number: for some reason, a lot of links to GOST 2.721-74 and even GOST 7624-55 pop up in the search, which are no more useful now than the Moral Code of the Builder of Communism, which was personally edited by a dear comrade and unforgettable General Secretary at one time Leonid Ilyich.
When drawing a diagram, observe the dimensions of the symbols of the elements: their scaling is not allowed. If, for example, an electric capacitor is indicated by two parallel lines 0.5 mm thick and 10 mm long at a distance of 2 mm from one another, then so be it, even if it is alone on a sheet of drawing paper A0.
Preparing a plan
Now consider the figure that accompanies this section. This is already a PLAN of electrical wiring: this is what the circuit turns into when you need to do it by hand. Let's explain the plan:
- At least two branches should go to each room from the meter - to lighting circuits and sockets.
- Since there is one bathroom in an ordinary apartment, DSU (additional potential equalization system) is not needed. Its branch is indicated by a dotted line in the diagram.
- In the bathroom, mark only the waterproof ceiling lamp and the boiler, if it is installed there. The bathroom is a special and complex case, we will talk about it later.
- Designate only branches to connection points (sockets) and stationary electrical installations. Stationary installations are those that are rigidly fixed to the supporting structures, or that are not powered through a detachable connection. For example: a boiler and a warm floor are stationary, but a washing machine, a dishwasher and an electric oven are not. The fact that they are connected to other communications does not concern electricians and does not care.
- Do not clutter up the circuit with small things like LED lighting for the ceiling, an extension to the balcony, etc. Inspectors are only annoyed by such things, and a quite decent plan can be "hacked to death."
- In no case do not show the branches to the balcony or loggia! For a city apartment, this is a gross violation of the PUE. These rooms must be powered from sockets in other rooms.

Now let's show you how to simplify the preparation of the plan:
- Take a plan of your apartment in DEZ or BTI.
- Scan; if large - in pieces.
- In Photoshop, glue the pieces, and remove the old designations of wiring, stationary electrical appliances and connection points.
- Apply new ones in accordance with the diagram and according to the model of the given wiring plan. It is more convenient to do this not in Photoshop, but in CorelDraw or another vector graphics editor by importing the original raster file and then exporting the finished plan back to the raster. Don't forget to save the vector template! Plans made by amateurs are returned for revision with comments in almost 100% of cases.
- In Photoshop, divide a large image at the desired scale into parts the size of your printer's printable area, print and glue into a large sheet so that the lines match. If they move apart a little, you can draw by hand.
Notes:
- If the bathroom is located far from the kitchen (as, for example, in Czech-planned apartments), then the group of sockets provided for it, described below in the section on the kitchen, should be placed in the bathroom adjacent to the bathroom.
- Groups of outlets in adjacent rooms should be placed exactly one against the other through the wall. In this case, by drilling through the wall, both groups can be powered with one branch, saving cable and pipe.
- In “tram” apartments (enfilade layout) in the room farthest from the meter, groups of outlets, but no more than two, are permissible (in practice, not according to the PUE) to be powered in series, one from the other. In this case, if the nearest group is powered through the wall from the living room, another half a branch is saved.
- Sconces and other local lights are also, in practice, permissible to be powered from sockets or in series within the room, if there is also a ceiling lamp in it.
- Ceiling lights must be powered by each separate branch. Powering them through each other or from sockets is unacceptable: general lighting circuits are considered vital.
- The rows are counted and marked on the plan as a chandelier. The branch for them is brought to the center of the ceiling, and the wiring during installation is done as safer and more convenient.
The finished power supply scheme and the wiring plan in the apartment must be registered and approved by the energy service. The verification and registration procedure is free of charge.
Important: the wiring plan should be given the utmost attention. Optimally, a well-planned plan saves costs by half or more compared to a hacky one.
Room electrical equipment
To draw up a power plan with skill, you first need to decide how many and what connection points and stationary consumers will be in the house. Of course, you are the master in your house, and it is impossible to develop a single method for drawing up a plan for any planning options. But the following guidelines may be helpful to you.
Bathroom
Bathroom electrical equipment is a tough nut to crack. On the one hand, only high humidity makes the bathroom especially dangerous in terms of the degree of electric shock. Plus, a splattered floor and a naked, steamed man in hot water. The resistance of his body falls more than that of a completely drunk: the circuit current through the body can exceed 5 A (!), And this is between an unconditionally fatal blow and charring. The damaging effect of the electric current depends on the time of exposure, and with such a force, the operating time of the RCD is by no means enough to definitely prevent trouble.
On the other hand, powerful electrical installations: washing machine, boiler, with a large intrinsic leakage current, operating at elevated temperature and humidity. Under such conditions, exposed live contacts, albeit under the outlet cover, will be a source of danger of electric shock.
PUEs allow the installation of sockets in the bathroom through an isolating transformer or RCD, but this solution is even more forced than the TN-C system at one time. The RCD has already been mentioned, and as for the isolation transformer, this item was simply copied from the section on industrial electrical equipment for lack of a better one.
Installation of an isolating transformer is a technically rather complicated task and the subject of a separate description. Recommendations like - to shove the RTR under the false ceiling in the bathroom - the fruit, if not of ignorance, then the latent desire for a perverted electrosuicide. According to the letter PTB and PUE, in the bathroom there can only be a ceiling lamp in a waterproof design. But in the spirit and essence of the same PTB and PUE, the power supply to the bathroom can be organized as follows:
- Replace the boiler and fan power cords with long ones so that they last through a hole in the wall to sockets in the kitchen or in the room adjacent to the bathroom. The boiler is not supplied with a regular cord, and the loss of a guarantee for an inexpensive fan is not a big problem, especially since almost 100% of the guaranteed return of fans is reduced to non-warranty cases. Of course - the cords are three-core, with a protective conductor.
- Purchase an extension cord without a cord, but with grounding contacts (euro), for three sockets, with figured holes in the back for hanging on the wall, and supply it with a three-core cord as well.
- Lead all three cords through a hole in the wall in the corner above the plinth into the kitchen, or an adjacent room, supply with euro plugs, and put in a PVC box: it will not catch your eye in the corner and below.
- The boiler plug is plugged into the outlet “permanently” - nowhere in any rules is there a time limit for plugging the plug into the outlet. Also, the fan plug, if it is “intelligent” and is triggered by temperature and humidity.
- The extension cord is hung in the bathroom on self-tapping screws in dowels.
- The washing machine is connected to the extension cord permanently. In the remaining two sockets, you can turn on the light frame of the mirror and the hair dryer.
- The extension plug plugs into an outlet in an adjacent room as needed.
Thus, in the bathroom there will be no exposed ends under voltage all the time, and if elementary precautions are observed, the danger of electric shock will be reduced to zero. And according to the PUE and PTB, an extension cord, even with a cord in a box and hung on the wall, is just an extension cord, not a socket.

Toilet
In the toilet, as well as in the bathroom, only one lighting branch for the ceiling lamp will go. Toilet and bathroom lamps can be powered in series on one branch: electricians do not find fault.
Kitchen
For the kitchen, therefore, you will need two branches of wiring: for the bathroom and for your own needs. If the bathroom is separated from the kitchen, then the branch for the bathroom will go to the room adjacent to it, but we will describe it here.
The wire cross section is 4 sq. mm and the protective automatics for both branches are the same and are described above. But the connection points are different: for your own branch of the kitchen, you need not one, as for the bathroom, but two triple sockets. A dishwasher, an electric oven, a food processor and spotlights will be permanently included in them. Powering the halogens on the underside of the hanging cabinet with a separate branch, as is sometimes recommended, is uneconomical and incorrect according to the PUE.
One of the remaining points will go under the kitchen fan, and the extension cord, suspended, like in a bathroom, on a wall or on a closet, is constantly turned on. It can include a toaster, a vacuum cleaner when cleaning, etc. The refrigerator is plugged into an additional group socket on the opposite wall.
It is desirable to place the sockets of the bathroom and the main group behind the lower kitchen cabinet close to the countertop, but away from the sink. If the bottom cabinet has a back wall, cut an opening in it. For the passage of cords, cut off the back corners of the tabletops - and it is not visible, and the cords pass freely.
The lighting branch to the kitchen is the same as everywhere else.
Hallway and corridor
Two branches are needed here: for an outlet and for light. If the corridor is long, and two lighting points are needed in it, then the one closest to the outlet is made in the form of a sconce and powered from it. And the far point will already be a ceiling lamp, powered by its branch.
Children's
The PUE requires for children's institutions the location of sockets and switches at a height of at least 180 cm from the floor. But this applies only to institutions, and the child will grow up, and the room will remain with him.
If a beloved child from a tender age shows an increased interest in technology, the socket in the nursery must be supplied with a protective disk. From a socket with a key-locked lid, a petty personality can puff up and suppress inclinations in itself, which, perhaps, will become the key to success in life in the future.
living rooms
Without going into the subtleties of the topology, let's say right away: to power the ceiling lights and two groups of sockets in living rooms, 2N + 1 branches are enough, where N is the number of rooms. Let's explain on the example of a three-room apartment:
- Living room - 1 branch of the main outlet group, 1 - additional, 1 - lighting.
- Bedroom - 1 branch of the main group, 1 lighting. An additional group is powered through the wall from an additional group in the living room.
- Children's - 1 branch of the main group, 1 lighting. The additional group is powered through the wall from the additional bedroom group.
- From the bedroom or nursery, depending on the layout, an additional kitchen group is fed through the wall.
In total, a 2-3 room apartment will need 12-15 branches, including air conditioning. The branch for the air conditioner should end in a socket, although it is a stationary device. For two reasons: for safety and ease of maintenance, and because the split is equipped with a regular molded cord, cutting off which, we lose the warranty.
How high will the sockets be?
The optimal height of the sockets is 25-35 cm from the floor. It is quite convenient to reach for them, they do not catch the eye, they do not interfere with furniture. The exception is the air conditioner outlet. It is placed higher so that its cord reaches out and does not hang out in plain sight. The excess cord can be rolled into a coil and pushed onto the wall unit body from above; the height of the placement of sockets is nowhere and is not regulated in any way.

Do not try to "wire out" beyond measure - this will only reduce the reliability of the wiring. Two groups, one double each, is sufficient. In extreme cases, a triple socket is placed in one seat, but this cannot be built-in.
Tools and materials
You will need the following tool to replace the wiring:
- Hammer drill with a drill for concrete 16-20 mm, a core drill 90-100 mm, a chisel for concrete 25-30 mm and a set of drills, also for concrete.
- Bulgarian with a circle on the stone.
- Soldering iron for 40-60 watts.
- Phase indicator.
- Tester multimeter.
- Pliers, screwdrivers and side cutters with insulated handles.
- Torch.
- Mounting knife.
- Construction level and a cord for beating the route of strobes.
- Spatula for alabaster putty.
- Portable electric lamp.
Materials should be discussed separately.
Terminal blocks
The described method of replacing electrical wiring eliminates its twisting and soldering along the length, and the wiring is absolutely resistant to jamming. All connections will be made in the input board (VSH) at the terminal blocks and at the end points. Terminal blocks are sold in sections of 10 contacts (5 pairs). You will need 3-4 sections; it is better to take three at once, and it is never too late to buy.
When buying, pay attention to the case material - polyethylene is bad, any other will do. And most importantly, two wires with a diameter of 2.5 mm should enter the holes for the wires. It is better to immediately take terminal blocks with rectangular holes, in which the wires are clamped not directly with a screw, but with a special plate.
Socket boxes
Mounting boxes for sockets and switches (sockets) can be any, but they must have protrusions on the outside to keep them in alabaster.
Cable brand
The "cool" and expensive NYM cable is not so cool at all: according to the manufacturer's specifications, it cannot be laid in wet concrete (and where is the guarantee that the walls will always be dry?) And on the street. Therefore, the choice is domestic cables VVG or PUNP. The first is more expensive, but its isolation is more reliable. But there are no complaints about the apartment wiring laid by PUNP.
All these cables are with solid wires, and this is one of the ways to save money when replacing wiring: stranded ones are much more expensive, and unreliable in the wall. If the wiring will be done by employees, then they will remember you to themselves: the cables are hard, especially PUNP. But it does not pull your pocket. And if you are not touchy and not devoid of a sense of humor, then you can listen: good electricians swear masterfully, no worse than aircraft mechanics.
Video: a little about the types of cable
Old pipe or new corrugation?
It is better to tear out old cable pipes together with wires without any pity: the pipe gaps are not designed for double-insulated cable, they are often clogged, the folds are flattened and wrinkled. It is better to hand them over and the old wires after replacing them with scrap metal: at current prices for recycled metal, this will partially or completely pay for the cost of a corrugated hose for cables.
It is better to take a metal corrugation: in the event of an accident, PVC, decomposing in a wall without air access, will release toxic gases. And by grounding the metal corrugations, you will also get shielded wiring, which has a lot of advantages and not a single drawback.
opening shield
The VSC will be located at the site of the old dose. It must be taken in a suitable size: it will have to fit 4 machines, 4 RCDs, 4 terminal blocks and all the ends of the wires. The ends of all corrugated hoses will have to enter the mounting openings of the VSC.
From other materials, you will need cotton tape (cloth), a little conductive paste and alabaster.
Let's start replacing
Repair temporary hut
First of all, you need to provide power to the tool for the duration of the repair. To do this, we attach a double or triple socket and a 16 A machine with a piece of cable 4 sq. Mm in advance on a plank or piece of durable plastic. We also stock up on a long one, so that it is enough for all rooms, an extension cord.
Then we de-energize the apartment by unscrewing the plugs or turning off the apartment machine, we manually grind the dose near the meter, remove it and bring the wires from the meter out. We connect a temporary hut to them on a tight twist (twisting for the time of repair is permissible), carefully isolate the joints, and attach the temporary hut to the wall. We supply the apartment and get to work.
Note: for this work, it is better to hire a DEZ electrician, or work extremely carefully - do not touch the wires with body parts and clothing, hold the tool only by insulated parts not lower than the restrictive ledge. And it is highly desirable to first familiarize yourself with the PTB and PUE. Remember: voltage can appear on a de-energized wire at any time! Those electricians who could not or did not want to understand this are no longer with us.
Shtroblenie and socket boxes
Strobes must be straight, horizontal or vertical. Inclined and crooked strobes lead to accidents and injuries. Horizontal strobes lead half a meter under the ceiling.
You need to ditch and drill the walls from a goat or from a stepladder with side stops, which outdoor advertisers use. An ordinary ladder from the side force can tip over, and you will crash down with a heavy, rapidly rotating tool in your hands.
The boundaries of the strobe are first carried out with a grinder to a depth in the diameter of the corrugation and to the width of the perforator bit, then a groove is knocked out with a chisel. Inside the corners, a grinder makes an oblique cut, and a hole is knocked out with a chisel so that the corrugation bend is smooth.
Holes for socket boxes in brick walls are chosen with a crown; in concrete - with a chisel. The crown, hitting the armature, immediately crumbles all over, but is not cheap. The notch under the VSC at the counter is also knocked out with a chisel.

Note: do not choose a double gate for switches. It is much easier to buy a corrugation, which will include two cables.
Gating is a very noisy, dusty and dirty job. Therefore, its time must be agreed with the neighbors. Best of all - in the first half of a weekday, when adults are at work, and mothers with small children are walking.
Wiring
We measure the necessary pieces of cable and corrugation. We tighten the cable into the corrugation on the floor. Then we put socket boxes in the holes on the alabaster pillow. Then we lay the corrugation to the cable in the strobes; we put the ends of the wires into the sockets. Finally, we smear the socket boxes with alabaster to the level of the wall, and we smear the strobes with corrugated pieces in about half a meter.
Note: if the switches are single-pole, then the ends of the zero (blue wire) are immediately twisted, soldered and insulated with three layers of electrical tape with the lower layer entering the wire by 15-20 mm and overlapping the layers by 50%.
At the end of the laying of the wires, we start the lead-in ends of the corrugations in the VSC, lubricate it with conductive paste, grab it with a tin clamp on the screw, and connect the screw with a cut of the PE wire to the ground terminal of the VSC. We put the VSC in place, mark the mounting holes, drill them, drive in the dowels.
We de-energize the apartment, turn off the temporary hut. On weight, we introduce wires from the meter and apartment PE into the VSC; we attach PE to the VSC body. We put the VSC in place, fasten it. We carefully isolate the wires from the meter, put them in the VSC housing. It's time to plaster; the apartment is empty.
About wire colors
Zero (neutral, N) is always indicated blue or blue color, protective conductor PE – yellow with longitudinal green stripe. Phase wires can be white, red
, black, brown. Only single-color wires can be connected to each other. Phase-to-zero transition, phase-to-phase transition and switching on of the circuit breaker in the zero gap are not allowed.
Stucco sideshow
Now it's time for plasterers, painters and wallpaper pasteurists. Or yours, in a new incarnation. But first you need to fill the sockets with foam rubber, paper or rags flush with the wall, and close the VSC with a piece of plastic film, tucking it under the edges of its frame. We also close the meter with a film, but be careful not to break the seal - then you won’t get into trouble with the energy service. If the seal is still damaged, you must immediately inform the power engineers.
Completion
After plastering, painting and wallpapering, the sockets and the VSC will be worn and sealed, but it will be easy to feel for them and cut the wallpaper along the contour. Having cleaned the remnants of plaster from the sockets, switches, lamps,.
Note: in sockets, it is customary to connect wires so that zero is closer to the window.
Then, on the terminal blocks in the VSC, we assemble the power supply circuit, but we do not connect the input from the meter yet. EACH BRANCH SHOULD BE CHECKED WITH A TESTER FOR A SHORT CIRCUIT BEFORE INTRODUCTION TO THE TERMINAL! Now for a short time we power the apartment, we find the phase and zero coming from the meter with the indicator.

We remove the power, we separate the phase and zero with segments of wire of the corresponding colors along the terminal blocks. ONCE AGAIN WE CHECK FOR A short circuit with the machines turned on, turn off the main machine, power the apartment, turn on the main machine. Didn't "bang"? We check the light, the voltage in the sockets and continue the repair.
Is it possible to do without papers?
As you can see, a good share of the work on replacing electrical wiring falls on paperwork. But any handy man experiences not always justified, but persistent disgust for paperwork. So is it possible to do without papers?
No. Electricians have a trained eye. The very first control of the meter readings will be reported to your own, and then wait for the visit of the inspector. Its result is a large fine and the legalization of work in fact, which is no cheaper.
Replacing wiring in a wooden house
Posting in wooden house- a separate topic. It can only be noted that the recommendations to lay a corrugated cable directly along the walls are completely untenable: open wiring has long been banned all over the world.
What can you advise if the house is old and there are no cable channels? Cover the cable hoses with wooden boxes. Whether it will be a decorative imitation of beams and ribs, or a simple plank in the corner - it's up to you, but it will pass with a certain creak for power engineers.
Homeowners face this issue quite often.
It should be clarified that partial replacement here means not only the replacement of electrical installation products - old sockets, switches with new ones, but the replacement of the mentioned electrical accessories and wires only in certain rooms.
Of course, in many respects, the option of completely replacing the wiring in an apartment or house is more preferable, which, probably, any competent electrician can confirm.
Technically, the obvious advantages of installing new electrical wiring in a house are primarily due to the possibility of creating high-quality reliable connections - switching power wires.
About the disadvantages of partial replacement
Having chosen a phased method and laying new wires in a certain room, we, faced with the need to connect the power supply, will be forced to power new sockets and lamps from the nearest existing old distribution box.
Here we must take into account that the old wiring is most often done aluminum wires and their direct compound with new copper due to the electrochemical incompatibility of these materials is unacceptable.
Of course, this is quite fixable using special connecting terminals - on the electrical market, modern manufacturers have provided a fairly wide range of these products. However, one cannot ignore the possible difficulties associated with their use.
It should be taken into account that the lack of free space or a large number of old connections in the box can cause certain difficulties, requiring reconnection of brittle aluminum wires.
However, if the performer has sufficient experience in carrying out such electrical work, this situation is quite solvable. What can not be said about the uniform distribution of the load and the compliance with it of the cross sections of the electrical wiring.
As an example, replacing the old wiring in one room (increasing, as a rule, the total number of “points” in it upwards) with a new one and connecting it to an existing box, most often we have a current overload on the wires feeding this box.
The fact is that the old wiring of the vast majority of our apartments and houses is made by one electrical supply group, the material (aluminum) and the wire cross-section of which do not correspond to the power consumption and the number of modern household electrical appliances.
A good solution here would be to power this room, bypassing the junction box - by connecting directly to the circuit breaker of the distribution board.
But even this solution cannot be called universal. For most homeowners, such a change in the interior is unlikely to be acceptable: wires laid through the entire apartment along the wall or ceiling to the electrical panel, even if they are laid in a cable duct, are a very doubtful decoration.
Especially in those cases when repairs are not planned in the premises through which the "transit" supply cables will be laid and there is no possibility to hide them in the strobes.
Summing up
Of course, it is better to make a choice in favor of the complete replacement of all old electrical wiring. But, not always our desires coincide with the possibilities. For various reasons, the most common of which is lack of funds or lack of time, we are forced to resort to phased repairs and not only electrical wiring.
Given the listed disadvantages of partial replacement, its choice should be justified - for example, if such a phased repair is planned to be done in the entire apartment and the mentioned supply wires are laid temporarily and will be hidden during the repair of the following premises.
Electric installation work. Complete or partial replacement of wiring in the apartment, what to choose? Anton Maslov
Partial replacement of electrical wiring in a 3-room apartment. Electrician services Togliatti.
Replacing electrical wiring is one of the very first and most important stages in the overhaul of an apartment.
Sometimes it is the need to replace outdated wiring that becomes the main argument in favor of radical changes in the appearance of living space.
In this article, we will analyze in detail how to replace the wiring in the apartment with our own hands.
In houses and old apartments built more than 20 years ago, where old-style wiring is still preserved, morally and physically obsolete, it is necessary to replace the electrical wiring. In the last century for the organization of internal electrical networks used aluminum wires.
Aluminum is highly susceptible to corrosion, in addition, during operation, the structure of the metal undergoes irreversible changes, the network becomes very fragile. Insulation deterioration increases the risk of fires due to short circuits.
Among the typical problems of old wiring, mention should be made of:
- Solidly grounded neutrals instead of the currently accepted protective grounding;
- Wiring by branching method;
- Lack of automatic protective shutdown devices;
- Too few outlets.
In addition, the load on the internal electrical networks for 15-20 recent years increased by several times compared to the design values. Combined with the technical imperfections of older networks, this poses a serious risk of an accident with a possible fire.
- the house was built over 20 years ago,
- sockets sparkle in the apartment,
- outlets fail,
- when turning on electrical appliances, there is a smell of burnt insulation,
- wires break easily
- current flows through the walls,
then the wiring needs to be changed immediately. And the more signs of wear, the less time you have to think.
How to make a competent replacement of the old electric wiring in the apartment with your own hands, see further in the video review:
Sequencing
Let's try to figure out in detail how to properly replace the wiring in the apartment with your own hands. Do-it-yourself step-by-step replacement of electrical wiring in an apartment:
- internal circuits.
- Drawing up a distribution plan.
- Approval and registration of the plan and scheme in the energy inspectorate.
- Temporary device.
- Wiring laying.
- Installation of protective mechanisms and connection points.
Then the power must be turned off, the wires must be routed through the terminal blocks. After that, it is necessary to carry out another check for a short circuit with the machines turned off, and then with the machines turned on, after which you can connect the main machine.
Safety regulations
All work is carried out with a tool with insulated handles, rubberized gloves. For chasing walls at a height, it is best to use goats or a stepladder with a horizontal stop. An ordinary ladder is not reliable enough.
Do-it-yourself wiring replacement is a rather difficult task, but doable if you know how to draw up and read power supply diagrams. Otherwise, it is better not to take risks and contact professional electricians.
In conclusion, we suggest watching a video review on how to choose the right material and do the wiring yourself: