How to cut the bale straw on your own. Straw chopper: types and manufacturers with their own hands. Description of a typical design
Those who are engaged in agriculture, perfectly know how important it is to have at hand. Some units can be purchased in a specialized store, while others - do it yourself. This will allow not only to save, but also create something useful for the economy. Solomoruska belongs to such aggregates. It can create such a device with your own hands. The main thing is to know the principle of operation and the approximate design plan.
What you need
To get a neat straw cutting with your own hands, you need to prepare all the tools and materials in advance. To work will be required:
- Three-phase motor, making 1500 revolutions per minute.
- Metal sheet, the thickness of which is 2 mm.
- Stove of steel, thickness of 10 mm.
- Metal sheet 3 mm.
- Pipe, the diameter of which is 25 mm.
- 3 mm metal strip 25 mm.
- Locksmith set.
- Welding machine.
- Grinding angular machine.
- Drill.
Production features
What is the strawzer? With our own hands you can make not only the case, but also knives. To do this, it is worth using carbon steel. Cut knives usually from the old circular saw. It is also suitable for a hollow metal-cutting machine. As for the body, it can be made from an old barrel or pipe, the diameter of which is 300 mm. To connect the details, you can use bolts and nuts, as well as electrodes.
If the electric motor performs more than 2,000 revolutions per minute, then experts do not recommend installing direct knives. It is better to create an aggregate equipped with a belt transmission. The machine will be quite powerful. With its help, it will be possible to grind not only the straw, but also root, and branches.

Where to begin
So, how is the straw cutting with their own hands? The drawings are the first, where to start. To begin with, the design must be drawn on paper. This will avoid many mistakes. In addition, the drawings allow you to determine the size of individual parts. If there is no idea about how to draw diagrams, you can search for a suitable model on the Internet. This will greatly facilitate the process. After drawing up the drawing, you can proceed to the manufacture of the borders.
What is the strawzer
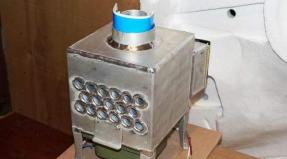
With your own hands, collect such an aggregate will not be much difficulty. The heart of such an installation is a working knot. This is a metal bunker, inside which sharp knives rotate. The main thing is to securely consolidate the details. Knives are fixed on the steel disk, which, in turn, is fixed on the axis of the electric motor.

The bunker, most often, has a cylinder form. In order not to occur in the process of operation, this detail of the strawzer is made with high sides. Otherwise, you can touch with sharp knives by hand. At the bottom there is nozzle. Through it, the crushed material is released. For greater convenience, it is located at the very bottom of the bunker and make inclined.
If desired, the case can be made low, but to equip a cover with a hole through which straw will be supplied. The bunker is installed on a tripod. Its height should be such that the engine can accommodate the engine. The motor is usually attached to the bottom with a separate plate.
As for the disc with a knife, it is very difficult to make it independently. Therefore, the design of these parts may be arbitrary. It is also recommended about the nozzle to set the container that will capture the chopped straw. In this case, you can use a barrel made of plastic with the side of the hole. Otherwise, Sichka will fly into different directions.
How it works
The made straw cutter with their own hands, the drawings of which are given above, is quite easy to use. To start work it is worth turning on the electric motor. Then you need to open the lid and download to the straw bunker.
The unit will do everything himself. From the side nozzle after loading will begin to fly off the finished sch, accumulating into a predetermined container. After that, the finished raw materials can be used for its intended purpose.

The strawzer of the barrel do it yourself is a simple design that can be made at home. The main thing is to comply with the recommendations and collect the unit in accordance with the drawing. Metal is recommended to first place, and then carefully cut according to the scheme. Corners, as well as pipes must be a certain length, which is also indicated in the drawing. After their circumcision, it is necessary to carefully clean the location of the cut.
Solomoruska with their own hands has certain features. The bottom must be welded to the bunker, and then the brackets. The electric motor is recorded. To start, a steel plate was attached to the brackets vertically, with the holes in it in advance. Only after that you can fix the electric motor. To tighten the design on the sides to the plate you can prigerate the jacks. That's all. Now you know how to make a straw cutting with your own hands.
How good to stroll through your own garden, in his beautiful tracks, admire well-kept beds and flower beds, and then eat a ruddy apple straight from the branch. But in order for all this magnificence to have a lot to work. So that the soil is fertile, it is necessary to make many organic matter. Mulching grass is a great way to support the soil in good condition. It can be decomposed on the beds immediately after the mowing or pre-compost. So that the thick stems of greenery are more active than decomposed, they are recommended to pre-grind them. You can make the grass grinder with your own hands or just buy it.
The choice of the finished technique largely depends on which volume of raw materials is to be varied. After all, the hammer is needed not only for the fertilizer of the soil. It will come in handy and those who have a utility farm: crushed greens add livestock and poultry food. With a small amount of work, you can easily cope with the help of ordinary sch. This is so called a triangular plate, equipped with durable and sharply sharpened bottom edge.
Sichka is an elementary tool for grinding grass. If the volume of work is small, then you can not buy gasoline or electrical grass and do not build. Put on the cutting on the cuttings and start work
For work, SP is planted on a long stalk. It allows not to bend when performing work. The raw material that is to be chopped should be decomposed on the ground a layer of 10-15 cm. The surface should not be solid, and the layer of grass is not too large. Then the SCH will not fill and will not spring. When hitting SIES from top to bottom, the grass is destroyed into small parts.
If the volume of the greenery treated is large enough, you need a solid unit, choose which will help this video.
The main purpose of this article is to search for ways of independent manufacture of the equipment that will be needed in the economy. If there is a desire, patience and minimal skills, you can make a homemade chopper of grass, which will not work at all worse, and maybe even better than the purchase. Better, because only you know the needs of your farm and you can perfectly adapt the device to your own needs. He will be exactly the way you need!
Option # 1 - Drill to help you!
Excellent tremorship is very easy to build from a regular drill. The way it works is a simple device, you can see on the video placed below.
So, the grinding process resembles the work of the kitchen combine: in a cylindrical building, the role of which plays a simple bucket, is sharply sharpened knife. When rotating it in a circle at high speed, the grass dissection occurs. For the manufacture of this herban, a two-mode drill "Temp" is used, with a capacity of 850 watts. The knife is made of hacksaw blades. The whole secret is hidden in the sharpening knife. If it is done correctly, the grass will not be sweeping on the blade. The knife should remain pure and free from greenery.
Cut the knife with one-sided sharpening. It must be oriented with a sharpened plane down. If it is necessary to grind fresh grass, the best shape of the knife will be a narrow rhombus so that the cutting edge goes to "no" at an angle to the edges. In extreme cases, you can round the edge blade. Then the grass on which the centrifugal force affects, slides along the cutting edge of the knife directly to the edges. It is cut easily and never wounds on the knife.
Option # 2 - For holders of the Vacuum cleaner "Typhoon"
The working principle of this device is no different from the previous one. It just looks like a more civilized and performance above. If, in the previous case, the grass was already in the tanks where the cutting tool was placed, now the raw material is supplied through the top hole, and the finished substrate comes out through the bottom, located in the side of the device. In order for the finished silage when the rash is not spread, you need to use a protective cover for the outlet.

Perhaps such an herbalus looks not as present as purchased, but it is functional and almost free. Decide what is more important to you
The crushed grass is going to the bucket, which must be prudently substituted under the outlet. It is clear that choosing the height of the racks for the unit, it should be borne in mind that the bucket of conventional parameters should be easily passing to place it in the right place. So where is Typhoon here? The body from the old Soviet Vacuum cleaner "Typhoon" is ideal for an elementary garden chopper: it has the top hole of the most suitable size. I repeat once again: this is the perfect option. But not the only one!
Any cylindrical capacity, whether it is an old pan, a bucket or cut pipe, too suit. 180 watt engine can be borrowed from the old washing machine. An old hacksaw blade will go to the knives, and the rectangular profile 15x15 mm is recommended as a racks. Here is a sleeve with a height of 40 mm, which will be attached to the knives, you will have to pull on the lathe.

The process of manufacturing the grass chopper is not as folded as it seems. In the photo: №1 - the corps, very convenient, because it is possible to load the grass from above, No. 2 - the engine from the washing machine, No. 3- location and appearance of knives
The motor with removed pulley is attached on the heel from below to the container. To clamp knives, the water nuts 32 mm in diameter will use. When making sleeves, prudently cutting the threads under these nuts. Do not forget about the hole for the engine shaft. So that there is a reliable fixation on the shaft, in the sleeve make two holes of 7 mm in diameter with a threaded M8 in them for locking bolts. On the reverse side of the engine from the reverse side, the platforms are pulled to increase the reliability of fixing the sleeve with locking bolts.
At an altitude of 15 mm in the upper part of the cylinder, the brine was removed, to form a square with a side of 25mm. His knives will be put on it. To make knives, it is necessary to cut 4 billers from the hacksaw cloth. In the central part of each billet, a square hole with a side of 26 mm is cut. The width of each part depends on the degree of rigidity of the source metal. It is clear that the knives should be placed closer to the bottom. Their cutting edges are sharpened using sharpened. Bolts fixing the sleeve are placed above the knives.

In the photo: No. 4 - sleeve for fixing knives and engine connections with housing, No. 5 - the square, to which the knives will be fixed, No. 6 - the shredder platform, which is made in the form of a truncated pyramid
If there is no possibility to make a silage outlet directly under the knives, then it is equipped on the side. For this, the grinder can be done near 7x7. For the formation of the guide case is used tin. To the chopper, the hull is fastened with m3 bolts. The unit platform must be as stable as possible. To do this, its base makes more than the upper part. Make it will be the most functional and comfortable.
The purpose of the platform is not only to hold the chopper, but also protect the engine. It is fixed to the container of the 3rd bolts M 6x45. The side faces of the platform better close the sheets of tin. In the racks, thread is cut under the m3 bolts, which are fixed on the platform.
Option # 3 - Herrase from what was at hand
Armed with the knowledge gained in reading the description of the manufacturing process of the previous unit, you are without much difficulty and efforts to build anything as simple and useful.

This tremury is made literally from what was found in Saraj. All things have long served their own, but in such a design they will certainly be able to be useful for their owner
For elementary tremors, you will need:
- agidel pump or any similar electric motor capable of making 3000 rpm and feed from a 220V voltage network;
- old aluminum saucepan;
- served their wooden hacksaws from which you can make wonderful knives;
- to start the engine, a button is needed, the role of which will play a PNV from the washing machine will play;
- fork and electric shuffle.
We suggest you carefully consider photos because they do not need special comments. Everything is extremely clear. Getting Starting the creation of grass chopper and everything will be fine with you.

Pay attention to how the grass in this chopper is placed. It is possible that you choose this particular model

The engine is set under the pan, and the start button is in the back of the platform so that it can be more convenient to reach it.

Such grass, crushed with the help of grass, is perfectly suitable for food cattle and bird, as well as for mulch purposes
Option # 4 - homemade straw
The three previous aggregates successfully turned grass into a silo. But if we need a chopper not only herbs, but also hay, should look at another invention, which is very detailed in the video below.
A little security warnings
Any device, the creation of which is described above, is equipped with sharp cutting details. So that he serve you for a long time, brought relief in the work, and did not assume the injury, to fulfill the elementary safety technique.
If the exploitation of the unit is related to electricity, be doubly careful and take the necessary measures. Especially closely ensuring that the grass fees do not try to include children. It is better to rearrange, than to union!
Easy the life of those who are engaged in agriculture, with the help of special devices. One of them is a straw chopper that can be used both to prepare litters or feed and to create a mixture for fertilizers. It can be purchased in a specialized store or make it yourself.
The hay is a versatile material for manufacture:
- detoking animals;
- underfloor material for different cultures;
- fertilizers.
It is possible to crush it to the smallest pieces, both manually and using a special machine. The crusher has quite compact sizes and can be stored even in the smallest economic structure. If you have minimal home appliances repair skills, then you should make a homemade shredder. It will help you to save a lot of money, as in stores prices for agricultural equipment are extremely large. During the preparatory work, you will need to study the schemes and drawings of various models of crushers for hay or straw.

The straw shredder works on the elementary principle: on the rod rotating due to the operation of the motor, the knives are located, which crushed herbal material to small pieces. Such a mechanism is placed in a large cylindrical tank, bucket or old vacuum cleaners. The greater the volume of the tank, the more knives will be required. Unlike machines manufactured by an industrial method, self-collected crusher performance is small. However, for those who hold 10-15 rabbits, such a shredder will be enough.
Important! Try to assemble not only the productive machine, but also safe. To do this, cover the worker bunker with a hatch for download.
At the bottom of the case, make an inclined pipe for feeding finished products. In order for you to be placed under a crushing bunker, a container for receiving the finished product, install the device on a tripod. Its height should be such that you have access to the upper part, and the bottom could be easily delivered by a bucket or pelvis.
The greatest advantage of crushers made by their own hands is that you can assemble them in your parameters, that is, to put the bunker at a convenient height and make it the most suitable volume.

Materials
What will be needed for the manufacture of a hay and straw chopper with their own hands?
To begin with, try to portray all parts of the device for crushing in the picture. This will help you visually submit, where and how the parts of the mechanism will be located. For its assembly, you will need to have at hand:
- ready electric motor;
- capacity under vegetable raw materials (can be finished or cooked according to the necessary dimensions);
- cover, reliably covering the worker bunker;
- steel plate thick in a centimeter, which will be a platform for the engine;
- sheet metal for the manufacture of supports and other elements, the thickness of it should be about 3 millimeters;
- bracket, holding a motor;
- shaft and knives of different sizes;
- side nozzle.

The most important part of the apparatus is an electric motor. It is chosen according to the parameters, based on the volume of the tank for grinding plant raw materials. The greater the mass that can be downloaded to the device at a time, the power is needed. If an ordinary barrel is based on a tank for grinding, then the engine of 2.2 to 5.5 kilowatta can be crushed in it.
Important! Another motor parameter to be taken into account is the speed of revolutions. It should be about 1500 per minute, but do not buy engines at a speed of over 2000 revolutions, as the crusher design will be unsafe.
For small crushers, experienced masters take the engine from a drill along with the case. You can also meet options with motors from the vacuum cleaners of Soviet production, pumps and other devices. The power unit must be connected to the shaft so that it can spin it. It must be done before installing the motor into the working bunker. Use only a balanced shaft so that the device does not shake during operation. You will need to fasten knives so that the distance between them and counterparts is minimal.
How to collect straw chopper
The device assembly is carried out as quickly as possible, as most parts are ready for use:
- First, the work is carried out above the body of the product. If the container does not have the bottom, then it is welded to it.
- Then at the bottom of the tank welding the bracket is mounted on which the engine will hold. A hole under the electric motor is made in the stove. This steel screen is welded to the bracket.
- Over the engine build oblique supports. They must be rigid enough. In the place where they are adjacent to the edge of the bunker, it is necessary to make a discharge device.
- Install the engine in place. Secure it with the help of self-tapping screws.
- Output the axis of the engine so that it is above the inclined supports.
- Install a disk with knives on the vertical axis and securely secure them on the shaft.
- In the last stage, set the lid on the container, place the trunk bunker and cover the device with special paint for metal. This will help prevent rust.

With the help of straw cutters, you can very quickly make SCH for rabbits. From a distance that you lay between knives, as well as on the number of disks with blades will depend on the size of the finished product.
Important! You need to have minimal skills to work with the welding machine. All work should be carried out in accordance with the safety rules.
The power of this mechanism will be enough to grind not only dried plants, but also for the preparation of feed from fresh raw materials. Ground plants in a dried or fresh form are extremely useful for different animals. Even taking into account the acquisition of a new motor. An independent assembly of this unit will cost you cheaper than buying an instrument in the store.
Farmers gradually go away from manual labor. The hosts in small private houses are actively implementing small mechanization tools to increase labor productivity. Such means include a straw chopper. Such factory production devices are on sale, but they are not always appropriate to acquire due to high cost. The fact is that the shredder device is extremely simple, and you can make it yourself.
Principle of operation and standard model
Explanations in the purpose of the chopper is unnecessary for those farmers that contain liveliness. In addition, the adaptation can be used to produce fuel briquettes from hay or straw at home.
Hand to disturb the desired amount of material for feeding livestock - the event is extremely labor-intensive in time and forces. And the production of fuel briquettes is thus not even worth thinking.
Some masters make handicraft shredders From the minimum set of girlfriend. Usually, old vacuum cleaners or pumps in which the electric motor is managed.
Tools of this type are characterized by simplicity of manufacture, but their performance is extremely low. It is enough only for the preparation of feed to the top ten rabbits. Large household requires more raw materials.
As a result, a reliable straw chopper is needed for private outlines, which can be performed independently. Power should also be at the level that will allow the device to work up to several hours without stopping.
Description of a typical design
Typical design involves the elements from which the device is made. Their minimum set can be supplemented with auxiliary. The goal is to improve comfort from working with the device.

Standard set of chopper:
- The bunker is the capacity of sufficient volume. Typically take an old barrel or a large bidon, where the vegetation processed is laid.
- The electric motor is installed at the bottom of the bunker. The main thing is that its power is sufficient to work without stopping and for large loading.
- The axis on which knives are fixed in an amount of from 3 to 6. It is fixed directly to the axis of the electric motor.
The basis of the apparatus is a hopper with sharp knives that hardly fix on the drive disk. The disc is installed on the axis, which is an electric motor shaft or connected to it through the gearbox.
The bunker is a container for laying a material - hay or straw that require grinding. In it, the process of cutting. For safety reasons, the bunker makes the highest possible so that when loading raw materials does not touch the knives with hands. The form of capacity is usually cylindrical, but you can meet the shape of a turned cone. Install the container on the stand, usually as a tripod. The height of the stand is such that the electromotor can be installed below. The latter is fixed on the bottom.
Sometimes the bunker is performed small in height, but with a lid for security purposes. In the lid, there must be a hole for loading raw materials.
Production on a flowing principle create by installing the pulmonary mass. Through the device, the grinding material is ejected from the bunker. This allows you to add raw materials continuously. That is, stop the engine to get sch and add raw materials, it will not be necessary. At the same time, a significant time saving is achieved. It will be made from the bottom of the bunker. The form is not important, the main thing is that there was a slope for the blade of the material.
The disc with the knives placed on it - the item is extremely complex in the manufacture. The design may be arbitrary. The purpose of the assembly is to achieve the maximum balance that the device does not shake during the work from vibrations.
Scheme of work

Capacity typically serves a barrel made of plastic. It is advisable to cover it with a lid, and to make a hole to make a hole so that SCH is fluttered in all directions. The operator remains to supply the raw material and release the container with SCH in time. Ideally, they use several, changing as far as filling.
Materials and manufacturing process
Making a house chopper starts with drawing on paper. This allows you to have a visual idea of \u200b\u200bthe design and reveal the shortcomings or modify important nuances at the design stage. Redo the finished product will be more expensive, and even time will be spent.
Materials for assembly:

The electric motor is the main part of the device.which sets its characteristics. Choose a motor depending on the volume of the bunker for the straw-choler. The greater the mass of raw materials at one download, the engine is more powerful there. Usually, an electric motor with a capacity of 2.2 to 6 kW is installed on the chopper of hay and straw for private samples. The speed of revolutions should not exceed 2 thousand / min for security purposes. Optimal - 1.5 thousand / min.
The electromotor at the speed of rotation is higher than the optimal can also be adapted to install into the design, but it is not directly connected with the shaft. For this use lower reducer, often belt. You can use the toothed gear. The downgrade reducer allows you to increase the return from the motor and grind roots and even small branches.
Motor connected with shaftwhere the disk with knives will be installed. The shaft can perform a tube, but only straight, without distortion. It is necessary for the right balance, otherwise vibration will arise, which is unacceptable.
Knives are installed on the shaft so that the minimum distance is between them and counterply. This will ensure high-quality grinding of raw materials.
Build device
Collect it is necessary to qualitatively, customizing the details. The life of the assembly depends on the service life and safety of the household straw chopper. The device contains moving parts, and poorly fixed connections can fly when working. This is fraught with an operator injury.

Order assembly:
- Working with a capacity and install an electric motor on it. In the absence of the bottom in the bunker it is welded. The bracket and metal plate are installed below, where the electric motor is fixed. The stove is fixed using the tank, and the engine is attached to it.
- Over the motor, inclined supports are installed that will serve as a bracket to install a discharge device. It is mounted in the place where supports are connected to the edge of the bunker.
- Attach the motor with self-draws or bolts. The axis of the engine must set up above the inclined supports.
- Form a cutting tool. For this, pieces of high-quality carbon steel are suitable, which can be taken from the spent cloth of the metal cutting machine. The disk takes this size so that the installed knives do not touch the hopper walls.
- The vertical axis is fixed with a disk with knives. The axis can be made of durable steel pipe. The main requirement is that the pipe is smooth, without bends, as they provoke vibration, which will affect the reliability of the device and its safety. The axis with knives is installed on the motor shaft.
- Install the lid on the bunker, which will increase the safety of the device.
The finished product is placed on the stand, which is fixed on the floor. Shredder straw, made with their own hands, preferably paint. This will prevent it from corrosion, and the device will last long.
The hay of the crusher for the home of self-making in quality is no less inferior to products from the device of factory manufacture. Only required knock on the state of knives. The power of the self-made apparatus is sufficient not only for the manufacture of SIES from the hay or straw, but also for grinding fresh herbs. Such food is useful for livestock, since it is easier for them to train. From dry straw, you can make fuel briquettes for personal use and for sale. This will pay off the device.
Independent work on the machine Even taking into account the new motor will be cheaper than the purchase of ready-made in the store. The market is littered with Chinese products whose quality is doubtful. And the choppers of European manufacturers have high cost and are not lifted to small farms.
Easy the life of those who are engaged in agriculture, with the help of special devices. One of them is a straw chopper that can be used both to prepare litters or feed and to create a mixture for fertilizers. It can be purchased in a specialized store or make it yourself.
The hay is a versatile material for manufacture:
- detoking animals;
- underfloor material for different cultures;
- fertilizers.
It is possible to crush it to the smallest pieces, both manually and using a special machine. The crusher has quite compact sizes and can be stored even in the smallest economic structure. If you have minimal home appliances repair skills, then you should make a homemade shredder. It will help you to save a lot of money, as in stores prices for agricultural equipment are extremely large. During the preparatory work, you will need to study the schemes and drawings of various models of crushers for hay or straw.
The straw shredder works on the elementary principle: on the rod rotating due to the operation of the motor, the knives are located, which crushed herbal material to small pieces. Such a mechanism is placed in a large cylindrical tank, bucket or old vacuum cleaners. The greater the volume of the tank, the more knives will be required. Unlike machines manufactured by an industrial method, self-collected crusher performance is small. However, for those who hold 10-15 rabbits, such a shredder will be enough.
Important! Try to assemble not only the productive machine, but also safe. To do this, cover the worker bunker with a hatch for download.
At the bottom of the case, make an inclined pipe for feeding finished products. In order for you to be placed under a crushing bunker, a container for receiving the finished product, install the device on a tripod. Its height should be such that you have access to the upper part, and the bottom could be easily delivered by a bucket or pelvis.
The greatest advantage of crushers made by their own hands is that you can assemble them in your parameters, that is, to put the bunker at a convenient height and make it the most suitable volume.
Materials
What will be needed for the manufacture of a hay and straw chopper with their own hands?
To begin with, try to portray all parts of the device for crushing in the picture. This will help you visually submit, where and how the parts of the mechanism will be located. For its assembly, you will need to have at hand:
- ready electric motor;
- capacity under vegetable raw materials (can be finished or cooked according to the necessary dimensions);
- cover, reliably covering the worker bunker;
- steel plate thick in a centimeter, which will be a platform for the engine;
- sheet metal for the manufacture of supports and other elements, the thickness of it should be about 3 millimeters;
- bracket, holding a motor;
- shaft and knives of different sizes;
- side nozzle.
The most important part of the apparatus is an electric motor. It is chosen according to the parameters, based on the volume of the tank for grinding plant raw materials. The greater the mass that can be downloaded to the device at a time, the power is needed. If an ordinary barrel is based on a tank for grinding, then the engine of 2.2 to 5.5 kilowatta can be crushed in it.
Important! Another motor parameter to be taken into account is the speed of revolutions. It should be about 1500 per minute, but do not buy engines at a speed of over 2000 revolutions, as the crusher design will be unsafe.
For small crushers, experienced masters take the engine from a drill along with the case. You can also meet options with motors from the vacuum cleaners of Soviet production, pumps and other devices. The power unit must be connected to the shaft so that it can spin it. It must be done before installing the motor into the working bunker. Use only a balanced shaft so that the device does not shake during operation. You will need to fasten knives so that the distance between them and counterparts is minimal.
How to collect straw chopper
The device assembly is carried out as quickly as possible, as most parts are ready for use:
- First, the work is carried out above the body of the product. If the container does not have the bottom, then it is welded to it.
- Then at the bottom of the tank welding the bracket is mounted on which the engine will hold. A hole under the electric motor is made in the stove. This steel screen is welded to the bracket.
- Over the engine build oblique supports. They must be rigid enough. In the place where they are adjacent to the edge of the bunker, it is necessary to make a discharge device.
- Install the engine in place. Secure it with the help of self-tapping screws.
- Output the axis of the engine so that it is above the inclined supports.
- Install a disk with knives on the vertical axis and securely secure them on the shaft.
- In the last stage, set the lid on the container, place the trunk bunker and cover the device with special paint for metal. This will help prevent rust.