Change the crane in the bathroom. How to replace the mixer in the bathroom with your own hands. Tools for work
If you have broken the mixer - the water flows all the time, the shower regulator does not work, etc. And so on and repairing the mixer is useless to do, or you just want to replace the mixer in the bathroom to the new one - in principle there is nothing complicated, you can try yourself without causing plumbing, install it.
How to replace the mixer in the bathroom
At first, overlapping the cold and hot water on the indigenous cranes, unscrew the nuts of the mixer, which are screwed to the eccentric. When unscrewed, we look at the eccentrics, in what condition they are.
Actually, normal eccentrics are made of brass and they do not rot and in 90% of cases it is not necessary to change them, but if you still decide to change them, you unscrew the old and screw the new, winding flashes, each eccentric screws the same number of revolutions and put They are symmetrically. Next, we screw the buttup cups, and manually screw the nuts of the mixer to the eccentrics when they screwed up to the stop by hand, screw the key to a quarter of the turnover and open the water, if it snaps a little, then we twist.
How to replace the mixer in the bathroom
How to replace the mixer in the bathroom if you have broken the mixer - water flows all the time, the shower regulator does not work, etc. and so on and repair the mixer do it useless, or you just want
How to change the mixer in the bathroom
Each apartment or house has devices and appliances, the replacement and repair of which can be performed independently, without referring to the help of a qualified wizard. The mixer in the bathroom belongs to the number of devices.

As a rule, it becomes unsuitable due to poor water quality or due to late replacement of the cartridge in the main filter.
If any problems occur, you should know how to replace the mixer in the bathroom without damaging the device.
Common bathroom mixer breakdowns
Damage can be different, but the most common are:
- Water leakage with closed crane. The reason for this is damage to the cartridge of the mixer with small particles, which are in the water.
- Breaking the threaded connection Devices.
- CorrosionWith time, mixers made from brass alloy are subjected.
For Chinese production faucets, the last two problems are characterized, because there is a low-quality brass alloy for the manufacture of the device. Therefore, their cost is much lower, in contrast to European equipment, which is made of stainless steel.

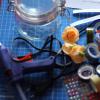
Before changing the mixer in the bathroom, it is worth preparing all the tools that may be required so that there is no need to constantly distract from the process to search for a particular inventory. Arsenal should be placed nearby from the workplace.
To perform the mixer replacement, the tools will be required:
- pliers;
- several adjustable keys;
- packle or fum tape;
- sealant;
- sanitary filament;
- paralite or rubber gaskets, size ¾ and ½ inches;
- graphite strip shaper;
- capacity for water.
Most of the listed materials and tools are in household, and the rest of the accessories can be purchased in a specialized store.
- To understand how to replace the mixer in the bathroom, a step-by-step instruction is offered.
- Discharge hot and cold water in the pipes of the plumbing system.
- Drain the water remnants from the mixer and reduce the pressure in the pipes by opening the cranes.
- When air and water completely come out of the plumbing system, release large nuts of the mixer, which fasten it to the eccentric-adapters connecting the pipes of the tap of the tap.
- Remove the old mixer.
- Pay attention to the state of the eccentric - it may be necessary to replace them.
As a rule, the distance between regular places for pipes in the mixers corresponds to 15 cm. In practice, this may not match the specified numbers. Then inaccuracy can be leveled to the desired size with the help of eccentrics that are released or tighten. Thus, the displaced part of the nozzle will take a central or extreme position, increasing the mid-scene distance or shown it.
When the required distance is selected between the nozzles of the eccentrics, the installation of a new mixer can be started. The installed eccentrics must be reliably fixed using the sanitary lion and the strip shaper. To do this, a small amount of flax is wound on the external thread, after the graphite shaker is applied, the sealant can be used. In the absence of these materials, it is recommended to use the sealing fum-ribbon.
Eccentrics must be turned into pipes with mirror accuracy. The synchronicity of performing actions is incredibly important, because at the slightest violation the device will take the wrong position, and the installed mixer will be selected. Installation of the mixer is performed only after correctly fixing the position of the eccentrics and the installation of the required inter-axis distance, which will be equal to the size of the mixer.

The final stage is a tightening of fastening nuts. In this process, too, there are some tricks, applying which the installation will be performed better. In order not to damage the coating of nuts that fasten the mixer to the eccentrics, it is recommended to wrap them with a tape, after which, using pliers or adjustable key, attract. Upon completion of the work, the isolate should be removed from the nuts.
Knowing how to competently change the mixer, you can not only perform a qualitatively, but also save money on calling the wizard. Using simple recommendations and step-by-step instructions, the mixer will last for a long time.
How to change the mixer in the bathroom with your own hands - step by step instructions
Each apartment or house has devices and appliances, the replacement and repair of which can be performed independently, without referring to the help of a qualified wizard. The mixer in the bathroom belongs to the number of devices.
Replacing the mixer in the bathroom - installation of equipment without the help of plumbing
Modern bathroom and kitchen cannot be imagined without mixers. The ease of operation of the water supply depends on their qualities and characteristics. Let's find out how to choose a mixer and independently replace it in the house.
To successfully replace a broken mixer, it is not necessary to have extensive knowledge or extensive experience in repairing plumbing. From the tenant, it will be necessary to determine the problem and think about the work plan. After that, with the installation of a new mixer, no special problems will arise.
Replacing the old mixer in the bathroom may be required due to the use of poor-quality water or late replacement of the cartridge inside the filtration element. When performing work with your own hands, be sure to make sure not to damage the product.

When a mixer breakdowns, it may be necessary to replace it.
The mixer breakdowns can be different. Among the most common experts allocate the following faults:
- water leakage with fully closed crane. They appear as a result of damage to the cartridge with minor parts of plumbing;
- breaking the mixer thread;
- corrosion formation. This problem is particularly relevant when using plumbing from brass.
With the last two cases, the owners of mixers purchased in China are most often faced. Such a plumbing is not highly reliable due to use when producing brass alloys and poor build quality. Nevertheless, the cost of such equipment is an order of magnitude lower than better plumbing from Europe made of stainless steel.
Often to repair the failed mixer is inappropriate. In this case, the only right solution will be the purchase and installation of new equipment. The mixer that was used in the kitchen is replaced much easier than the product installed in the bathroom. The second, as a rule, is equipped not only with switches for adjusting the temperature of the supplied water, but also the water supply system for the shower and bath.
Before changing the mixer in the bathroom, decide on new equipment. At the same time, pay attention to such features as the place where the product is located, and its type. Depending on the place of attachment, the equipment can be installed on the side or the surface of the bath, or locking into the wall. By design, the mixers are divided into ball and valve.
When operating with balloons, the water temperature is adjusted by one handle. They are more practical in use and have an original appearance. To protect small details of such mixers from trash from entering them, you must install the filter. The valve mixers better show themselves when used in hard water conditions.
Before starting the replacement, you will need to prepare everything you need for work. You may need such tools:
- pliers;
- several adjustable keys;
- sealant;
- fUM tape;
- rubber gaskets;
- tase or bucket for water.
Rubber gaskets, sealant and fum-ribbon is best to buy in the store for the sale of plumbing. When buying, pay attention to the integrity of the gasket - today it has become popular to sell damaged products inattentive buyers.
Immediately before starting the replacement, you will need to perform a number of preparatory activities. This will help quickly and comfortably change the faulty faucet in the bathroom.

Before starting work, it is necessary to overlap water
To begin with, overcoat the water supply in the pipes. Fluid residues necessarily in the pelvis and open all the cranes to reduce the pressure in the pipeline. Wait 10 minutes and start gradually release the nuts, fastening equipment to the eccentric, that is, adapters.
Remove the old mixer and carefully inspect the adapters. It is possible that they will have to replace them. The reason for this may be the appearance of cracks or rust within the eccentrics.
Most often, new devices are sold in a completely disassembled form. It is very important to check for all parts from the kit while buying. In the set must be attended:
- gander;
- shower and hose;
- plafones for decorative design;
- rubber gaskets;
- eccentrics.

Assemble the mixer will not be labor
All items must be placed in separate tissue or cellophane bags. Be sure to check the quality of the eccentrics - the main thing is that the carving on them is a whole.
Collecting the mixer, first of all, you need to connect it with a hussac and a shower hose, c pre-screwed to the hose. When assembling, experts do not advise the use of wrenches so as not to damage the elements of the mixer. Decorative plaffers are installed after mounting the mixer.
In most cases, the distance between the pipes for pipes in the designs of the mixers is about 15 cm. However, this parameter may vary, and inaccuracies need to be corrected by pulling or releasing the eccentric. In this case, the displaced part of the nozzle will occupy a central or extreme position. The distance between the axes will increase or shrink.
After you select a suitable distance, you can proceed to replacing the equipment. By installing a new mixer, securely fix the eccentric. To do this, use the plumbing flax and the shaker of the gasket. For fixation, wrap a little flax on the outer side of the thread, and then apply a substance that is used to form gaskets. Instead of these funds, you can use a sanitary sealant or fum-ribbon.

The distance between the pipes is usually about 15 cm.
Wash the eccentrics is needed with maximum accuracy. If you allow an error, the new mixer will take the wrong position and turns. Install the device can be installed only after fixing the position of the eccentrics and adjustment of the inter-axis distance. It must correspond to the size of the equipment installed.
At the end, you will need to tighten the fastening nuts. This stage also has certain tricks, having studied that the installation of the equipment will be performed better. So that the coating of the nuts is not damaged during the installation, they need to be covered with a polent. Next, the fasteners must be tightened with an adjustable key or pliers, after that the isolate can be removed.
Settling in a new apartment, residents must install a new mixer. The procedure is not much different from the previous algorithm, but there are still differences, and most importantly of them are the need to install fittings.
Before installing fittings, you will need to make some calculations. The distance between the centers of the parts should be 15 cm. Centers must be located strictly parallel to each other. The layer of installation of the mixer depends on the location of the fittings, so carefully refer to the selection of this parameter.
Installation of fittings needs to be performed after laying plumbing pipes. At this point, a bathroom finishing doom must be installed. You need to screw the fittings so that they are 25 mm in favor of the edge of the crate. Fitting outputs are fixed as hard as possible using mounting brackets or profiles.
If the lamp is not installed, as the walls will be placed in the future, then when calculating the fittings, you need to consider the distance from the lighthouse to the surface of the finishing tile, glued to the wall. In most cases, the protrusion does not exceed 15 mm. The entire further installation will be the same as when replacing the old mixer to new equipment.
Replacing the mixer in the bathroom with your own hands
Modern bathroom and kitchen cannot be imagined without mixers. The ease of operation of the water supply is largely dependent on their qualities and characteristics.
How to independently install the mixer in the bathroom
The mixer provides mixing hot and cold water to get a warm, pleasant fluid at the outlet. Making a mixer in the bathroom with your own hands is easy, so you pay for this money to the coming plumbing does not make sense. Installing the mixer with your own hands implies the mandatory purchase of a new crane, which must be properly pick up, since the result of the work done on its quality. The main thing in this case does not chase for the cheapness. The more expensive the mixer, the more qualitative.

A hurry when replacing the mixer will result in large problems already during the operation of the mixer, so performing these works, do not hurry, because you will use the mixer for more than one year.
When choosing a mixer, you need to be guided by the following parameters:

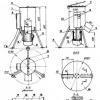
Mixer assembly scheme for bathroom.
- Weight. The quality of this device can be determined by its weight. The device made of high-quality and durable material cannot have a small weight, since it is the metal thickness that affects the long-term operation of this or that mixer. His weight is a guarantee of the use of thick, high-strength metal.
- Material. In the manufacture of a mixer for the bathroom can be used brass or silumin. The latter metal is cheaper, moreover, it is significantly easier than brass fellows. Silmina, under which the aluminum alloy with silicon, continuing metal, so the mixers made of it are often broken by knobs or blast furnace nuts. The only advantage of the appliances from the silumin is their cheapness. As for brass devices, they are much more expensive, while they have a lot of weight and increased viscosity of alloys, which does not allow the pipe and nut during minor deformations arising from the installation and operation of the crane.
- Parameters. Replacing the mixer with their own hands implies a preliminary study of technical parameters. Even if you purchase the most expensive device, it can be unsuitable for use if its parameters will not correspond to the place of its future installation. Therefore, before you buy it, you need to decide whether a faucet is needed with or without a crane. If the first option is selected, you should decide how long the crane should be.
Self installation of the mixer in the bathroom
Bathroom mixer replacement should begin with a dismantling of an old instrument. But that its replacement is high quality, it is necessary to prepare the following tools in advance:

The diagram of the device mixer for the bathroom.
- hexagons;
- passatia of large sizes;
- crosshead screwdriver;
- flat screwdriver;
- gas key number 2;
- horn key at 12 and 14;
- two divorce keys;
- FUM tape.
Dismantling of an old mixer
It is easy to remove the old crane with your own hands, the main thing is to overlap the flow of water before starting work. At the same time, it is necessary to overlap not just the main highway, but also hot water, which can be supplied by an electric boiler or gas column. The replacement of the mixer in this case will be carried out in the bathroom, the wall surface in which is covered with tiles.
First you need to pull the water from the crane and unscrew it from the wall. It is necessary to do it carefully, since the likelihood of damage to the thread on the fitting, located in the wall itself. If you allow damage to it, you will have to make a major overhaul of the walls of the bathroom to replace the fitting.
Important! Upon completion of the dismantling of the mixer, with your own hands, you need to carefully clean the fitting with the inner thread remaining in the wall in order to press out the pieces of an old winding and paint.
Assembling mixer
The replacement of the mixer in the bathroom implies also the assembly of the latter, as it is sold unchanged. Therefore, purchasing it, you need to immediately check the availability of all necessary components. In the box, together with the mixer must lie:

Installation of the mixer for the bathroom is performed after its assembly.
- gander;
- shower canoe;
- shower shower;
- main unit;
- decorative plaffones;
- rubber gaskets;
- eccentrics.
All these components must be packaged in the bags, they can be cellophane or tissue. It will be useful to check the quality of the fastening nuts of the Eccentrics. The main attention should be paid to the integrity of the thread.
To assemble the mixer with their own hands it is necessary to connect to it a hussak and a shower hose with a drunk can be connected to it. Even a child can cope with this task.
Important! During the assembly, it is unwanted to use the keys or tighten the nuts with minimal effort.
Eccentrics are wrapped with fum-ribbon, after which it is neatly inserted into the fittings that are in the wall. In the absence of a tape, you can use the winding packles with the addition of the "Unipacled" paste. The purpose of the eccentric is to displace the distance between the centers. The distance between the two inputs on the mixer is most often equal to 150 mm. When installing fittings often there is a violation of this distance. Fix the position allow the eccentrics. But despite this, when they are screwed, it is desirable to use the level.

Device diagram and assembly of fittings.
The next step towards the installed eccentrices is trying on the main unit to try to turn. The correctness of the installation of eccentrics is evidenced by the trouble-free hoisting of both sides of the block. After that, the block is removed so that on the eccentrics to wind decorative plaffones, they, in turn, should fit tightly to the tile on the wall. The task of these plafones is to hide the mixer insertions in the water supply.
Now you can fasten the block itself. Use additional winding material is optional. The mixer's dense shrinkage is capable of providing gaskets located inside the presser nuts. The nut is slightly tightened by the key. With a normal tightening, the key must trust a little.
At the end of work, a trunk crane and hot water opens to check the mixer for performance.
Installation of the mixer for a new wall

Connection diagram of the mixer to the bath and washbasin.
At the entrance to a new apartment, it is not necessary to replace the old device to new, but the installation of the mixer with the need to change the plumbing pipes with the subsequent facing of the walls with a tile. The main essence of the installation remains the same, the only thing - it will be necessary to install fittings, which in the first case were already in the wall.
To remove fittings by installing a mixer, some calculations are required:
- the distance between the fittings centers should be 150 mm;
- fittings centers should be placed parallel to each other;
- the extreme point of fitting should be flush with the wall plane;
- fittings should be placed at one level. At the same time, the height of their location should be at an acceptable height mixer for mounting. In this case, you can navigate on board the bath.
Installation of fittings is carried out only after laying pipes of plumbing. By this time, the drywall must be installed or the beacons on the plaster should be installed.
If in the future it is planned to use drywall, the fitting will need to solder so that he advocates for the crate on average by 25 mm. In this case, the output must be fixed as hard as possible. To do this, you can use profiles or mounting brackets.

Scheme of the device of the mixer 3-x position.
If the wall continues to be placed, then when calculating the protrusion, you will need to be guided by the distance from the lighthouse to the plane of the tile attached to the wall. Most often, the protrusion in this case does not exceed 17 mm. All further installation work is carried out in the same way as in the first case, when the old instrument was replaced with a new one.
Performing the installation of the mixer in the bathroom, you can not hurry. In this case, the hurry can turn into the emergence of large problems already during the operation of the mixer. Therefore, it is necessary to twist the eccentrics at first without a seal, and only after you see the correctness of your actions, you can put them according to the scheme.
Before the start of installation work, a bath, washbasin or washing will be closed. To do this, you can use unnecessary rags, corrugated cardboard, tape or film. It is necessary to do it in order to protect the plumbing equipment from the chips in case of a fall of a rather heavy mixer or its components. There are such cases when the mixer pierced an acrylic bath. So that the usual replacement of the crane has not turned into the need to purchase a new bath, washbasin or toilet bowl, you need to progress.
Replacing the mixer in the bathroom with your own hands: Tips for choosing and installing
How to replace the mixer in the bathroom with your own hands? The mixer provides mixing hot and cold water to get a warm liquid at the output.
In almost every modern house or apartment there are various devices that require periodic maintenance or replacement. Many of these devices do not require a call to a qualified wizard for this work, and sometimes it is not even necessary to apply a special tool. One of these devices is a mixer in the bathroom or in the kitchen, which over time fails due to the wear of individual nodes or with poor quality water. Before changing the mixer in the bathroom or some of its details, it is enough just to familiarize yourself with its design and prepare the necessary tool. In this article we will talk about how to change this device yourself, as well as make a video that will clearly demonstrate the key points of the process.
The most frequent breakdowns of the bathroom mixer
First of all, we consider the most frequent breakdowns that may occur during the operation of the device. The most common are:
- liquid flow With a fully closed valve of the crane. In the lever mixers, this is due to the damage to the cartridge with minor mechanical particles. In valve devices, this occurs when wear or damage to the internal elements of the valve;
- cutting the thread of the valve or connecting thread. Such a breakdown occurs in the case of excessive use of force while closing the crane, which leads to a breakdown of the inner thread of the valve. The complete replacement of the tap in the bathroom will be required when a mixer compounds with water mainstream. This usually happens with the cranes that are installed on the walls, if they rely on them while taking the soul.;
- corrosion of the inside of the case. This is subject to all bath mixers, which are not made of stainless material.
Such problems as a breakdown of the thread and corrosion of the body are inherent in low quality products.
Important! Having hired an third specialist to eliminate malfunction, it is important to remember that the cost of replacing the mixer in the bathroom can reach half the cost of the product itself depending on the design and complexity of work. Therefore, it is more profitable to eliminate the malfunction yourself, having studied the design of the product.
Tools for work

Before changing the mixer in the bathroom, you must prepare the desired tool, consumables and spare parts to be replaced in advance. The entire tool must be prepared and placed near the work site. For high-quality and fast work, we need:
- adjustable key. Some models will require two keys;
- passatia;
- typhlon tape for sealing threaded compounds;
- replaceable details or a new mixer depending on the nature of the work carried out;
- painting ribbon to overtake the fastener nuts of the mixer when installing or disassembly.
Typically listed materials enough to change the mixer in the bathroom.
Preparation for work

Before removing the mixer in the bathroom, it is necessary to clearly imagine the sequence of actions, the quality, speed and safety of work depends on the execution of which. The whole sequence should look like this:
- we overlap the water supply to the mixer on the main cutting valve;
- open the faucet cranes, in order to remove residual pressure in the system and remove the residues of the liquid;
- start disassembling the mixer in the bathroom by unscrewing nuts that fasten the tap itself to the tap pipes;
- remove the mixer and check the condition of the thread on the plumbing pipes.
Important! In 90% of cases, special eccentrics are installed between the mixer and pipes, which perform the role of adapters when the size is inconsistent between the pipes and the inlets of the mixer. They also allow you to set the crane in the desired position when the exit pipes are uneven. Before unscrew the tap in the bathroom, you need to remember that first of all the mixer needs to be disconnected from the eccentrics.
Installing a new mixer on the wall

Usually, when installing the hidden layout, the end of the pipes are out of the wall with a distance of 15 cm from each other, which corresponds to generally accepted standards. But unfortunately, this distance does not always clearly coincide with the inlets of the mixer. In such cases, before replacing the mixer in the bathroom, special eccentric adapters are additionally bought, which allow you to compensate for the difference in size. In many models of mixers, such eccentrics are already included with the product.
Before starting the installation of new eccentrics, it is necessary to compact the threaded connection with a titon tape, so that water is not sealing through the threads. The tape is wound in 3-4 turns, after which the adapters are connected to the outlet holes of the pipelines and clamp a wrench. Before unscrew the mixer in the bathroom, it is advisable to remember in what position they stood, although it is not necessary to do it.
Important! Eccentric adapters must be screwed into the outgoing pipes in compliance with the mirror-accurate location of each other relative to each other. If they are installed unequal, then ultimately the mixer will hang crooked relative to the horizontal. To achieve maximum accuracy, you can use a laser or water level with a ruler.

Next, you can start mounting the mixer itself. It is important to remember that before changing the crane in the bathroom, which has chrome-plated clamping nuts on the inlets, they must be pre-wrapped with a painting ribbon in order to not damage the layer of spraying when twisting. It is also important not to forget to put the Typhon tape on the opposite ends of the eccentrics, which will be connected to the incoming holes of the mixer.
After the mixer is replaced in the bathroom over, you can open the main shut-off valve and check the product on the leakage. In this case, it is important not to open the main crane sharply, but to give pressure to the system gradually. It is desirable to open the valves on the mixer, in order to come out of the pipes.
Installing the mixer on the bathroom or sink

Replacing the crane installed on the bathroom housing or washbasin looks a bit easier due to the fact that there are no eccentrics in such a design and the mixer itself is connected to the plumbing through the hoses. Before changing the crane in the bathroom of this type, you need to turn off the water supply to the system and drain it. Then with the help of two adjustable keys, disconnect the hoses from the plumbing line.
For your information! Before removing the crane in the bathroom, see the possible options for disconnecting hoses. In many cases, turn off the hoses from the mixer itself is very uncomfortable, due to limited space, then they are easier to disconnect them from a plumbing line and remove the old mixer with them.
As a rule, before changing the mixer in the bathroom of the built-in type, you need to disconnect it from the surface on which it is located. In most cases, models of such cranes have a body with a carvings. This housing is inserted into the tub or sink technological hole and is clamped with a nut. Between the housing of the mixer and sink, there is a rubber gasket for sealing.
Disconnecting the old mixer, you can start setting the new, repeating all the actions in the reverse order. For such small operations as a replacement of the hussawa of the mixer in the bathroom, the dismantling of the product itself is not required at all. Just with a wrench to unscrew the pressure nut, remove the old hussak, install the new and clamp the nut back.
If you do not know how to replace the crane in the bathroom yourself, you can easily use this material as a guide to action.
All things have their own service life, no exception and mixer in the bathroom.
This device is actively used quite active, so even with a large stock of strength, it becomes unusable over time.
Installation of the mixer in the bathroom may be needed in several cases:
- the old mechanism is completely out of order and is not subject to repair;
- repair is carried out in the room, the finish, bath, other large-scale tasks are replaced;
- the old mixer does not like or does not suit the characteristics.
Although at first glance this procedure may seem challenging, the installation of the mixer in the bathroom will not cause difficulties even at the novice if it is properly prepared and take into account several nuances.
To independently change the mixer, you will need a small set of tools - an adjustable key (or a set of conventional horn wrench), bubble level, pliers. Of the additional materials you will need packle, preferably tape FMU or sealant.
 IMPORTANT When buying a mixer independently, make sure in full completeness. In addition to the block itself, the box should be a hussak, a hose and a watering can, eccentric, decorative linings, a set of sealing pads. Some cheap models have extremely low-quality gaskets, so it is desirable to immediately buy separately normal seals.
Select model
 In the market, a huge number of models of various manufacturers - from simple two-fledged to electronic. Throwing around how to change the mixer in the bathroom, you should choose a variety of hopefully.
Manufacturers offer brass, symptoms, less often - steel, copper products. When choosing it is worth excluding the silhouette is a cheap low-stream alloy that will not be able to live for a long time.
The choice of mechanism is determined by personal preferences, features of the bathroom design. Somewhere it will be good to look at a single-art device, somewhere will become the current classic two-screw.
Screws are with rubber or ceramic shut-off elements. The latter is more convenient, but they have higher price, and they are more expensive in repair. In addition, this type is more sensitive to mechanical impurities, so it is necessary to preserve the filter of coarse water purification.
Dismantling of the old device
 If the mixer served for many years, then with its dismantling, problems may arise - threaded compounds could be accuited, in the rust and calcite.
You need to try to perform work with your own hands neatly, without applying extra effort, so that it is not accidentally damaged by the pipeline fittings.
Because otherwise it will have to be engaged in expensive repair of pipes, without which the installation of the mixer in the bath will be impossible. Before you start disassembly, you should block the water supply with your own hands.
In the new systems, the ball valves are certainly available immediately before the mixer (under the bathroom, for the decorative panel), in old pipelines there will have to overlap the overall valve.
Next, you should drain the remnants of water from the system and make sure that the blocked taps are not subtred. In some cases, old valves pass water even in a closed position, you will have to get a bucket, rag and try to do everything as quickly as possible. The likelihood of communication with displeased neighbors will depends on how much fluid.
 The mixer is usually unscrewed without any problems with a regular key.
If the nuts go tightly, you can use a lever or armed with a gas key ("ass"), but should act neatly so as not to damage the pipeline.
Then you should unscrew the eccentrics.
There may be problems with them.
If the eccentric has a turnkey slot, then they should use them. Otherwise, pliers are used - one "lip" rushes directly into the hole until it stops. Then the tool turns. Sometimes you have to use an additional lever.
If the design is old, then the destruction of the eccentric - thread fragments remain in the pipe. Then you will have to use a drill or a perforator to gently drill or knock out the remnants without damaging the thread on the pipe.
Without completing this task, it will not be possible to start installing the mixer in the bath.
All pieces, dirt, rust must be carefully removed with your own hands, clean the pipe. If this is not done, then after installation, all this chopping will fall into a new mixer and can trigger his breakdown.
Installation sequence
Prepare all the materials and tools by removing the old device and shining the pipes, you can start installing the mixer in the bath.

Eccentrics are needed in order to provide the necessary distance between the pipes, as well as the horizontal location of the main unit. Screw them so that both conditions are performed at the same time, not so simple.
But there is a trick - the main unit is put on the eccentric, without tightening its nuts, the design is aligned. At the same time, it is no longer necessary to monitor the distance between the pipes.
 Screwing the nuts of the main unit, connecting the hussak and the shower hose, it is important not to drag.
If the fastener is weak, then it is not long to pull it a little, but if you overdo it and break the seals, you will have to go to the store again.
Check the device for leaks easier with napkins or toilet paper.
Initially, all the elements wipe dry, then a minute later, a dry cloth is carried out again in all potential places of leakage. The napkin should remain dry, then the installation of the mixer in the bath is successful.
A little leakage is allowed in the place of attachment of the eccentrics to the pipes - after scattering the packle it will stop.
Another problem that may occur - confused a crane with cold and hot water. Traditionally, the right valve is always done with cold. But if the pipe installers confused something, they will have to adapt.
Since the cranes in most faucets are equivalent, the only thing that will have to do is to change the blue and red indicators or the sticks of the valves.
Mounting work
If the installation of the mixer in the bath is performed for the first time, the task is somewhat simplified. No need to dismantle the old device, clean the pipes from rust.
 Instead, two minor troubles are added.
First, you have to unscrew the plugs, which for surely installed the masters, which collect the pipeline. This is done by the usual wrench.
Secondly, it is worth making sure that the pipes to which the mixer will be mounted in parallel.
If the ends "look" in different directions or on each other, then without additional adapters, the installation will not be possible.
If the pipes are summed up with their own hands, then two more conditions should be performed - the headings to which the mixer will be attached, should be well fixed, and the height of the mixer above the bathroom is provided by installing pipes at a distance of 60-80 cm from the floor.
Some is concerned about how much centimeters should be between the pipes. Most standard models are focused on a distance of 15 cm.
Rates
The price of the service depends not only on the query of the master, the complexity of the problem is also affected by the complexity of the task, including the type of mixer.
The mixer in the bathroom or in the kitchen is one of the most important functional elements of each house. But it is often happening with him every kind of trouble in the form of currents from a variety of places, even those of which she was not expected at all. At the same time it is possible to repair the mixer with your own hands. Let's figure it out in typical problems when repairing and replacing crane grams.
There are several types of damage to mixers that can be eliminated without replacing it. But it directly depends on its design and, materials from which it is manufactured. On sale there are both high-quality products made of thick metal alloys and fakes under well-known brands that fail much faster than expected. In this case, only replacing the mixer in the bathroom with your own hands will help. Moreover, it is there that he is most susceptible to breakdowns, because, as a rule, there is a long goose, which is very often disassembled, collapses or something else in this way. But, fortunately, the faucet consists of functional modules, when replacing which you can avoid buying a new unit. For example, .
Replacing the crane
To change the crane in the bathroom, professional plumbing skills are required. It is enough to have an idea how to keep an adjustable or horn key in your hands, and in which direction the crane should be surrounded. Naturally, before replacing, it must first buy it. But given the huge variety of both the design and form, it is desirable to take the old crane-tap with you and acquire the same. Today there are two of them on sale:
To change the crane, the following set of tools will be needed:
- screwdriver (flat or figured);
- shilo, thin screwdriver or other, but a durable subject;
- the key is adjustable or caped.
The first thing for the repair of the crane is necessary to overlap the water supply. Next, with a fine tool, a decorative plug on the barishment is neatly removed. It is done fairly easily and effortlessly. Then unscrewed the bolt and removes the lambs from the crane shank. At this stage, access has been opened to unscrew the trades. With the key, it is disintegrating from the mixer. Next, it is necessary to clean the thread from the old seal or sealant and wipe the dry cloth. Inspect the state of the edge of the socket where the new crane is installed. When assembling, all actions are made in the reverse order, but we should not forget about the seal, which is wound on the crane itself along the thread. Here it is not necessary much, because there is a factory gasket included. Each box can have a different core thickness, the shape of a shank and a thread step. All this must be taken into account and remember when buying a new one.
How to change the faucet if it is a ball type? With this type of device, a slightly different technology. First of all, it is necessary to remove the top handle. It can be attached differently: in front or top. To do this, you will need a hex key or screwdriver. Turning a locking screw with its help, the lever is easily removed up from the cartridge. Next, the special key will be required to turn the old locking mechanism and install a new one. Unfortunately, they are not subject to repair, and with a sufficiently cheap mixer, they are generally impossible to unscrew.
Change the mixer in the bathroom
Often it is impossible to solve the problem of the crane, and then you have to resort to larger work - replacing the entire node.

How to change the mixer in the bathroom? The answer to this question is quite simple. But in order to implement it, you should have some understanding of its device and work. It is also necessary to possess an opportunity, because devices from different manufacturers have their own characteristics in the design. In addition, when it is installed, caution with chrome-plated brass coating should be made maximally.
To replace the mixer in the bathroom, you will need the following approximate set of tools and details:
- Adjustable key or pair of keys 24 to 27. It depends on the design of the crane itself.
- New mixer.
Having all of the above in stock can be started. Here are the main stages:
- First of all, overlapping the flow of cold and hot water.
- Next, with the help of an adjustable or cape key, we unscrew the nuts fastening nuts to the pipes.
- We remove the decorative skirts that hide protruding fittings from the wall, they are attached to a special bar.
- At the next stage, it is necessary to carefully clean the remains of the old seal from the threaded connection and wind new. As it may be a tape FMU or sealant.
The tape must be wound along the thread so that when twisting it, it does not occur it. Also do not forget about the pads that come in the kit. If there is no, then you should purchase. Silicone is quite suitable for these purposes. When twisting the nuts in place, it is necessary to make it possible as much as possible in order not to damage the decorative coating. You can put a turnkey piece of fabric.

Plumbing repair in the kitchen
The kitchen is a frequently visited place in the house or in the apartment, therefore the mixer here is most susceptible to wear. Replacing the mixer in the kitchen with your own hands may be required for two reasons:
- premature wear;
- non-compliance with the new interior.
If the old mixer failed, then do not hurry to spend money on the purchase of a new one, because there is a chance to repair the faucet. Therefore, the question often arises: "How to change the crane in the kitchen?". But the answer to it is quite simple and is solved by the same method as in the case of the bathroom.

To change the crane in the kitchen, the same set of tools will need as in the case of the bathroom. Here, differences can only be in the design of the mixing unit and in the absence of a hose with a sprayer. As for practicality, it can be used here with rubber gaskets with screwdrivers and ceramic inserts. The main thing in order to enter water in the housing was a strainer. It largely prevents the insertion of all sorts of dirt and rust for locking inserts and cuffs.
Also no less often fails the hose on the mixer. Today they are produced in two types: 
- Rubber in a metal braid. Less durable and qualitatively due to the use of a thin rubber tube.
- Completed from thick high pressure tires. High quality and expensive.
To change the hose on the mixer, you need to have two horned keys with you, cuffs, if not included and sealant.
How to change the mixer in the kitchen, if the problem is not in the box? To solve the task, you will need all the same divorce and cape, sealant or sealing tape. Here, difficulties will be the fact that the mixer is attached to the sink itself. Therefore, to unscrew it will have to climb it. It is mainly fastened with a stud and clamping semiring. By revealing the screw and removing the ring, the mixer can be raised up. But the water supply hoses still fastened to it. In many models of mixers, they can be unscrewed using a 10-11 mm horked key.
When installing a new mixer, you should use new underwater hoses, because they are mainly disposable and after long-term operation are hardening and crackled.
To replace the mixer in the kitchen, a sealing tape or sealant will also be required, even in the kit and cuffs are provided. But here the main thing is not to overdo it, because the sealant is additional insulation, and not the main one. Read the important items that are used to connect the water supply.
Video about how to independently repair the crane
The kitchen faucet refers to the most intensely used plumbing equipment. Anyone, even the highest quality similar device, over time requires a certain service - replacing the leaking cartridge or loosely closing bucks. However, it also happens that the housing itself comes into disrepair - the irreversible processes of the surface erosion begin with the constant exposure of the water, the thread in the jacks for the valves or the cartridge begins, the chrome coating is erased. And if the product is from a poorly quality silumin, it is quite possible to complete the case of the body with the appearance of cracks and the pumping of fragments.
Maybe not such a fatal situation - just the owners decided to update the kitchen interior, and without installing new modern plumbing in this matter, too, do not do. It was told in a special article of our portal. Now it will be about how to change the mixer in the kitchen independently, without resorting to the call of a specialist.
This process , although and very responsible, but still quite affordable for the usual owner of the apartment.
What will be required for work
To work on replacing the mixer, you need to immediately prepare the necessary components, accessories, tools, consumables.
- We proceed from the fact that the mixer is already purchased. However, it is necessary to check whether the length of flexible hoses that are included are sufficient. As a rule, those that go in the set are only 300 mm, which can be clearly not enough. In addition, if the mixer is not "branded", then the quality of these sleeves in a metal braid usually leaves much to be desired, and they should be replaced immediately.
When choosing and acquiring such hoses, you must pay attention to the fact that the length of their fitting (otherwise it is often called a needle) should be different - this will facilitate the assembly, since the hexagons turn a turnkey will not interfere with each other.
In addition, it is necessary to correctly select the type of threaded connection with a plumbing pipe. This also applies to the diameter and the type of threaded part ("dad" or "mother"). Most often, of course, the "Mom" hoses are used with a ½ inches nut - for direct connection in the appropriate pipe. Nevertheless, options are possible, for example, if the collector's comb is installed or a ball valve with the output "Mom".
Hoses should not be located in tension, in tension, but should not be purchased with a very large length of length. When pressure drops (opening and closing the crane), they will twitch, vibrate, and this causes a rapid wear of the rubber tube placed under the steel braid. She begins to scatter and may in the near future give to flow.
Schematically - the device of the flexible hose in the braidMore durable and reliable in this respect - corrugated stainless hoses.
Of course, they are more expensive, and they are somewhat more complicated to mount them. But in such hoses, excellent stiffness - they will keep the bending attached when installed.
Some masters prefer to do flexible hoses, making the water supply to the mixer made of metal-plastic pipe. To do this, you need to purchase a set of pieces of ultrasters with fittings under the metal plastic.
Such a lining, of course, is also more difficult to perform than with flexible sleeves, but once mounted such pipes, it will be possible to continue for this plot.
Video: How to pick up really high-quality hoses
- Of the tools for work, you will need:
- Spanners. The key to 10 and 22 × 24 will be guaranteed. Very often the fastening nuts on the studs require a key to 11. If the mixer is attached to the washing of a large diameter nut, then it is better to prepare an adjustable key.
- Screwdrivers with direct and curly tip.
- Pliers.
- In some cases, do not do without a gas key.
- If the installation will be made on a new sink, on which there is still no hole, or on the tabletop, the electric drill is required with the corresponding crowns (usually with a diameter of 35 mm).
- To work in conditions with insufficient illumination, under the sink, the illumination will most likely need a flashlight.
- Materials may require:
- Sealers for threaded connections. They will be needed when there is a need for mounting on the clutch, adapter, adapter, searches for metal-plastic, and the like. You should not trust the fum-tape - it is better to use conventional linen palaces and sealing paste (type "Unipak") - such a connection will be guaranteed from leakage.
- If the installation of the mixer is carried out with temporary dismantling of the washing, then it is necessary to prepare a silicone sealant and, of course, the syringe for the convenience of applying it.
- There may be situations where the old "accurate" threaded connections will not be disassembered. Can help in this case pulbelizer The balloon of the universal lubrication composition "WD-40".
After everything is prepared, you can proceed to further actions.
Prices for popular models of mixers
Mixers
Dismantling of the old mixer and preparatory work
- Before proceeding to work directly under the kitchen sink, it is necessary first of all, turn off the feed and cold, and hot water. For this, the valves are overlapped at the entrance to the apartment, or if it is provided for by the internal layout system - overlapping water supply from the collector to the kitchen. Sometimes cranes are installed directly under the sink. Of course, theoretically you can only cover them. However, practice shows that when carrying out work in a close space, it is not eliminated by the likelihood of a random opening of a ball crane with an awkward movement of a hand or elbow. To prevent such misunderstandings, it is better to overlap the water supply to the kitchen completely.
- After the valves are blocked, the valve should be opened on the mixer - it normalizes the pressure in the pipe. For a plot of connecting old hoses, it is necessary to substitute a basin or other capacity of suitable dimensions. The hoses are twisted, it is possible to exit water remaining in pipes.
- Now you need to remove the old one. This is not such a simple, as it may seem at first glance.
- First, working in an uncomfortable posture, in a very cramped space, lying on the back - it is very difficult, especially if the washing is embedded in the kitchen cabinet.
- Secondly, the "classic" layout of the mixer is between the wall and the washing bowl. In such a narrow niche, I do a wrench very difficult - there is simply no place for its imposition and turn.
- Thirdly, almost certainly all the connections from time and dampness crowned, "baked" and so simply will not fall.
In numerous Internet articles on the replacement of the mixer, this stage, sometimes, is described by casual, such as the "Unscrew the pin with a screwdriver and pull the mixer." Experienced masters know the price of such allegations - with a very large share of probability, these most studs do not agree with a screwdriver, rather - the rusted slot will cut down. So, it will take the key, but about the "convenience" of working with it under these conditions already mentioned.
Which exit? If it is possible to remove the sink (and this feature is in the vast majority), it means that it is not necessary to fluctuate - and dismantling, and the subsequent installation of the mixer will be performed and faster and much better. It is better to spend a very minor amount for the purchase of sealant and hold enough simple actions to remove the washing and its subsequent installation in place - in the end you will still be in winning.
- To dismantle the sink, of course, it will be necessary to disconnect it from sewage. You can remove a flexible corrugated hose from the sewer pipe, or, which is probably more convenient for further work, simply unscrew the locking ring on the siphon and remove this "glass" from the drain nozzle of the sink.
- Now, conveniently sitting on, it will be easy to remove the spent naught Mixer. On the dependence on its design or a large lock nut, or studs are twisted. It may take to sprinkle these "WD-40" nodes so that they succumb to. There are situations when it does not help - then there will have to use radical measures - cut off with a hacksaw or grinding. The main thing about this is not to damage the sink.
To cutting with grinding, sometimes you have to resort when replacing the old-type mixer installed on the rigid supply of steel pipes.
Disassemble the rusted Signs or a multi-layer paint-covered - extremely hard. Therefore, it is more profitable to simply cut out of the above threaded part. Further - by circumstances. If you manage to free the high-quality threaded nozzle for further addition of the flexible hose - then the question is simplified. If not, then, apparently, you will also have to cut the thread with Lerka.
- In order not to postpone on the case, it is necessary to immediately conduct a revision of the state suitable in the washing of water pipes, in particular, those threaded sites on which flexible hoses are planned to be screwed. In order that the laying of the hose felt tightly to the trough of the pipe, it should be even over the entire circumference, not to have sharp or protruding edges, geometry disorders due to corrosion exposure. If there are doubts - it is better to "pack" in this place a threaded factory extension driver - this will guarantee the reliability of the compound with the hose.
Installation is carried out on the pass, the fibers of which are turned on the thread on the pipe clockwise, and then wake up the sealing paste. The extension is spinning with a horkin or gas key until it stops.
- If you wish and the availability of funds, you can immediately install locking valves if they have not previously stood. This will subsequently carry out any repair work in the kitchen, for example, when an emergency occurs, without turning off the overall water supply network.
- In the event that it is planned to carry out water supply with metal-plastic pipes, it is the meaning of CP AZU "Package" on the steel pipes transition fittings.
- If it is assumed to install a new mixer on the old sink, then it is necessary to carefully clean the area around the mounting hole from the scale of scale, which accumulated dirt, traces of rust, and the like. Such cleaning is carried out with facial and bottom.
- In the case when it is planned to install a new sink, it is necessary, of course, to immediately try to purchase such that already has the installation hole. However, some models are not equipped with them, and have to take appropriate measures.
If the washing is made of stainless steel, then for this use a special tool that cuts perfectly smooth holes in metal with a thickness of up to 1 mm.
The diameter is selected, based on the model of the mixer. So, if it is attached to the hairpins, it will be enough 28 or 32 mm. When mounting on the nut, the hole is necessary with a diameter of 35 mm.
The cutting process is lowIt is easy for them - a hole with a diameter of 8 mm is drilled in the intended place. The device is inserted into the cutting part of the bottom, twisted with a bolt so that the cutting edges firmly lay down to the metal. Then, turning the bolt with a wrench, ensure the rotation of the knives around the circle.
It is more difficult if the washing is ceramic. For cutting hole in this case, a diamond crown will need. But even its presence in the home arsenal does not guarantee success - such a wash can easily be damaged if there is no experience of such work.
The Council is, and in another case it is better to turn to professionals. Usually in good stores for the sale of plumbing will be prompted, where and how it can be done, and in some cases such a service may also be provided.
If the mixer will be installed on the worktop, the hole will be drilled in it. To do this, you can use an electric door with a crown - an annular saw Ø 28 or 32 mm. Doing the desired hole with such a tool in the panel of the wood composite of special labor will not be.
Installation of a new mixer
As repeatedly in the article mentioned, the models of the mixers may differ in the fastening to the surface of the washing or countertops.
- The diagram presents a mixer that is attached to threaded studs. In the set of oh, the studs are included with the brass nuts themselves, the clamping bracket in the shape of a crescent with holes for the studs and a rubber or polymer gasket of the same configuration.
There are models of mixers, in which only one stud is used, but this design will not differ particularly stable (there is no shock around the axis), and it is better to acquire with two.
This design provides a reliable installation on surfaces with a thickness of up to 30 ÷ 35 mm, which is particularly important when mounting the mixer on the worktop.
- Another option is the mixer at the bottom of the cylindrical threaded part and the nut, usually m 34.
Such models are more suitable for installation on a metal washing. It is important that the bottom in the hole area is not a complex embossed configuration - an absolutely flat section is necessary, otherwise dense adjacent and reliable fixation will not be achieved.
Installation of different types of mixers has its own characteristics.
A. Installing the mixer with fastening on naika
The elongated lower cylindrical part will not prevent twisting the flexible hoses, so the installation begins, actually, from the mounting of the mixer itself to the washing.
- The CM ESTER kit necessarily includes a sealing rubber ring, and a special groove is provided on the lower end of the housing. The first step is to install the gasket into this groove.
- The threaded cylindrical part is inserted into the hole of the washing. In this case, it is necessary to ensure that the rubber ring remains in place, not shifted.
- Then, a wide rubber gasket is installed below, which should also be included in the delivery.
- Screw a brass fixing nut. It has a peculiar "skirt" - an extension in the form of a washer that will ensure maximum clamp through the installed already rubber gasket.
- The nut is delayed in such a way as to ensure the mixture of the mixer on the sink. At the same time, it is necessary to control the correct orientation of the spinning - it must be located so that the sector of turning to the left and right from the central position is equal, and the inclusion lever or valves stood smoothly relative to the washing. At the angular location of the mixer, the position of the via is diagonally is selected.
- Adjust the position is easy - you can loosen the nut, align the mixer and re-fix.
- Now you can go to the installation of hoses. To begin with, the hose with a short fitting is screwed and tightened by a key to 10.
No winding of the threaded part of the packs of palaulies or fUM tape, as a rule, It is not required - it costs one or two sealing rings to ensure reliable sealing. The fitting is screwed up until it stops with an average effort - to drag dangerously, as the rubber ring may be damaged. Usually there is enough effort of the hand, and only then no more than one turn of the key.
... and then, just like the elongated- The next step is similar to the second hose - with an elongated fitting.
- If water is planned for a metal-plastic pipe, then the fitting with fittings is screwed into such a sequence - the one that has a bend, and then direct.
- After the hoses (fitting) are screwed, the sink can be installed in place.
Find out how to choose from our new article.
B. Installation of the mixer with fastening on studes
The feature of the installation in this case is that the hoses are screwed to install the mixer into the opening of the table top or sink, otherwise it will not be possible to tighten from high quality.
- Initially, brass nuts are removed from the studs, and the studs themselves are screwed into the corresponding holes on the lower end of the mixer. On the heels, slots are usually provided for a direct or curly screwdriver, but, as a rule, they are easily twisted manually, without much effort. The tightening is strong here is not needed - it is enough just to wrap them up to the depth of 8 ÷ 10 mm so that they stood stably, without a backlash.
You can immediately try on the stud figure gasket and pressure plate on the studs, but then these items should be removed - they will be installed later.
- Both hoses are in the hole of the washing (table top) fittings up.
- It is necessarily controlled by the presence and correctness of the installation of the sealing ring on the mixer housing - the same as described above.
- The next step is to screw the flexible hose fittings. The sequence of work does not change - first short, then elongated.
- Mixer S. connected Hoses and screwed studs are inserted into the installation hole of the washing or table top.
- On the bottom of the studs first, the curly gasket is dressed, and then the metal presser plate. Naked and manually, as far as possible, brass nuts are twisted.
- After checking the correct location of the sealing rings on the housing and the direction of the gland, the nuts are tightened with the key to 10 (sometimes to 11) until it stops, so that the mixer is reliable fixation on the surface, without the slightest backlash.
- It is important to control so that there are no cracks left around the hull, not closed gasket - This sometimes happens with too much hole in the washing and improper centering of the mixer in it.
Everything, the mixer is installed, you can install the sink into place.
Repeat that all listed actions, of course, can be made under certain conditions and proper agility and without dismantling washing, but this is extra difficulty.
Find out what to choose, as well as consider the nuances, from our new article.
Video - installation of the mixer in the kitchen
Prices for components for mixers
Accessories for mixers
Connecting the mixer to the water supply
Making a washing is a separate topic that requires a detailed consideration in the article specifically reserved for it. It can only be noted that if it is mortise and mounted on an old place, then on the cleansed surface of the table top on the perimeter of the installation you need to strike the sealant. After pressing, he must reliably overlap the slot so as not to allow water to penetrate it.
If the car wash is overlaid and adjoins the wall, then after it is installed, the sealant also closes the gap between them.
Now it remains only to connect hoses to tap pipes. Hose nuts are usually already equipped with rubber gaskets, and no winding or excessive effort is required for reliable sealing of the compound. On the contrary, too strong tightening can lead to the destruction of the gasket and the appearance of leaks. It is enough to be tightened with your hand until you stop, and then only on ½ turns tighten 22 or 24 key.
With metal-plastic eyeliner, of course, it will be somewasher - It is necessary to thoroughly measure the desired segment, set it the necessary bending, and then tighten into the corresponding compression fittings.
Video: Connecting the mixer on the rigid liner
Usually, when connected by hoses or reducing pipes, the schemes adhere to: on the left - hot water, on the right - cold.
If the washer was shot, then do not forget to connect it back to sewage, setting the siphon and inserting the corrugated hose with a sealing cuff into the intended sealing pipe.
In fact, everything, you can turn on the water supply and try the mixer in operation. There is, however, another subtlety - it is recommended to start shed water with a tip-shot - aerator. The fact is that in the pipes, hoses, or even in the mixer can be accumulated small inclusions, which are able to quickly score the holes of this nozzle. After several liters of water alone, the aerator is easy to install on a regular place.
At the first start, all connections are checked for leaking. If there are signs of leakage, it is necessary to immediately eliminate these shortcomings with a small suspender.
The article covered the most common Methods for installing kitchen mixers. However, you can encounter with more complex options.
- For example, if the mixer is picked up a shower head on a retractable hose, you will have to spend another switching and adjustment.
The bottom will be located (on the scheme - pos.1) in the corrugated braid or without it, a length of about 1.5 m, with a fitting at the end. This fitting, after installing the mixer to the regular place, is screwed into the housing intended for it. On the flexible hose itself, Georgic is installed (pos.2) - it will return to the place and hold it in this position, and at the same time will serve as a limiter length of the hose pulling. The position of this ship can be changed using a locking screw.
- Another option is when two channels are provided in the mixer in the extension - for conventional tap and for purified drinking water. On such models there is an additional fitting (pos. 3) to connect another hose, which is from the system installed under the sink and purification.
The inclusion of the mixer for a set of drinking water is carried out by a separate crane or lever (pos. 4).
There are also more "sophisticated" schemes - with the thermostats that are dismissed under the sink, autonomous boilers, electronic control units, with a mechanical burden associated with the plug hole of the sink bowl, and others. Installation technology in this case should be detailed in the proposed product passport. However, if there were ambiguities in this matter, you should not do ammunition - it is better to invite a specialist.