Mill manual round how to make. Manufacturing a homely manual mill with an electric motor. Homemade mill with their own hands. Making a box for download
Many hostesses believe that it is possible to prepare high-quality food from natural ingredients. Today, even independent grinding of flour is in fashion. For this there are household mills for grain. The unit can be bought or done and do it yourself.
The grain mill will allow to get a product from raw materials, the quality of which is guaranteed by your own choice. The ordinary apparatus grinds wheat, oats, corn, barley and other grain crops. At the output, at the request of the owner, the flour of any type of grinding, flakes, cereals of different fractions, feed, is obtained. The household mill is small and calmly placed on the desktop. In this case, its performance allows you to cover the needs of the household. The simplest model with a low-power electric drive handles the half-wheel of wheat per minute.
The grain mill operates on the basis of a rotary mechanism. It consists of:
- rotor;
- stator;
- electric motor.
The principle of action of such a mill is simple. The grain enters the mechanism through the receiving glass. Inside it is shared by the rotor and stator. Through the output nozzle in the prepared container, ready flour or another product is poured.
Homemade grain mills are two types:
- Mechanical. The grinding is carried out by rotating the handle with the hands or simple electrical drive. Possess low performance. But the assembly of the mill is very simple and low-cost. You will feel a pleasant process of converting grains into flour. It is grounded in a handmade coffee bean coffee grinder.
- Electric. Focused on the processing of increased grain volumes. These mills are an excellent option for regular use of the house. Models with a powerful engine can argue even mushrooms or dried fruits.
Attention! So that the "filling" of the mill worked reliably, it is placed in the body of solid wood types of pine, linden or beech. The tree will give the fragrance of flour pleasant notes.
Preparation for the assembly of a simple mechanism
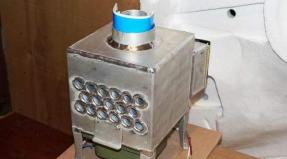
The proposed household model model is the author. She was developed by Udmurt masters. The length of the housing does not exceed 32 cm. Height and width - even less. Mass of the crusher in the assembly - 15 kg. The engine mill is needed with a low power, up to 180 W. The motor is suitable from the old washing machine or such a household unit. Basic performance - 1 bucket of corn or 2 Wheat buckets for 10 minutes. The author's assembly scheme of this mill is presented in the photo. In addition to the electric motor, you will need:
- 12 screws and as many spring washers for fixation;
- steam steel corners with dimensions of 45x45 mm (for engine support);
- steel sheet with a thickness of about 8 mm (for bed);
- and one more, with a thickness of about 3 mm, as well as fastenings - 4 bolts;
- studs with nuts;
- the box of small iron for the roof (receiving glass) and 2 screws for it;
- rotor;
- stator;
- protective cover for bearings;
- coupling;
- metal pipe;
- remote ring 0.5 mm;
- pair of bearings №203 plus 3 bolts;
- steel handle brackets 0.2 cm thick;
- wooden knob.
Attention! In this mill scheme, a basic type bolts are used everywhere - M6.
Crusher assembly: rotor manufacture
For the manufacture of the rotor, together with the shaft, the stator and the lids for the bearing compartment, you will need the ability to own a drilling and lathe. Before working on the mill, it is important to know the subtleties of the process:
- The shaft is pulled out from steel rounder or patch M45.
- The basic rotor variation is 105 mm, followed by turning to 104.5 mm.
Ready item should be handled:
- heat the furnace to 800 ° C;
- cool in the oil container;
- warm up to 400 ° C;
- put cool at room temperature.
Attention! It is impossible to conduct hardening with water, it will negatively affect the strength of the mill.
Check the quality of the procedure can be filed. He should not leave footprints on the cutting edge of the teeth.
In the proposed scheme, the rotor rotates on a pair of radial bearings. A remote ring is attached between them on the shaft. It will allow the bearings to shift and adjust to the voltage inside the device. The mechanism will become more reliable and last longer.
Stator and other elements
Alone to make the stator is even more difficult. During the turning on the machine, leave the minimum allowance in the workpiece:
- make opening in the center - 70 mm;
- follow the workpiece at the calculation of the diameter of 10.5 cm, mark the places of future openings, contours
- holes from below and on top;
- drill the deaf removing with a depth of 2.6 cm;
- liquid on the wall of the allowance and cut the place for the rotor (10.5 cm);
- from the reverse side, turn out the landing groove for bearings;
- think over and prepare a ring for the seal.
Council. The stator also need to harden.
Work on machines is the most difficult stage of the assembly of the mill. Therefore, you can trust his professionals, ordering the details from them. The location of the stator is manually adjusted with the help of bolts. The quality of the grinding depends on the accuracy. The milling mills, except the motor, includes a capacitor (3.8 km), fuse and switch. All contacts should be closed from direct access.
After a successful trial launch, it will only be used to make a bed, fasten the device, attach to it to the reception and exit of raw materials. The simplest mill for grain is ready.
Have you tried to independently make such a mill?
Mill-homemade: video
Hand mills for grinding the grains of the house are modern household structures, allowing no special effort to get flour from different types of croup.
When developing such a device as a grain mill, professional engineers apply the latest technologies, thanks to which work in the kitchen becomes pleasant and easy. These are relatively new aggregates, but they managed to gain wide popularity in the kitchen appliance market.
There are also industrial but they are used on large milk enterprises and in farms. The prices for them are high enough.

The stores present a wide range of such devices as a grain mill. But it's not so difficult to make such a device, but it will take a fair share of skill and the ability to work with turning and boring devices. The homemade grain mill will allow to get flour of different grinding depending on the specified setting. At the same time, you will spend the minimum of money.
This article will tell about how to make a mill for grain with your own hands.
Mill "Baby"
The most common model is the mill for grains "Baby". It was invented in Udmurtia with two engineers. Through this device, it is possible to achieve not only the grinding of the grain to the desired size, but also the manufacture of feed and producing flour from corn, buckwheat and other cereals. Such an electric mill for grain will be simply indispensable in the family that lives in his own home and contains pets.

The size of this machine is small, but the level of performance is able to surprise any user. In five minutes you can process the full bucket of corn, and the wheat bucket is easy to grind in just three minutes.
Technical parameters of fixtures:
- the size of the housing, not including the bunker and the nozzle, is 320 x 160 x 170 mm;
- the device is capable of producing two types: small and large;
- low engine power index - 180 W;
- a high level of performance at low power cost;
- the presence of a reversing rotary engine;
- the weight of the device is 15 kg.
The main task that increases the efficiency and strength of such an aggregate as a grain mill is a rotor assembly and stator.
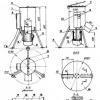
Device scheme
Many are interested in how to make a mill for grain with their own hands?

Before you start collecting a device, experts advise to stock all the necessary details:
- electric motor (you can use since the required power is small);
- engine mounting sites (12 m6 bolts are required with washers equipped with springs);
- (two corners of steel 45 x 45 mm);
- the base of the device (bed) from sheet steel, the thickness of which is 6-8 mm;
- studs with nuts, providing tightening;
- receiving box based on roofing metal;
- rotor;
- bearing node cover;
- stator;
- nozzle;
- sheet iron cover with a thickness of 3 mm;
- four screws M6, fastening cover;
- remote ring;
- fastening the receiving box;
- two bearing number 203;
- three screws connecting the lids of the bearing assembly;
- m6 screws equipped with nuts (for installation);
- box for download;
- the axis (the pylon M6 and two nuts);
- tree handle;
- fastening places.
Rotor manufacturing process
The hand mill for grain with their own hands has a unified scheme, so the assembly can be found to the discharge of the lungs. If it seems the impossible workpiece of parts manually, you can order them in a turning workshop. You need a stator, rotor, as well as the cover of the bearing assembly.

If you decide to resort to the manufacture of the rotor on your own, then a number of important technical nuances should be taken into account:
- The item must be equipped with a variable cross section. It is made of forging M 45 9 cm long and diameter 12 cm or steel round.
- The whole process should flow in stages: the preparation of parts made of metal (in a circle with a diameter of 105 mm at the same distance, holes with a radius of 5 cm) are drilled.
- Remove the outer layer of the circle should be so that the size of the groove decreased to the indicator of 104.5 mm. Workers teeth must be in an open state. After that, the rotor is triggered.
Rotor processing
Hardening the rotor must be carried out in a specific sequence: the temperature in the furnace is brought to 800 ºС, after which the part is lowered into the oil container. Cooling the metal with water in this case is extremely not recommended, as cracks may appear. Then leave: the rotor is subjected to secondary heating, but already up to a temperature of 400 ºС. We must give it to cool at room temperature. As a result, you will get a very durable and firm detail, which will serve not one dozen years. To check the level of quality of work performed, a file should be carried out on the cutting side of the teeth. If a slide is noted and there is no trace, it means that everything is done correctly.
In such a device, like a homemade grain mill, the rotor will spin with two radial bearings. This increases the stiffness of the node and the strength of the device. Between the bearings in the shaft, the remote ring is 0.5 mm. It serves to displace bearings and creating the tension required to adapt the node to the voltage in the mechanism.

Making stator
The manufacture of the stator is a bit harder, since in this case you will need accuracy. The work is made in stages. First of all, turning the workpiece on the lathe, and then leave a small technological allowance. For this purpose, driven up to 70 mm in the center. A circle markup is made on the workpiece with a diameter of 105 mm, the central points of future openings are applied. Subsequently, they will become a working plane for the stator. Marking is applied strictly according to the drawing.
The contours of the holes are denoted from above and below, and then dried out the deaf "windows" with a depth of about 26 mm. The machine is removed on the machine, left earlier, and the place for the working chamber is resetting (105 mm). The resulting workpiece turns over and the planting excavation is made to insert the bearings. You will also need the manufacture of grooves for sealing parts. The mill can function without this component.
When the stator is ready, you can proceed to creating threaded holes for bearings, stator, nozzle and boxing box. The stator, like the rotor, is subjected to thermal processing by similar technology.
Providing a clear operation of the unit, the coordinates of the stator should correctly set. In this case, bolts are used. The rotor when operating should move slowly and easily, without jerks and stops. Only after checking the functionality of all parts, you can proceed to the trial launch of the device. To this end, the mill (flour joint) is fixed on a stool or the same table so that it does not fall when vibration.
Stanna production
The bed is an important detail. It is used as a stove for the base. To create it, a sheet of steel with a thickness of 6-8 mm is applied. The stator is attached to the bed through screws M6. Screws will hold the nozzle that can be removable. The nozzle is installed in the opening of the base corresponding to the diameter of the part. In the mechanism, it is held only by friction.
Manufacture of pipe
To make the nozzle, you should take a section of a pipe with a thin wall. The diameter of it should be equal to 28 mm. Applicable product with the presence of a round or same square section. Depending on this indicator, the opening of the desired shape and diameter is made in the frame.
Making a box for download
If you made all the above items, the production of the boot box is not so difficult. Its mastered from the roofing metal sheet, bending according to the desired form and soldering the seams. The usual sheet iron also applies, but the roof has greater strength.
When the item is ready, it should be installed on the stator and fix it with two M6 bolts.
Consider important moments
Before you start collecting a manual mill for grinding grain, the following fact is taken into account: if the rotor can be cleaned only in one direction, then the first half of the working chamber of the stator will be in operation, and when the rotor rotates, the second will be connected in the opposite direction. The parties differ in the number of protrusions and their dimensions. This allows you to get flour of different grinding (large or small). Only the direction of the rotor should be changed.
Installing an aggregate
To bring all parts to the operating condition, a certain current is required. Before starting to drink all the details of the devices, prepare the necessary electrical equipment. For such a unified design, expensive elements are not needed.

You will need an electric motor, a capacitor with a capacity of 3.8 μF, a fuse and a toggle switch. The engine is installed on a plate of dielectric, the remaining components are attached there. So that the rotor turns around in the opposite direction, resort to switching capacitor.
Shafts for crushing and engine are located along the axis. A rigid coupling is used to transmit rotation. In the corners for the attachment, holes are drilled, which direct the part to regulate the position. Holes are made in the bed. They are needed to move.
In the receiving box, the cereals are loaded, the cutter for flour is installed under the outlet, and the first grinding process is performed at home.
The article covers the question of how to make a mill for grain with your own hands. The manufacture of such a practical apparatus is not particularly difficult. Manual car will cost you much cheaper than buying a factory device.
Many hostesses believe that it is possible to prepare high-quality food from natural ingredients. Today, even independent grinding of flour is in fashion. For this there are household mills for grain. The unit can be bought or done and do it yourself.
The grain mill will allow to get a product from raw materials, the quality of which is guaranteed by your own choice. The ordinary apparatus grinds wheat, oats, barley and other grain crops. At the output, at the request of the owner, the flour of any type of grinding, flakes, cereals of different fractions, feed, is obtained. The household mill is small and calmly placed on the desktop. In this case, its performance allows you to cover the needs of the household. The simplest model with a low-power electric drive handles the half-wheel of wheat per minute.
The grain mill operates on the basis of a rotary mechanism. It consists of:
- rotor;
- stator;
- electric motor.
The principle of action of such a mill is simple. The grain enters the mechanism through the receiving glass. Inside it is shared by the rotor and stator. Through the output nozzle in the prepared container, ready flour or another product is poured.
Homemade grain mills are two types:
- Mechanical. The grinding is carried out by rotating the handle with the hands or simple electrical drive. Possess low performance. But the assembly of the mill is very simple and low-cost. You will feel a pleasant process of converting grains into flour. It is grounded in a handmade coffee bean coffee grinder.
- Electric. Focused on the processing of increased grain volumes. These mills are an excellent option for regular use of the house. Models with a powerful engine can argue even mushrooms or dried fruits.
Attention! So that the "filling" of the mill worked reliably, it is placed in the body of solid wood types of pine, linden or beech. The tree will give the fragrance of flour pleasant notes.
Preparation for the assembly of a simple mechanism
The proposed household model model is the author. She was developed by Udmurt masters. The length of the housing does not exceed 32 cm. Height and width - even less. Mass of the crusher in the assembly - 15 kg. The engine mill is needed with a low power, up to 180 W. The motor is suitable from the old washing machine or such a household unit. Basic performance - 1 bucket of corn or 2 Wheat buckets for 10 minutes. The author's assembly scheme of this mill is presented in the photo. In addition to the electric motor, you will need:
- 12 screws and as many spring washers for fixation;
- steam steel corners with dimensions of 45x45 mm (for engine support);
- steel sheet with a thickness of about 8 mm (for bed);
- and one more, with a thickness of about 3 mm, as well as fastenings - 4 bolts;
- studs with nuts;
- the box of small iron for the roof (receiving glass) and 2 screws for it;
- rotor;
- stator;
- protective cover for bearings;
- coupling;
- metal pipe;
- remote ring 0.5 mm;
- pair of bearings №203 plus 3 bolts;
- steel handle brackets 0.2 cm thick;
- wooden knob.
Attention! In this mill scheme, a basic type bolts are used everywhere - M6.
Crusher assembly: rotor manufacture
For the manufacture of the rotor, together with the shaft, the stator and the lids for the bearing compartment, you will need the ability to own a drilling and lathe. Before working on the mill, it is important to know the subtleties of the process:
- The shaft is pulled out from steel rounder or patch M45.
- The basic rotor variation is 105 mm, followed by turning to 104.5 mm.
Ready item should be handled:
- heat the furnace to 800 ° C;
- cool in the oil container;
- warm up to 400 ° C;
- put cool at room temperature.
Attention! It is impossible to conduct hardening with water, it will negatively affect the strength of the mill.
Check the quality of the procedure can be filed. He should not leave footprints on the cutting edge of the teeth.
In the proposed scheme, the rotor rotates on a pair of radial bearings. A remote ring is attached between them on the shaft. It will allow the bearings to shift and adjust to the voltage inside the device. The mechanism will become more reliable and last longer.
Stator and other elements
Alone to make the stator is even more difficult. During the turning on the machine, leave the minimum allowance in the workpiece:
- make opening in the center - 70 mm;
- follow the workpiece at the calculation of the diameter of 10.5 cm, mark the places of future openings, contours
- holes from below and on top;
- drill the deaf removing with a depth of 2.6 cm;
- liquid on the wall of the allowance and cut the place for the rotor (10.5 cm);
- from the reverse side, turn out the landing groove for bearings;
- think over and prepare a ring for the seal.
Council. The stator also need to harden.
Work on machines is the most difficult stage of the assembly of the mill. Therefore, you can trust his professionals, ordering the details from them. The location of the stator is manually adjusted with the help of bolts. The quality of the grinding depends on the accuracy. The milling mills, except the motor, includes a capacitor (3.8 km), fuse and switch. All contacts should be closed from direct access.
After a successful trial launch, it will only be used to make a bed, fasten the device, attach to it to the reception and exit of raw materials. The simplest mill for grain is ready.
Have you tried to independently make such a mill?
Mill-homemade: video
Household mini-mill for grain - necessary device for flour. The manufacture of the mill will require the skills in working with drilling and turning devices. With this device, you can get a flour of large or fine grinding and use it for homemade baking. Check out the detailed instructions, how to make a mill with your own hands and try to apply knowledge in practice.
Characteristics of homemade mini mill for grain
This adaptation was created in Udmurtia O. Zaitsev and A. Yovykin and got the name "Baby". With the help of this mill, made with your own hands, you can grind grain, make feed for cattle and birds in our subsidiary farm, grind flour from, oats, wheat and other grain. The homemade mill has a small size, but it has a high productivity: in just 5-6 minutes you can grind the corn bucket, and wheat and oats - 2 times faster.
The technical characteristics of the homemade grain mill made by their own hands are as follows:
- dimensions (without a nozzle and bunker) - 320 x 160 x 170 mm;
- the power of the electric motor is 180 W;
- performance: on corn - 0.2 buckets per minute, on wheat, oats and other cultures - 0.5 bucket per minute;
- the number of possible grinding varieties - 2;
- the chopper is homemade, rotorism and reversible;
- mill mass assembly - 15 kg.
This homemade mill-grain mill has sufficient reliability: as practice has shown, in two years of active exploitation, the mechanism never made a failure.
How to make a mini mill rotor
The design of the homemade mill for grain is quite simple, so anyone who has a desire can collect a similar device independently. However, before making a mill with their own hands, you need to get certain skills, namely, the master ownership of drilling and turning devices.
But if there are no such skills, then you can order the required details in the workshop. Only three main details will have to be ordered from the masters: the rotor, the stator and the cover of the bearing assembly. You can assemble the entire design of the already manufactured parts in your domestic workshop.
If there is an opportunity for all parts for a homemade mill for flour on their own, then a number of technological recommendations should be taken into account. In the manufacture of the steel rotor, it is necessary to pull it together with the shaft of the alternating section. It is made from steel rounding or forgings (grade 45, with a diameter of 120 mm and a length of 90 mm). Work should be carried out in three stages. First, a pre-treatment is needed, a hole with a diameter of 10 mm is drilled in the workpiece, which should be uniformly placed around the circle (with a diameter of 105 mm). When the upper layer is removed (the duct until the diameter is 104.5 mm), the working protrusions are open. Then the finished rotor must be improved, i.e. quenching and vacation.
The technology of this process is as follows: The part must be heated to a temperature of 800-820 ° C (to light red color), then lower it into the oil bath (it is not recommended to use water, otherwise the part will be excessively fragile and cracked), then vacation For which you need to heat the rotor to 380-400 ° C, and then cool the air. As a result, the hardness of the treated surface increases significantly - up to 350-400 brinell units. You can check the quality of hardening the product using a file by spending them on the cutting edge of the rotor tooth. With high quality hardening, the file will easily slide on the product, not leaving the trace.
The rotor of this design rotates two radial ball bearings. This allows you to significantly increase the support of the node, as well as the reliability of the entire mill as a whole.
A remote ring with a thickness of 0.5 mm should be installed on the shaft between the bearings. This device gives bearings the ability to shift to the calculated value, creating a small tension that allows you to adapt the node to the internal stresses available in rotor-stator mechanisms.
How to make a stator homemade mill with your own hands
The most difficult is the manufacture of a stator, so the maximum accuracy and accuracy of the work performed here. The entire process of manufacturing the part also takes place in three stages. First you need to handle the workpiece on the lathe. At the same time, a technological allowance should be left on the part of the working chamber. To do this, it is necessary to drill the central hole to a diameter of 70 mm, then a circle with a diameter of 105 mm should be placed on the billet, apply the centers of future holes, which further form the working surface of the stator. These markups are applied in accordance with the drawing. Next, the contours of the upper and lower "windows" are placed, and after that, in accordance with the drawing and markup, the deaf holes to a depth of 28 mm are drilled.
Next, it follows on the lathe to remove the technological allowance and squander the cavity under the working chamber to a diameter of 105 mm. Now the workpiece must be deployed and distorted the landing socket for bearings No. 203. The groove under the sealing cuff is also calculated (if it is planned). However, from practice it is known that the design can do without this element.
This is the first stage of processing the part ends. Now you can proceed to tripping the threaded holes to install the stator cover, the nozzle, the boot hopper and the cover of the bearing assembly. At the end of the work, the stator must be improved, like the rotor (by the same technology).
In the process of how to make a self-made mill, it is very important in the process of assembling a mini mill carefully adjust the position of the stator. This is done with bolts. The rotor should rotate easily and without jamming. After that, you can trial to run the mill. First, it needs to be fixed on the stool, turn on the network, fill the bunker with grain and turn on.
How to make a bird's homemade mill
The next point: how to make a third important piece of construction for a homemade mill - a base plate, or a bed. It can be cut from a steel sheet with a thickness of 6-8 mm. It then needs to be attached to the stator using M6 screws, which will simultaneously fix the nozzle. The last element can be made and removable, simply installing it into the hole of the bed, which is done in this case in size. In this hole, the design element will be held only due to friction.
The nozzle is made of a segment of a thin-walled pipe with an external diameter of 28 mm. Its section can be square or round, and in accordance with this, the hole in the bed is also made square or round depending on the diameter of the pipe used.
Next, the boot hopper is performed. This is the simplest detail in the overall construction according to the method of manufacturing. The bunker can be cut out of roofing iron, then the sheet bend on a given form and suck the butt. Roofing iron may well compete in strength and reliability, in this case, with a thicker sheet. The finished bunker is installed on the stator and is fixed with two M6 bolts.
Before making a mill for grain, be sure to consider one important factor. If the rotor rotates in one direction, only one half of the stator working chamber is involved. If the rotor will rotate in the opposite direction, then another half of the stator will start participating. Since the size and number of protrusions in the working chamber on the right and left are different, then the result of the product stroke in the first and in the second case will be different. Due to this, using one or another option, it will be possible to get a large or smaller degree of grinding of the product at the output. To do this, you only need to change the direction of rotation of the rotor.
Electrical equipment for household mini mill
Even before making a minor mill, take care of electrical equipment. As electrical equipment in the design of the mini-mill, a condenser, a toggle switch and a fuse are used. They are mounted next to the electric motor on the plate made from the dielectric. To carry out the rotor reverse, you just need to switch the capacitor, the capacity of which is about 3.8 μF (thanks to a relatively small load on the engine).
The shafts of the crushing mechanism of grain and the engine must be positioned coaxially. Rotation transmission will be carried out using a connecting rigid clutch. In the fasteners, it is necessary to make holes-guides under the bolts M6 so that the coaxiality of the shafts can be adjusted. In the slab base of the mill in the horizontal plane, the holes should be used to be used to move, and in the vertical, the same holes should be placed on the other shelf of the corners.
For finished flour, it will only be necessary to substitute the container under the outlet nozzle. If everything is done correctly, the mill will work without interruptions.
Is it possible to make a mill for grain with their own hands? How is it used?
The homemade mill is currently used by connoisseurs of a healthy lifestyle to obtain flour from various grains - corn, rye or wheat in domestic conditions. There are models that allow you to get other products - feed and flakes. Maching products independently, you can be confident in its quality.
Types of household mills
Grain mills are 2 species: mechanical and electric. The first have a smaller cost, the latter can cope with a large volume of grain, but also the price of them is more expensive.
The mechanical device is convenient what can be used away from sources of electricity. When choosing it is worth asking what diameter of the millstone: what they are more, the easier it will recycle grain. It is worth paying attention to the material from which millstone is made - it can be granite or ceramics. The best material is corundum ceramics, thanks to her you can get a flour of the finest grinding.
It should be known that the homemade mill is not adapted to handle oilseeds, such as sunflower.

Mill "Baby"
If you have technical capabilities, work skills with a turning machine and the presence of materials and tools, a mini flour mill can be implemented independently. In any case, the necessary parts can be ordered from tokar. First of all, before making a mill, it is worth finding drawings. One of the easiest and most famous models is called "Baby". It was invented by engineers from Udmurtia, and it is relatively different from other models not only in small size and simplicity of construction, but also with broad functionality and excellent performance: in 5 minutes it can cope with a whole bucket of grain.
Specifications of the homemade grain mill:
- weight - no more than 15 kg;
- average productivity: Oats, wheat and other cereals - 0.5 buckets per minute, corn - 0.2 buckets;
- power consumption - 180 W;
- produces 2 types of products - large grinding and small;
- dimensions - no more than 330x170x170 mm.
List of necessary materials for assembling device:
- electric motor (the engine is suitable from the broken washing machine);
- m16 brand bolts for fixing the engine;
- steel corner is used to manufacture the engine support;
- galvanized iron for the manufacture of a box (ready flour will enter the box);
- rotor, stator;
- bearings;
- axis and 2 nuts M6;
- cover for a node;
- tree knob or other material.
Production of the mill occurs in 3 stages: you need to make a rotor, stator and a bed. The first is pulled out of steel blanks with a thickness of 90 mm and a diameter of 120 mm in accordance with the drawing. One of the most complex parts in the manufacture is a stator. Works should be made as carefully and accurately, following the drawings. The rotor and the stator in this case will work as a millstone. The bed can be made of a sheet iron with a thickness of at least 8 mm.
Mill of washing machine
Interesting feuswarm made of washing machine. This simple and powerful device works on the principle of coffee grinder. Detailed instructions for the manufacture of such a mill does not exist, since each washing machine is characterized by individual parameters. The main thing is to understand the meaning of the device's work: not a millstone is used, but the grain is grinding with knives, placed on the axis, which rotates at high speed. The device uses 2 electric motors installed oppositely, knives are opposite to each other. The speed of operation and the quality of the final product will depend on the sharpness of their sharpening. For the manufacture of a knife, a steel sheet is used with dimensions of 200 × 15 mm with a thickness of 1.5 mm. The sharpening is performed along the knife rotation, you can experiment with it. After the end of the sharpening at the place of fastening the knife, the hole is drilled on the axis. The knife is put on the axis and is attached using 2 nuts with washers.
From the sheet iron or other material it is necessary to make a container from which the grain will come to the fukery. The container and the tank are divided by a valve opening manually.
At the place of the release of finished flour on the mill for the grain, a sieve and a container for collecting flour are installed. To prevent losses when the product is released, it is recommended to use a sleeve of rubber or plastic (you can make it from metal).
To prevent the output of the mill, it is recommended to clean the millstone every week.