Aising recipe for cooking at home. Aising, or Edible lace. DIY icing for lace. Aising moldings
Everyone loves. Cookies, muffins, gingerbread - all this improves mood. And when they are also beautifully decorated, they look doubly appetizing. Professional confectioners create works of art that are sometimes even a pity to eat. Housewives today also do not lag behind them in their desire to make a real holiday for their relatives.
Sweets decoration
And other pastries are very diverse. Since ancient times, they have been decorated with various creams, fruits, chocolate chips, nuts and coconut flakes. A more complex option is pouring jelly, coating with sugar fudge, chocolate icing (ganache). Foreign notions also came to us: mastic and icing. These are more complex baking options, including a variety of figurines and decorative elements. Icing decoration is considered the pinnacle of confectionery art. Some masters create masterpieces that are simply breathtaking. However, knowing some secrets, each hostess, with a certain skill and patience, will be able to amaze her guests.
Aising - what is it?
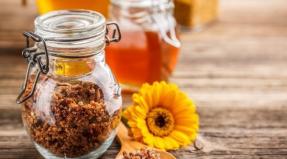
From English, this word is translated as "icing", the full name is "royal icing" (Royal Icing). Aising came to us from England, where confectioners at the court of monarchs decorated cakes in this way. This is a mass for drawing and creating edible decorations based on protein and sugar. Aising can be different in composition and consistency depending on the purpose: contour decor, airy decorations or product molding.
- Plastic - used for modeling jewelry and creating lace. Helpers here will be a silicone mat for icing and molds). The mass is placed in the base, slightly dried, carefully removed and placed decoratively on the cake. Plastic icing is somewhat different from the classic one - in composition it is closer to mastic.
- Classic - a more liquid mass, which is applied directly to the confectionery product, or the decor is made on a stencil, and after hardening, the parts are folded into figures. It has a very fragile structure.
We will tell you how to make classic icing for gingerbread, cookies, cakes and other pastries.
Cooking process

The icing recipe is actually incredibly simple. You will need:
- powdered sugar - 150 g,
- raw egg white- 1 PC,
- lemon juice - 1 tsp
From this composition, a rather large amount of mass is obtained, which is enough to decorate a small cake or a kilogram of gingerbread. Any pastry looks much more appetizing with decor such as icing. How to cook it? Let's consider this process step by step.
- Separate the protein from the yolk. Make sure not a drop of the yolk gets into the bowl with the protein. If this happens, it is better to take another egg.
- Beat the protein with a whisk or mixer at low speed. No need to beat it into a lush foam - just mix until smooth.
- Add the sifted icing sugar in small portions, without ceasing to beat the mass.
- At the end, pour in the lemon juice, which will give the glaze a shine.
The perfect decoration for confectionery is ready. Nothing complicated, right?
Consistency
The amount of powdered sugar and whipping time may vary slightly depending on what your frosting is for. Aising is usually distinguished by density:
- The mass of the consistency of thick sour cream. It is obtained by using a slightly smaller amount of powder. Reminds us of our usual icing, which is used to decorate Easter cakes. Such icing is used for gingerbread and cookies, the top of which is poured in a uniform even layer. The readiness of the mass can be checked by running a knife over it. For some time, a trace of the cut remains, which gradually smoothes out, and the glaze again becomes homogeneous and perfectly even. If this does not happen, then you have beaten the mass too much, and such icing is no longer suitable for pouring - the top of the cookie will be ribbed and uneven. However, do not be upset, as you just prepared the next version of the glaze.
- Soft peaks. This icing is ideal for inscriptions and linear decor, which is applied directly to the confectionery. Readiness is checked very simply: remove the spoon or whisk from the protein mass - the icing should hang from it with soft peaks, slightly bending depending on the turn of the spoon.
- Solid peaks. This is a denser mass. When you take out the spoon, the icing reaches for it and remains on the surface in stable hard peaks. This icing is ideal for squeezing patterns from a pastry bag with different nozzles directly onto a cake or cookie. Also, this glaze is suitable for complex decorations, which are first squeezed onto a stencil, and after solidification, they are assembled into shapes.
little secrets

Does royal icing seem incredible and are you scared to even try it? Do not worry, use the classic recipe, pay attention to some of the nuances, and you will see that the preparation of icing will be easy. You will definitely succeed!
Colour
Glaze can be colored using food coloring. To do this, divide the mass into several parts and add the desired shade to each. Dyes come in different properties and degrees of intensity, so add color little by little, kneading the mass well. Follow the instructions printed on the package.
Powdered sugar
Cooking icing is possible only with powder - sugar will not work here, as it will not have time to dissolve and make the mass heavy. Moreover, it is advisable to sift the powdered sugar before this, saturating it with oxygen. If you have a good electric mill, you can grind your own powdered sugar.
Consistency
You can adjust the mass density. If you beat it too hard and it turned out to be too liquid, just add powdered sugar. If the icing is very thick, it will be difficult to squeeze out of the piping bag. In this case, add egg white to it.
Storage
If you did not use the entire mass at once, you can store it in a tightly closed container for 3-5 days. Keep in mind that frosting hardens quickly when exposed to air. You can use leftover icing for cookies. Its recipe can be anything, with the exception of wet, too porous baking.
Lemon acid
If desired, a glaze component such as lemon juice can be replaced with citric acid.
Creation of figurines

If you create three-dimensional figures by squeezing the mass onto the stencil, grease it a little beforehand olive oil for easier separation of dried parts. Normal sunflower oil won't fit here.
To create three-dimensional flowers and other figures, apply glaze to the stencil, and then lay it on any curved surface. For example, a flower can be placed in a cup with the leaves spread out; butterflies - on the fold of the book (when they dry, you get a fluttering effect).
Incredibly beautiful are large volumetric icing decorations: shoes, carriages, houses, towers and more. It seems that this is impossible to do, but in fact, everything is not so scary. These figures are made up of many individual parts, which are pre-applied to the stencil and dried, and then joined together with a cream.
Remember that the average drying time for the glaze is 12 hours, so it must be applied to the finished cake in advance. Icing for cookies also requires time to dry, otherwise the shortbreads will simply stick together. It is better to start the preparation of bulk or prefabricated figures, which are preliminarily applied to the stencil, a day in advance so that they have time to dry well and are easy to assemble. Make them with a margin, because the parts are very fragile and can break during the assembly process.
Common Mistakes
It seems that everything was done according to the recipe, but the icing did not work out? Here are the most common mistakes that can completely ruin the icing:
- Lemon juice must be added clearly according to the recipe - one teaspoon per protein from one egg and 150 grams of powder. If you put in too much egg white, the frosting will be too brittle.
- Carefully add powdered sugar depending on the desired consistency. Too liquid mass will spread over baking, too dense it will be difficult to squeeze out of the pastry bag. Adjust the density of the icing with protein and powder.
- The glaze needs air to dry. Do not put the decorated product or the drying parts of future figures in the refrigerator - the icing will become limp and flow.
- For the same reason, do not apply the mass on cream or wet biscuits. Ideal for dry biscuits and cakes, pre-coated with a base - mastic, marzipan, ganache.

Accessories
You can not do without auxiliary accessories if you are preparing icing. What it is? First of all - a pastry bag. With classic royal icing of any density, it is impossible to work with your hands, so you can’t do without a pastry bag or a syringe. Using various nozzles, you can create beautiful patterns, but more often the glaze is drawn in straight lines. The real helpers will be icing pencils, acting like a syringe, but with their help, especially thin lines are created.
Stencils, silicone mats and molds help create intricate patterned decorations that are difficult to make by hand. You can apply a pattern or its details on plain baking paper, after placing the drawn contours of the future product under it.
Decorations
Professional confectioners create real works of art from icing. No wonder it is called royal icing - confectionery decorated with it is truly worthy of kings. We will reveal some of the secrets of the masters, using which you can make beautiful icing decorations at home.
Biscuit

Frosting cookies and gingerbread cookies is a great start to your workout. Drawings can be both the simplest and complicated with a large number of small details. Icing for cookies, the recipe of which can be anything (short and ginger is good), can be of two types: soft peaks (for contours and patterns) and the consistency of thick sour cream (for pouring).
If you want to completely fill the surface of the cookie with icing, apply a contour around the edges, let it dry a little and fill the rest of the area with soft mass. The contour will hold it back, preventing it from combing. Use fine-lined tips or icing pencils to create fine lines and patterns.
Lace of kings
The thin lace that decorates cakes using icing looks incredibly beautiful. an edible glaze decoration of very fine workmanship. There are three options for creating it:
- Applying a plastic glaze to a silicone mat. After drying, this lace can be bent and laid as you like. It is quite convenient to use, but it cannot be prepared from classic glaze.
- Drawing a lace pattern directly onto the surface of the cake using a pastry bag with a fine tip or icing pencils.
- Drawing lace on a stencil. After drying, they are carefully transferred to baking.
Aising: master class

Airy lace covering the cake with a dome, or decoration with balloons looks very beautiful, and it seems that it is impossible to do it manually. However, having learned a couple of secrets, every housewife will be able to perform such a miracle. Of course, icing will help with this. How to cook it? Here is a step by step guide:
- Take an ordinary balloon. Wash it well and inflate it to the size you want the final decor to be.
- Prepare the frosting to the consistency of hard peaks. A softer mass will simply drain, and the pattern will not come out.
- Fill a piping bag fitted with a fine tip or an icing pencil.
- Squeeze out the icing with a thin branched thread over the ball, imitating lace, braiding the ball completely or half.
- Leave to dry for at least 12 hours. After that, pierce the ball and carefully pull out the remnants.
Just a magical decoration for the cake is ready!
Conclusion
From this article, you learned everything about icing: what it is and how to cook it. By adhering to simple rules, even at home you can create incomparable culinary masterpieces worthy of the highest praise.
Decoration with icing is an original, refined and fairly simple way to make any confectionery product even tastier and more appetizing in appearance. However, in order for the lace icing to turn out to be truly flawless, it is important to follow a few simple recommendations. We will try to highlight the main and most important of them in this article.
Be careful not to beat the icing mix too hard. If you are not yet experienced enough, it is better to use a fork - it is easy enough for it to destroy the integrity of the protein and bring the mixture to a homogeneous state. Another option is to take a mixer, only use it at the slowest speed and not for long. Too much whipped icing becomes fluffy and oversaturated with bubbles, which can affect its strength.
Powdered sugar should be the finest grinding. Do not try to make it yourself with a coffee grinder and sugar - it is better to immediately take the purchase. If the icing turns out with grains, it will be possible to say goodbye to its plasticity, and such a mixture will become useless for making openwork figures.

A good technique that should be mastered by anyone who is going to paint with icing is ironing. It allows you to get rid of air bubbles in the sugar mixture and lies in the fact that before use, a portion of icing is smeared on a clean surface with a pastry spatula. Smoothing is also used if icing is needed a little softer than the standard consistency, because this action releases liquid and the mixture becomes less dense. For smoothing, 7-10 spatula movements in both directions are usually sufficient.

Two useful tricks to check the readiness of icing:
- Fork. In a bowl with icing, draw a strip. If the mixture is brought to the desired condition, the strip should be clear.
- Finger. If you dip your finger into the sugar mixture, the icing does not flow back into the bowl, but remains in the form of a hard peak.
Many people are interested in how to choose a package in which to place the icing for drawing. Of course, ideally it is better to use a confectionery syringe, but since not every housewife has it, you have to make an icing bag from improvised materials. It is best to use a tight bag or roll up a bag of thick paper - the main thing is that it is elastic enough and does not bend in the hands when squeezing out the mass. The hole in the bag is better to make smaller.

Regardless of whether you use ready-made icing stencils or draw (print) them yourself, we advise you not to make lace decorations on top of the template itself, but to put cling film or glass between them - this way, the template will become available for reusable use.
We bring to your attention a video that tells you how to make beautiful openwork icing balls:
All lovers of making jewelry from icing are faced with such a problem as ponytails. Tails are small sticking out pieces of the sugar mixture that remain on the part when you stop extruding the mixture at the moment the stencil stroke is completed. Here are a few ways to deal with ponytails:
- Correct pressure on the mixture bag is important. At the end of the outline of the stencil detail, it is necessary to stop putting pressure on the bag (even a little), and then abruptly tear the tip of the bag off the surface. You can apply a circular tip tear: first to the side at 3 o'clock, and then a semicircle to nine.
- If the tips still remain, you need to smooth them with a slightly damp brush or just with your finger (without waiting for the icing to dry).
- An important point is in what sequence to trace the lines of the stencil. If you first draw all the internal lines, their tails can simply be covered with a contour main line drawn at the end.

A separate trick is the manufacture of colored icing. We do not recommend adding food coloring at the stage of preparing the mixture, since in this case the icing may not whip well. A much smarter option is to paint the finished jewelry by hand using a flat brush with natural fibers. To do this, dilute the food coloring in a small amount of water and, lightly dipping the brush to a barely damp state, begin to gently paint over the surface of the jewelry.
To get a more saturated shade, first wait for the first layer to dry, and only then start painting again.
An interesting idea is to use an ordinary spray gun to spray the diluted dye in the finest dispersion mode.

If you are preparing an icing cake for a specific date, please note that icing products require drying at room temperature (at least overnight, and possibly longer). Aising is afraid of moisture, so it cannot be stored in the refrigerator, especially if there is high humidity - it is best to put jewelry in a cardboard or plastic box. It is better to install icing figurines on a cake covered with protein cream immediately before serving.
If you can’t call yourself an icing master yet, make all the decorative elements in two or even three copies (especially if you have to combine them into a complex three-dimensional structure): often fragile figures often break, and the remaining ones may not be enough for a full-fledged cake decoration.
In conclusion, we suggest watching a video on how to work with icing at home - perhaps everything that has been said will become more understandable.
Only a few can resist sweets. Cakes, muffins, gingerbread and cookies help to improve your mood, pamper yourself and loved ones. Confectioners are capable of creating works of art, but housewives are not far behind professionals. Aising for decorating cakes and other confectionery products at home can be prepared by every housewife. To do this, it is important to know the recipe and secrets of successful decoration.
What is icing
The term is translated from in English like royal icing. He came to Russia from England, where at the court of monarchs it was customary to decorate cakes with edible flowers and lace. Aising is a mass for decorating confectionery products, which is made on the basis of protein with granulated sugar. By composition, purpose (contour, modeling, etc.), consistency, it is divided into several types.
Classification of confectionery icing:
- Plastic. This type is used for sculpting figurines, creating lace. The composition of icing is similar to confectionery mastic. Work with it using molds and a silicone mat. The finished composition is poured into a mold, dried, and a decorative element is obtained.
- Classic icing is a mass with a more liquid consistency. Glaze has a fragile structure. The mass is applied directly to the confectionery product or stencils are used.
Consistency
Depending on what the glaze is intended for, the amount of powdered sugar changes during whipping. By density, icing is divided into the following types:
- The consistency of thick cream. The mass is prepared with a small amount of powdered sugar, reminiscent of the traditional icing for Easter cakes. This type is used for cookies or gingerbread, the surface of which is poured with a uniform layer. Finished products are distinguished by a perfectly even layer of glaze.
- Soft peaks. If you need to make an inscription, contour, draw a picture on a pie or cake, then this type of icing is perfect. To check the readiness, you need to get the whisk from the whipped mass, the icing should hang in soft peaks that bend slightly when you turn the tool.
- Solid peaks. This glaze is thick. If you remove the whisk from the whipped mass, the icing will reach for it and freeze in dense peaks. Icing is used to extrude patterns from a pastry bag onto a cake or cookie. For flat and voluminous figures made using a stencil, this mass is also suitable.
icing recipe
A traditional English pastry glaze is made from sugar, egg white and lemon juice. Flexible mass requires a more complex composition and long whipping. There are many recipes on how to make icing at home step by step. You need to choose the method of preparation, taking into account the purposes for which you plan to use the glaze: drawing or making decorations for confectionery. Below are recipes for both types of icing with detailed description cooking process.
Classic icing
- Time: 30 minutes.
- Number of servings: 8 persons.
- Calorie content of the dish: 305 kcal (per 100 g of glaze).
- Purpose: for dessert.
- Cuisine: English.
- Difficulty: easy.
Drawing icing for the cake is prepared without much difficulty. The products necessary for him can be found in every home. At the same time, with the help of icing, you can turn a chocolate cake, cookies or cupcakes into a festive dessert that will not leave indifferent relatives and guests. The icing prepared according to the recipe below is enough to decorate 1 kg of gingerbread or a medium-sized cake. Baking will immediately become original, appetizing and solemn.
Ingredients:
- powdered sugar - 150 g;
- lemon juice - 1 tsp;
- chicken egg - 1 pc.
Cooking method:
- Take an egg. Separate the protein from the yolk. Even a drop of yolk will spoil the protein cream, so you will have to take another egg if the procedure was not successful the first time.
- Beat the egg white with a mixer, blender or whisk until smooth.
- Sift the powdered sugar through a sieve.
- Add powder to the protein in small portions, without stopping whipping the mass.
- Pour in lemon juice to give the mass a glossy sheen.
- Use the prepared icing to decorate baked goods.
Flexible icing at home
- Time: 45 minutes.
- Number of servings: 8 persons.
- Calorie content of the dish: 325 kcal (per 100 g of glaze).
- Purpose: for dessert.
- Cuisine: English.
- Difficulty: medium.
To make icing flowers or other cake decorations, a mixture with a more complex composition and a dense consistency is required. Flexible glaze is prepared with a silicone mat. Rare components for cooking can be ordered in specialized online stores. The resulting mass is enough to decorate 1 medium-sized cake or pie.
Ingredients:
- corn starch - 20 g;
- water - 50 ml;
- food coloring (white) - ¼ tsp;
- fructose - 20 g;
- citrus pectin - 1 tsp;
- invert syrup - 1 tsp;
- food additive polysorbate-80 - 3 drops;
- food glycerin - 1 tsp.
Cooking method:
- Combine starch, dye, pectin, fructose, mix.
- water room temperature pour into container.
- Add dry mix.
- Mix everything, leave for 30 minutes.
- Re-mix the composition, pour invert syrup.
- Combine food glycerin with polysorbate-80 additive, add to container.
- Spread the resulting mixture on a silicone mat to work with flexible icing.
- Preheat the oven to 100 degrees, send a mat with icing into it.
- After 10 minutes, remove the mat, allow the mixture to dry and cool.
- Separate the resulting flexible pattern from the rug, use for decoration.

icing drawings
Housewives who decide to learn how to draw with royal icing on confectionery will need stencils and a syringe to extrude icing. Those who have painting skills can take a silicone icing mat or a film smeared with olive oil and start the creative process. If self-confidence, as an artist, is missing, you can download stencils from the Internet.
For those who have children, pictures from coloring pages are suitable as stencils. The pattern is placed in a stationery file, its surface is moistened with oil and the pattern is started to be created along the contours from the picture. Very thin lines should be avoided so that the resulting masterpiece does not begin to crumble. The use of icing of several colors is allowed. In this case, the drawing is applied in stages: first, details of one shade, then another.
Volumetric figures
The simplest form of 3D royal icing decoration is the 3D butterfly. To make it, you need to take a stencil with a file, as when creating drawings, but put a sheet on an open book. The angle at which the pages lie will give the butterfly volume. If you want to get semicircular shapes, the stencil file is placed on the cylinder (a small one will do). plastic bottle, glass, etc.).
Ornaments in the form of a ball look spectacular. An openwork hemisphere or many small balls will turn any pastry into a work of art. To create such figures, you will need a balloon, which is pre-inflated to the desired size. Gently moisten it with a cotton swab with olive oil and proceed to the process. A pattern is applied, after which the ball is left in a dry place until the sweet mixture dries completely.
The production of figures in 3D format involves gluing several flat parts. The difficulty lies in finding a stencil for all the necessary parts of the figure. Before mounting the volumetric decoration, you need to wait until the parts dry well. Glue the parts with a mixture for drawing or whipped protein. The glaze dries in about 12 hours. Volumetric figures are recommended to start making a day before serving the cake or pie on the table. All parts for voluminous jewelry should be done with a margin, because they are fragile and can break during the assembly process.
Secrets of working with icing
In order for your cakes, pies and cookies to delight guests and loved ones with original decor, it is important to learn how to work with royal icing correctly. Below are all the secrets to successfully decorating confectionery with icing:
- Beat the mixture better with a fork or whisk by hand, so as not to spoil the structure.
- Powdered sugar should be finely ground and sifted before use.
- Glaze should be smoothed with a spatula for cream.
- Do not store frosting in the refrigerator.
- Figures and drawings are best done in several copies, in case of breakage.

Video
Aising (Royal Icing) - protein drawing mass, it is not used as a cream, but only for the manufacture of voluminous jewelry. Templates are made, patterns are drawn, sweet and edible lace is obtained :), then dried and stored in candy boxes or plastic in a dry place. Aising is afraid of moisture and cannot be stored in the refrigerator. It is also not friendly with sour cream, butter cream. Such decorations can only be planted on protein cream or chocolate icing, mastics.
You can also buy ready-made icing.
1. To make icing, take one protein (separate the protein from the yolk very carefully) and beat it with a fork until a light foam forms.
2. Be sure to sift the powder. Then gradually add the powdered sugar while continuing to stir. Mix until a stable mass is formed. Thick enough, but so that it can be squeezed out through a syringe or bag.
3. Now add lemon juice. Add juice not at the beginning of whipping, but almost at the end, then the products are less fragile.
4. You can’t beat the protein, because. when whipping, bubbles form, which should not be in icing. The protein is simply mixed with powdered sugar with a fork or whisk, but not with a mixer. And then cover it with a wet napkin and let it stand for 30 minutes. to get all the bubbles out of it.
5. To make jewelry, you need to make a drawing of the desired product or take a template. It is convenient to use children's coloring pages. Put a piece of polyethylene on this drawing or put the drawing in a transparent folder so that the drawing is clearly visible. I am using file.
6. Now we take a pastry bag or a syringe, you can just take a small plastic bag. We fill it with icing and start drawing, that is, on the polyethylene that lies in the figure, we squeeze out the icing, clearly following the lines of the picture.
7. After we have finished the drawing, we leave the icing on the polyethylene to dry. Since icing products are very fragile, you need to make more of them.
8. If you need to give the product some form, then make some kind of fixture that will correspond to the required shape. For example, butterflies are dried on a slightly open book, then they will not be flat, but with raised wings. To make a crown, as in the main photo, you need to dry the icing on a liter jar.
When working with icing, you need to remember to prepare a slightly damp cloth in order to cover the nozzle, which is left idle for a while, since then the nozzle becomes clogged with dried icing.
It’s better to shoot at the edge of the table, start from the corner, hold the corner and pull down from the edge of the table, as if through the edge at the table ...
Icing dries in different ways ... depending on the size of the part (flower) and your humidity. My thin products dried up the next morning, and so 2 days is enough for an ordinary flower. Large parts can dry for 5-6 days. You can put in the oven, but not more than 40 ° C.
Also with icing you can make different figures of animals, fungi, trees ...