How to draw princesses and fairies in stages. How to draw a fairy, or get your own sorceress. How to draw a Tinker Bell fairy in full growth in stages
Very often children are interested in how to draw a fairy. A beautiful, magical creature, pleasing to the eyes, what could be better for learning to draw? And adults may also be interested in how to draw a fairy. For example, for an object lesson to children. The fairy-tale characters of children can somehow quickly become interested. Where do you start? From the circle. A large, lush dress can hide the legs of a fairy, plants - hands, but no fairy is without a face. So, first you need a circle. A perfectly round face should not be done, it is better to be slightly extended towards the chin. At the same time, in the forehead area, our circumference should be larger.
Next, you can draw the contours of the face. Perhaps with a slightly lighter touch of the pencil. And don't forget the two ovals: the eyes. Don't make your lips too sexy (advice for adults). But they should also not be made narrow, otherwise your fairy will have a too angry expression on her face. The nose can be drawn with two points or with a neat, slightly curving line. Of course, two points are easier to draw. As you can see, if you want to know how to draw a fairy with a pencil, you don't need any special secrets. You must have at least basic knowledge of how to draw a person.

Drawing a fairy is best done by breaking the process down into different stages. After the circle with the outline of the face appears on the piece of paper, you need to think about the ears (will they be?), And also about whether the hair will hide them. Often, at this stage, they begin to draw hair, but this is a mistake that can spoil the impression of the drawing. You yourself need to imagine, if necessary - with lines in the drawing - the placement of the fairy's body in space. And here the hair will only get in the way. Further, if our fairy is supposed to have wings, and most fairies have them, some even play the role of a distinctive feature, then you first need to figure out how the wings are located in space. And whether hair does not interfere with them, for example.
Fairy body: position in space

The fairy body is an important point in the drawing. If you do not know how to draw a fairy in stages with a pencil, then you need to determine the body in the second place - after the face. A body at an obtuse angle in relation to the face will indicate that the fairy is flying. And the dumber the angle, the more dynamic the body will be. If it is located at a right angle or close to it, then such a location in space means only one thing: the fairy is standing or hovering in space. At an acute angle, she can stand slightly leaning back, lie, sit, lean back, or fly back. True, the latter is not recommended to portray if you have not had experience in drawing fairies before. Not an easy task.
The body can be drawn with an oval, but not particularly strong, and so, barely outlined with a pencil, so that you can quickly and easily erase without tormenting the paper. In general, the rough drawing should be done carefully, with light, careful touches to the paper. Then you can make two small ovals in the main oval - the upper part of the body and the lower one. And gently erase the transition between them, so the fairy will have a waist. The lower part of the body will most likely be a dress or a skirt, the upper part will be the upper part of the dress, respectively, as an option, a blouse or something like that. The transition can simply be made smooth, by choice, or you can outline it somehow neatly. For example, a neat rectangle with a buckle in the center will look like a delicately made belt. You can also pretend that the fairy has a bow on the belt. Or a scarf.
The next step is to outline the line of the skirt. The longer the skirt, the less visible your legs will be. And don't forget the proportions! Fairies, of course, are fabulous creatures, but they should look natural in a completely human drawing.

Fairies must have hands, at least hands. If you don't want to draw your fingers, then you can cheat and depict a fairy with gloves. There will also be fingers, but they can be designated conventionally. Also, the hand can be hidden, but hiding both hands is not worth it, because the posture in which the hands are folded behind the back, especially in a state of activity, does not look completely natural.
We must not forget about the need to detail the blouse, the dress itself. It is also worth detailing the skirt. You can make a regular skirt, you can - in the form of flower petals. In the latter case, we need to draw an inverted and enlarged flower bud to the desired proportions. And remember: even if we do not see, as a viewer, exactly where the arms and legs are located, we still need to know where they are in order to correctly draw the part we see. And how exactly the body of a fairy is located in space, for example.
Features of drawing fairies
Among other things, you need to take into account the peculiarities of the structure of the fairy body. Does she have wings? What part of the back do they grow from? And the tail? Some fairies have it, oddly enough. Sometimes how to draw a fairy tail is not particularly clear. In such cases, there is no need to reinvent the wheel. Just draw the tail of the reptile, so you will make your fairy unusual, different from all other fairies. You can have a cat's tail, a lion's tail, for example. Or a domestic cat. In general, on the Internet you can even find a detailed master class on how to draw a fairy tail in stages, but in short, you need to draw an elongated rectangle, round the end, and make the rectangle flexible and mobile. And at the end - a tassel or a fluffy end of the tail, possibly a thickening!

In general, it remains for the fairy to finish drawing the wings (you can use the wings of a butterfly or a dragonfly), and your drawing is ready. As you can see, the instructions on how to draw a fairy in stages is not so difficult and scary. And it is quite realizable. After drawing with a pencil, you can start using colors. And if you want to know how to draw, for example, a Winx fairy, then you can find specific master classes. And see how others are doing it. There are also enough phased drawings on the Web, including those made online, as well as drawings at various stages of readiness to figure out what's what.
Another fairy, no less popular and beloved by children, is a character from the famous fairy tale about Peter Pan. If you are going to find out how to draw the Tinker Bell fairy, keep in mind that this character is really recognizable. That is, there should be a little less amateur performance here. You can try to draw just a fairy for a start. And then just go to the character. And keep in mind that you can get your hand pretty good by redrawing the picture of the fairy Tink from the books. This refers to the illustration.
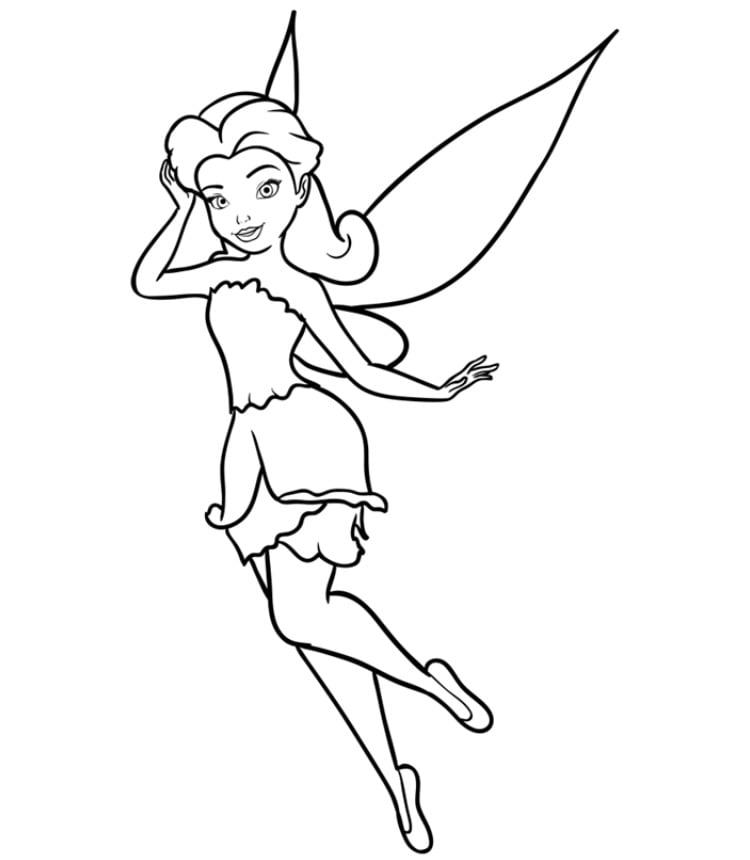
We have already studied the lesson on drawing the Rosetta fairy, but then the beautiful fairy looked a little different - she had a sword in her hand and a bandage on her eye. After all, then she was a pirate. And today Rosetta came to us in her favorite pink dress.
We have already told you about the character of the fairy Rosetta, that she is very fond of cleanliness and order. Her gardens are a real work of art! And not without reason, because she is a fairy of the gardens! Rosetta is also a fashionista, and loves to delight us with bright and stylish outfits, of which there are a lot of them in her large wardrobe!
How to draw the fairy Rosetta
In order for the Rosetta fairy to look similar, draw a sketch at the first stage. This is done simply - just sketch the fairy figurine from the following picture (try to make it slightly noticeable so that later the sketch does not stand out):
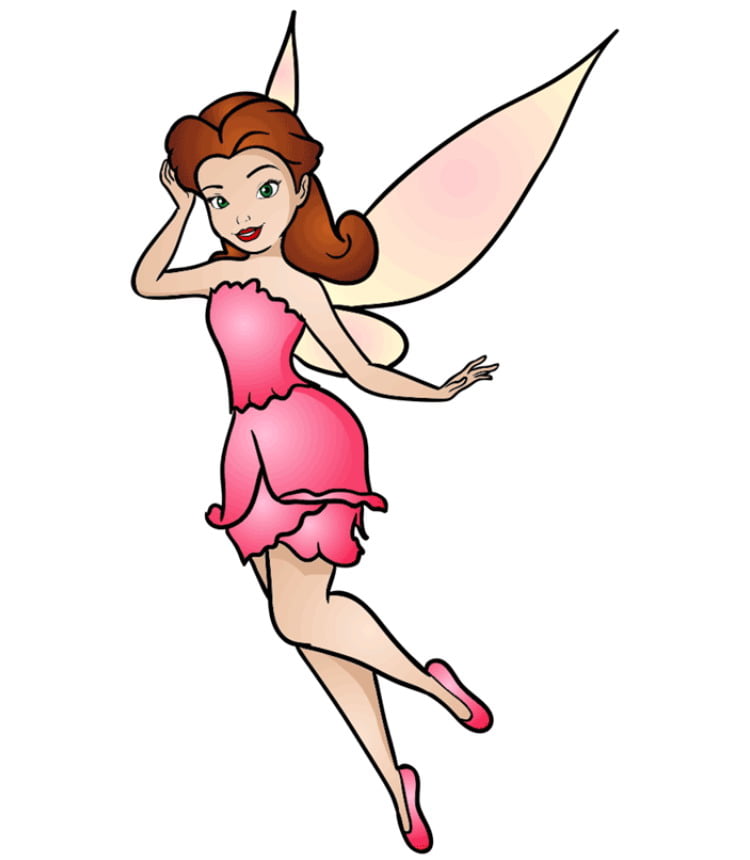
The next steps are to draw Rosetta's body parts, her hair, outfit and wings. A step-by-step example is shown in the following pictures:


Final stage. Color the fairy Rosetta. Her dress and shoes are pink, her skin is light and her hair is red.
- Flora is a fairy born on the planet Linphea, whose magic is directly related to nature. Before joining the club, she was very shy.
- Stella flew in from the planet Solaria. She is cheerful, sincere, cheerful and generous. Due to the serious attention to her appearance, she has repeatedly won beauty contests. She loves shopping and her wardrobe is considered the largest in the universe!
- Muse is a sorceress from the planet Melody. She was born into the family of a professional pianist and a great vocalist, but her mother soon died, and her father decided to give up music and forbade her gifted daughter to develop her abilities.
- Tekna is a girl from the planet Zenith, on whom all fantastic things and phenomena are directly related to the development of technology. Since infancy, Tecna has never parted with a pocket computer. Logical and rational, she brilliantly makes plans of action. She is very affectionate and open with loved ones.
- Leila is a fairy from the watery planet Andros. Her parents were constantly on business trips, so the girl was left alone and whiled away the time mastering the rules of etiquette.
- Bloom - it was she who became the founder of the club. Her magical abilities manifested themselves at the age of 16 when she tried to save Stella.
Each of these heroines can not only be drawn with a pencil, but also revived with multi-colored paints!
What else did we not know about the Winx fairies?
Why exactly this name was given to the school "Alfea". The secret lies in the sacred meaning of the letter "Alpha" - "the beginning of beginnings."
It is interesting that Britney Spears became the prototype of the appearance of the founder of the club, and the character was copied from the director's wife, Joan Lee.
The animated series was heavily influenced by the Sailor Moon TV series and the Harry Potter book series. And the appearance of most of the heroines was born under the impression of Barbie dolls.
How to draw Fairy Winx, even for those who have never drawn before, we have laid out in the most accessible way in the form of simple sequential steps in this section.
Today we will find out with you. A fairy is a mythological creature that came to us from Western European folklore, stories about her were passed from mouth to mouth. It was believed that a pretty sorceress is capable of various tricky tricks: hiding things, confusing hair. Looking at a cute girl with wings, it's hard to imagine such a thing. After all, as a rule, this is the image of a miniature, exquisite girl with a magic wand, from which we expect the creation of a good miracle. So let's try to draw it just like that. So let's get started.
How to draw a fairy
Step one. Let's draw a circle - the head. Na is an auxiliary cross with two horizontal lines, which will help us a lot in drawing a face. And then we build the axial lines of the body: a short neck, narrow shoulders, a curved spine, hands with palms and a pelvis. We draw legs, almost connecting at the bottom, in the middle of them we show the knee joint in the form of a circle. In place of the foot, there are two circles.  Step two. Draw a pair of large eyes between the two horizontal auxiliary lines: eyelids, eyelash line, pupils. The bottom point of the vertical line should rest against the chin. Based on this, draw a rounded line below the circle. Show a small ear on the side. : It should start at eye level and end at nose level. Above we will depict the winding bangs of the fairy.
  Step three. Let's draw, which did not cover the bangs. We outline the neck, which passes into the hand, and the wing line (similar to) stretches diagonally upwards from it. At the top of the head, we will continue to draw a hairstyle.
  Step four. On the face -. A shock of hair continues upward from the head. Let's show from behind the head: it is not wide and slightly pointed at the top. We finish drawing the second wing of two parts: the upper one is more elongated, the lower is rounded. We'll dress the fairy herself in a corset.
  Step five. Now our task is to draw the hands along the center lines. We will show thin fingers in place of the palms. In his right hand is a wand to work miracles. And from the skirt down we draw zigzags, zigzags, zigzags ...
  Step six. Just a little bit more. Let's draw the fingers of the second hand. Continue downward the lines of the legs along the already drawn center lines.
  Step seven. Let's show the second leg. And now from the balls that are in place of the feet, draw a pointed cone down to get a small graceful leg.
  Step eight. Now we take an eraser in our hands and carefully remove all auxiliary lines. You can outline the eyes and wings a little brighter.
  Well, how did it work? So the fairy is ready to transform into bright colors. Colored pencils will help you with this. I hope you have learned the lesson I tried very hard to create very easy and useful drawing lessons for you. Just four or five steps and you will become real artists. Do you think I'm cheating? Well, try to draw it yourself.
Fairies are fabulous characters associated with beauty and goodness. Therefore, we will try to portray it with just such representations.
Necessary materials:
- marker;
- pencil;
- eraser;
- colored pencils of pink, yellow, light blue, brown, green tones.
Drawing steps:
1. First, we can easily designate with simple shapes the silhouette of a fairy, its main proportions and the position of many elements. The head is in the form of a small circle. From it we draw a straight line for the spine. Further, on the sides there are arms, which we will designate with curved lines and a circle. Draw the pelvic part in the form of a skirt. Draw small circles in the middle of the stripes - knees. Next, let's draw a couple more circles.

2. We begin to detail the drawing of the girl from the face. For convenience, we use auxiliary lines that need to be drawn on the circle.

3. Draw the eyes, nose, mouth in the appropriate places. You should draw the head of the sorceress turned slightly to the left.

4. Draw the hair. Small strands fall over the forehead and a little over the eyes. Draw the ears.

5. Go to the body and begin to draw the back, right arm and fairy wings. They consist of two elements.

6. Now we draw the robe. The girl is dressed in a beautiful blouse with bare shoulders and a cute skirt with triangular edges. So she looks like a forest fairy, but if you want to draw a helper for Cinderella, then depict a chic fluffy dress with many layers of thin fabric.

7. Draw hands and fingers. Let's draw a wand in the hands of the fairy. Also, let's not pass by near the legs, because they also need to be worked on and make them look like real strokes. Draw shoes near the lower circles.

8. Draw the outline of the drawing. Let's draw some small details in the middle, including the face.

9. Color the fairy hair with a yellow pencil. To give a natural skin tone, we use two colors in the picture, pink and brown.

10. With a light green pencil, completely paint over the fairy dress and shoes.

11. With a darker shade of green, add volume to all the clothes.

12. Make the wings blue, the magic wand brown.