Nexus 7 w3bsit3-dns.com firmware. New Nexus. Installing Drivers and Console Utilities
Sometimes there comes such a turning point when the firmware gets bored and you want to sit on the "good old stock". This manual is also suitable for people who have any technical problems and need to return the device under warranty.
Instructions for installing stock firmware on Nexus 7 (2013) Wi-Fi
All your data will be deleted. If you want to save important information, I recommend making a backup. Everything that you do, you do at your own peril and risk. The author is not responsible for the "scabbling" of your device.
This manual is only suitable for the Wi-Fi version of the device! When flashing the LTE version, you must use a different firmware file. The file with the firmware for the LTE version is
Training
- We download the drivers, if they are not installed, then install them according to the instructions.
- Download ADB and Fastboot depending on the bitness of the OS:,. Unpack the archive into any folder. It is necessary that there are no Russian letters and numbers on the way. I unpacked my folder to d: \ ADB
- Download the firmware file
Installation

Now we enter the line:
- flash-all.bat
We are waiting for the end of the firmware
If the tablet is frozen in perpetual loading
- Turn off the smartphone by holding down the Power button for 10 seconds
- Press the Power + "Volume -" button, fastboot starts
- We go into Recovery Mode
- We see an android with an exclamation mark, hold down the Power button and the volume "-"
- We select wipe data / factory reset, confirm the choice.
- And now we reboot the smartphone using the reboot system now item
- Enjoy the stock firmware
If you are going to return the tablet under warranty, then you need to load the Bootloader. To do this, you need to put your device in fastboot mode and write the command “fastboot oem lock“ in the address bar.
And you didn't like it?
Or maybe one of your family members (probably a cat - there is no one else) installed Android 4.9.9 on it and now the tablet does not boot? Or maybe you just need to give the tablet to the service and you don't want them to know that you were experimenting with firmware? These are just a few reasons why you would like to restore the factory firmware on your tablet. And today I will tell you how you can do it.
So, restoring the factory firmware on a second generation Nexus 7 is quite easy, and for this, you first need a computer with the Android SDK installed on it with adb and fastboot programs.
Also, do not forget to enable the USB debugging option in the tablet settings. You can read how to find USB debugging in the latest versions of Android in.
You will also need a system image of your tablet, which you can download from Google. WiFi version of Nexus 7 sample 2013. It is codenamed "razor".
Keep in mind that the first step we need to take is to unlock the bootloader of your Nexus 7.
Note: If you have already unlocked it before, then you are "lucky" - since when performing this procedure all your personal data is lost available on your tablet, so the first thing you need to worry about is backing up.
Note 2: On a tablet with an unlocked bootloader, it is quite easy to install a modified Clockworkmod or TWRP recovery and get root rights.
So, after you have installed the Android SDK on your computer, connected your tablet to it and made sure that the computer "sees" your device, you can proceed to restore the factory firmware on your Nexus 7.
How to restore stock firmware on Nexus 7
1. Reboot the tablet into bootloader mode. This can be done by running the command in the command prompt window
Alternatively, you can turn off your tablet completely and turn it on by pressing and holding the buttons at the same time. decrease volume and inclusions... (Turn off, press the volume down, then the power button).

2. On your computer, in the Command Prompt window, enter the command
3. Confirm its execution on the tablet by selecting "Yes" by pressing the volume up button and then the power button.
Attention ! This will erase all your personal data!
If you had previously unlocked the bootloader, steps 2 and 3 can be skipped.
4. Unpack the previously downloaded system image of your tablet into a separate folder on your computer.
5. If your bootloader was unlocked earlier and you want to save personal data, find in the folder where you unpacked the system image file flash-all.bat (or flash-all.sh for a Linux computer) and remove -w from the line with the fastboot update command ...
For example, if you see a line like: fastboot -w update image-razor-jss15j.zip, you need to make it look like: fastboot update image-razor-jss15j.zip.
Save the edited file.

6. Run the flash-all.bat file (or flash-all.sh for Linux computer):

That's it, congratulations - you've managed to get your stock Android system back on your Nexus 7.
If you now want to install an alternative recovery on your tablet for further experiments with firmware, creating and restoring full system backups and getting Root, you, as an experienced user, can do the following:
Installing TWRP Recovery on Nexus 7 and Rooting Your Tablet
1. Download the image with TWRP recovery for your tablet to your computer from here. To do this, click on the "Get TWRP for your device" button and type the tablet name in the window that opens (Nexus 7 2013)
Download SuperSU zip file from this post to tablet Google+(mirror: UPDATE-SuperSU-v1.51.zip to get root in Android 4.3)
2. Connect the tablet to the computer and boot it into bootloader mode (using the adb reboot bootloader command or using the buttons inclusions and decrease volume).
3. Enter the command in the command prompt window (terminal):
fastboot flash recovery FileNameRecovery.img
4. Now you can reboot the tablet into a new recovery using the command:
In addition, the Nexus 7 can be rebooted into recovery mode by turning it off completely and turning it on by simultaneously pressing and holding the buttons increase the volume and inclusions.
5. Flash the zip file from SuperSU using TWRP (Install button -> select the zip file from the list and confirm the selection with the slider)
6. Restart your tablet (Reboot -> System Buttons) and update SuperSU from the Play Store.
That's it, now you have root on your tablet.
By the way, all of the above is true both for the new Nexus 7 and for any other Nexus device (in the latter case, you just need other files with the system image and recovery).
In front of you detailed step-by-step instructions on how to flash an ASUS Nexus 7 tablet. Our editors have chosen the most suitable method for flashing this ASUS model. If this instruction does not give any result try flashing another method: TWRP Recovery, ROM Manager, Fastboot or classic OTA.
Warning! After flashing the device, all your data from the internal memory will be erased, so to save your contacts, settings and applications, first save all data from the tablet.
Installing the system using CWM Recovery 1. Charge the flashing tablet at least 80%. 2. We save all data that cannot be lost from a flash drive, sim card and tablet memory. Simka (if any) can be pulled out. 3. We put the necessary firmware into the tablet's memory. The firmware file must be in archive format zip... You can select and download the firmware. 4. All ASUS tablets have a Recovery from the manufacturer, so we change it to ClockWorkMod Recovery. We do it according to the following instructions: Install the app from Google Play on your tablet. Launch it and grant Root rights. If there is no root-channel on the tablet, we get them by. Select "CWM Recovery" from the list of options.
  Then the application will show a list of available Recovery. In the example, Rashr showed 2 options: ClockworkMod with support for taps on the screen and the classic version (controlled by the volume and power buttons).
  You will be prompted to download. Click "Yes".
  Then the download of the CWM Recovery image for the tablet will begin.
  A notification will appear that the firmware was successful and now you have a modified recovery installed. We immediately go into it, for this click "Yes".
  Ready. If you already have ClockworkMod Recovery installed, then just enter it by holding any of the combinations for 3-5 seconds: - Volume up + power button - Volume down + power button - Volume up / down + power button + "Home" - Volume up + volume down + power button 5.
Movement in the Recovery menu is carried out using the volume buttons, and the selection is confirmed with the power button. Before installing the firmware, you must first do a factory reset. Therefore, in the menu, select the item wipe data / factory reset.
Ready. If you already have ClockworkMod Recovery installed, then just enter it by holding any of the combinations for 3-5 seconds: - Volume up + power button - Volume down + power button - Volume up / down + power button + "Home" - Volume up + volume down + power button 5.
Movement in the Recovery menu is carried out using the volume buttons, and the selection is confirmed with the power button. Before installing the firmware, you must first do a factory reset. Therefore, in the menu, select the item wipe data / factory reset.
 6.
Then just confirm that you agree to reset: Yes - Wipe all user data.
6.
Then just confirm that you agree to reset: Yes - Wipe all user data.
 7.
Now in the main menu of Recovery select install zip.
7.
Now in the main menu of Recovery select install zip.
 8.
Then select Choose zip from / sdcard.
8.
Then select Choose zip from / sdcard.
 9.
Navigate to the folder where you saved the firmware zip file and select it.
9.
Navigate to the folder where you saved the firmware zip file and select it.  10.
You will be prompted to confirm the action. Please select Yes - Install ....
10.
You will be prompted to confirm the action. Please select Yes - Install ....
 11.
The process of installing the firmware will begin and at the end an inscription will appear Install from sdcard complete.
The firmware is complete. We return to the main menu of CWM Recovery and reboot the tablet. For this we choose reboot system now.
11.
The process of installing the firmware will begin and at the end an inscription will appear Install from sdcard complete.
The firmware is complete. We return to the main menu of CWM Recovery and reboot the tablet. For this we choose reboot system now.
 12.
Ready. The tablet will start loading with the already installed firmware. Other materials
12.
Ready. The tablet will start loading with the already installed firmware. Other materials
Instructions for Google Nexus 7 2013 WiFi firmware:
First you need to install drivers, unlock Bootloader and install custom Recowery CWM or TWRP.
The instruction itself (Described when using CWM. On TWRP it is almost identical with slight nuances.):
1. Load the previously downloaded CyanogenMod assembly into the tablet's memory. If the tablet is not detected by the computer:
- Go to "Settings" -> "Memory" -> "Three dots in the upper right corner" -> "USB connection to a computer" -> and check the box "Media device (MTP)"
- If after that the device was not found, then do the following. Go to "Settings" -> "() For Developers" -> and check the box "USB debugging"
2. Start CWM (for this, on the switched off tablet, hold down the "Power" and "Volume -" keys simultaneously, select "Recovery mode" with the volume rockers and press the "Power" key)
3. Do Backup (item "Backup and Restore" -> "Backup to / sdcard")
4. Do "Wipe data / factory reset", "Wipe cache partition" and "Advanced" -> "Wipe dalvik cache"
5. Flash CyanogenMod 10.x ("install zip" -> "choose zip from / sdcard" -> "0 /" -> "and here you select the .zip firmware file
6. If necessary, then flashing the Google Apps addon (done the same way as in paragraph "5." just select the .zip file GApps
7. Press "Reboot system now" and follow the instructions on the display
You will need:
Computer running Windows8 / Windows 7 / Vista / XP 32/64 Bit;
- loaded drivers.
First step: Move the file to the root of the C: drive and unpack it so that you do not get unnecessary folders nested one into the other:
On the C: drive, the Android directory should appear with the Driver and Tools inside.
Second step: Turn off the device, connect it to the USB port of the computer with a cable, and without hesitation, hold down two buttons at the same time: volume down and the power button. If you did everything correctly, you will see a droid lying on its back under the "Start" sign:

Windows will notify you almost immediately when a new device is found; ignoring this, we follow to the device manager (usually just right-click on "(My) Computer" -> Properties -> Device Manager), we find in "Other devices" "Unknown device" (or "Android 1.0") c exclamation point in the yellow triangle and double-click on it.
Click "Update driver", refuse to search the network and select the local search for the driver, directing it to the C: \ Android \ Drivers directory and allowing it to search in subfolders.
If the warning "Windows Security (could not verify the publisher)" appears -> Install this driver anyway. As a result, the tablet will be defined as Android ADB Interface:

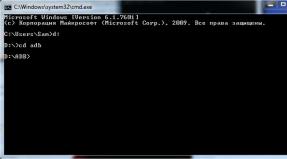
Third step: Open the command line. Press the Win + R keys and enter cmd:

A black window will open with a friendly blinking cursor, in which we write in English letters: cd C: \ Android \ Tools and press Enter:

We ended up in the directory where fastboot.exe is located, now we will make sure that we did everything correctly and that the device is available. To do this, enter the command that will show the connected devices - fastboot devices and see the following:

If instead we see "waiting for devices ..." or something like that, there is a good reason to reboot / reconnect the device correctly (two buttons after connecting to the USB port) / remember if alternative driver versions were installed earlier.
Congratulations! You have just done what is essentially the biggest and most difficult job. In the future, from the third step, start all the operations that can be performed through fastboot.
Unlock Google Nexus 7 Downloader 2013
This is a necessary step to install a functional custom TWRP recovery and custom ROMs.
Leads to a complete loss of all data, it is recommended to do BACKUP.
We type in the command line (or copy / paste):
fastboot oem unlock
We confirm our actions by agreeing with the volume / power buttons. The next time you reboot, you will see the "ajar lock" symbol at the bottom of the screen, then the job is done: the bootloader is unlocked.
Locking the bootloader
To block the bootloader, enter in the command line:
fastboot oem lock
Installing custom recovery on Google Nexus 7 2013
Downloading.
We connect the device in fastboot mode, move the downloaded recovery file to the C: \ Android \ Tools directory and enter the command:
fastboot flash recovery twrp.img
Installing Root rights on Google Nexus 7 2013
Downloading.
We drop the file into the tablet memory, turn off the tablet and go to fastboot. Next, use the volume buttons to look for the Recovery Mode item and press the power button. Click on the Install item and select the Root. After installation, select Reboot System.
You will need:
- unlocked bootloader;
- installed recovery;
First step: Download the desired firmware file in a zip archive. You also download Google Apps (Gapps). Throw the files into the root of the tablet's memory.
Second step: Turn off the tablet. We hold down the power key and the volume down key. Use the volume keys to select the Recovery mode item and press the power button. The tablet is loaded into recovery mode.
Third step: Select the Install item, find the file of the selected firmware and swipe to the right for in a specially designated area, wait for the installation to finish. After completion, press Wipe cache / dalvik, do a swipe, press the Back button, press the back button and select Google Apps if downloaded. Install in the same way as the firmware.
Fourth step: Return to the main recovery menu. Click on the Wipe item and swipe to the right. Next, click on Reboot System.
Congratulations! You now have new firmware installed.
You will need:
- Installed drivers;
- ADB and Fastboot utilities;
- unlocked bootloader;
First step: Download the official image 4.3.
Second step: Unpack the contents of the archive into the folder with the ADB and Fastboot utilities (the link is in the header).
Third step: Boot into Fastboot mode. Run the flash-all.bat file. You are waiting for the end. The device may reboot during the firmware.
Congratulations! Your Google Nexus 7 2013 tablet has been returned to factory condition.