Plasticine painting. Ideas for creativity. Drawing with plasticine (plasticineography) Drawings from plasticine on paper for children
Plasticine paintings are a whole trend in the art of modeling from plasticine. This trend even has its own name - plasticineography. The difference between this direction and others is that the plasticine craft is located on a horizontal surface.
Sometimes masters sculpt pictures from plasticine on cardboard, sometimes on glass. Plasticine is smeared with some effort, so the base for the craft must be strong and tough. Next, the image is applied with plasticine.
Plasticine paintings for children are even more suitable than three-dimensional figures. The fact is that it is sometimes difficult for small handles to give the desired shape to plasticine, while even the smallest children can smear the clay on a hard surface.
Today we will make a painting in a rustic style "Cockerel on the hedge".
Plasticine painting "Cockerel"
A do-it-yourself plasticine painting is created as follows:
Take a square sheet of white cardboard.

We draw on the sheet with a pencil the border of heaven and earth.

The turn has come to work with plasticine. To make the plasticine easy to apply, you can hold it a little on the battery, in the sun, under warm water, or just knead it in your hands. The main thing is not to overdo it, otherwise it will become too soft and will not keep its shape.
Fill the lower part with green - this is grass.

Fill the upper part with blue - this is the sky. You can put a whole piece of plasticine and smear it over the surface, or you can fill the space with many small pieces of the desired color and smear them one by one, filling the entire white surface.

Apply a thin layer of white plasticine - these are clouds. If blue plasticine appears through them, then they will turn out to be very natural and light.

We roll long brown sausages. From them we collect a plasticine fence.

We take yellow plasticine. We glue the body of the cock.

We attach the round head.

Decorate the cockerel's neck with red-orange "feathers". We make feathers from strips of plasticine, on which scars are finely-finely applied with a stack.

We decorate the body of the cockerel with scars. We glue the yellow tail.

Decorate the tail with red plasticine feathers.

We sculpt a beard, beak and scallop from red plasticine.

We glue the eye.

Detail by detail, we sculpt a patterned wing for the cockerel. We make points on the wing with a thin stick or an awl.

We sculpt and fix sunflower petals in the picture.

Decorate the sunflower with a brown center. We sculpt the stem and leaves of a sunflower from green plasticine. We sculpt the second sunflower.

Our picture from the Picture from plasticine "Space"
Plasticine painting "Day of Knowledge"
We begin the picture from plasticine "Day of Knowledge" by covering the dense cardboard base with dark blue or purple plasticine.


Plasticine painting "Fish"
Look at the video how to make a picture from plasticine "Rybka".
Modeling pictures from plasticine is a great way to develop fine motor skills in a child.
This article will help your child develop the initial skills of plasticine sculpting: rolling and flattening balls, rolling sausages and working with a stack. The child will learn to make himself colorful pictures from plasticine.
A few simple and useful tips before getting started. Take plasticine in your palms and warm it, then the plasticine will become soft, pliable, and it will be easy and simple to sculpt from it.
If you sculpt from multi-colored plasticine, be sure to wash your hands before working with white plasticine. Otherwise, particles of other colors adhering to the hands will mix with the white plasticine and color it.
Plasticine painting Amanita.
For work, you will need cardboard on which we will sculpt a plasticine picture, the plasticine itself and a board for rolling plasticine.

First, let's make a suitable background and learn how to work with plasticine. Pinch off small pieces of plasticine from the plasticine and smear them on the cardboard with your finger. We make a frame around the edge, roll out plasticine of a different color with a sausage and slightly flatten it. The beginning of our picture has been laid.

Then we make fly agarics. Roll two short sausages from white plasticine, flatten them and stick to the workpiece - these are the legs of the fly agaric. To make a mushroom cap, first roll out the red plasticine sausage, draw the outline of the mushroom cap, and then fill in the entire inner space. Don't forget to make a mushroom skirt.

Roll small balls from white plasticine, gently stick them onto the caps of the fly agarics. Roll the droplets out of dark green plasticine, flatten them, make veins in a stack.

Roll up balls from blue plasticine, flatten them, cut out the bells with a stack.

From yellow plasticine, make a bee's body by first rolling and flattening it. Stick your head and strips of black plasticine.

Make the wings of a bee from gray or blue plasticine rolled in the form of droplets.

The plasticine picture is ready. You can come up with and add something of your own.

Plasticine painting Butterfly.
We select the appropriate color of plasticine and use our fingers to apply it to the base of the picture, smearing it over the entire surface.

We begin to make the butterfly with the wings. We roll two identical balls, make droplets from the balls, pressing on one side with our finger and flatten them. This is how wings are made. We also make the lower wings, but we take a little less plasticine.

I will fold the wings in the middle, we are already making the head and body of the butterfly, do not forget about the antennae.

We decorate the wings with multi-colored plasticine. Cut out the clouds with a stack of flattened white or creamy plasticine.

Below, along the butterfly, we make grass from two shades of green plasticine. Plasticine is divided into several identical pieces, roll up long droplets, flatten them. We apply on the picture by tilting them slightly to the side.

We make chamomiles in a familiar way, from plasticine droplets.

The finished works look amazing and will decorate any wall in the house.

Plasticine painting Ladybug.
As in the first two cases, we completely cover the base for the application with plasticine.


Plasticine painting Caterpillar.
In the classroom in kindergarten or at school, working with plasticine, you can feel yourself not only in the role of a sculptor, but also as an artist, if you mold a picture from plasticine. This is also a kind of painting. Drawing pictures with plasticine on the surface.

Using a pencil, divide the cardboard horizontally into two parts. We cover the upper part with blue plasticine - the sky, and the bottom with green - grass. We make flowers around the edges. In the middle we make a caterpillar.

Plasticine painting "Raspberry"
Looking at this picture from plasticine, the words from the song are remembered.
"The raspberry berry attracted us to itself,
The raspberry berry called for a visit in the summer.
How these sparks sparkled at dawn,
Oh, how sweet the raspberries were. "
Continuing the theme of plasticine paintings, I want to show how to mold a sprig of raspberries with children. The raspberry bush looks almost realistic, like a real one.

In the applique we use yellow, raspberry, green and white plasticine, cardboard from a candy box. Cutting off the cardboard of a suitable size, coat it with yellow plasticine. You can use colored cardboard, but plasticine holds up worse on paper. From raspberry plasticine we sculpt a shape resembling a bucket, with a stack we divide it into two parts. We roll up small balls.

We stick the base of the raspberry on the yellow base, and put the balls on top by lightly pressing. We make twigs and sepals for the berries. Roll a small ball out of green plasticine, flatten it into a cake, make a sepal with a stack, stick to raspberries.

For raspberry leaves, you need to make droplets, flatten them, and make cuts along the edges with a stack, and veins.

Raspberry flowers are more ordinary-looking than ours, but nothing prevents us from making them pretty. We make five small cakes from white plasticine and one of yellow ones. We put the cakes into a flower. We make a few more of these flowers and add them to the bush.

Plasticine sculpting is one of the first types of creativity for kids. Plasticine can be given to a child as early as a year. You can punch to form flagella, circles and just smear it on cardboard and, of course, make an application from plasticine. This will definitely captivate the child for a long time. Of course, the older you are, the more complex the figurines and appliqués can be made. When sculpting from plasticine, the fingertips will always be involved, which well stimulates the child's speech development. True, this is another way of developing fine motor skills, as well as imagination, fantasy, promotes the development of coordination of actions and improves perseverance.
Technique types
There are the following main types of plasticine applications:
1. Technique of smearing. With such an application, you can use a ready-made template or drawing, or you can give a howl to fantasy. To fill in the drawing, knead the plasticine well and stretch it along the sheet, filling in individual sections of the drawing. The work should be done carefully, without going beyond the contours.
2. Quilling technique or flagella technique. Plasticine applications made by this method will have a very unusual and original look. The drawing can be arbitrary, or you can fill in a ready-made template. To do this, roll out thin plasticine filaments and twist it into the desired shape. To attach, slightly press down on the cardboard.

3. Plasticine mosaic. Perhaps the most common and fascinating type of plasticine applique for kids. This variation involves the use of a template. You just need to tear off small pieces of plasticine and fill the drawing with them.

4. Technique of volumetric application from plasticine. Suitable for older children. Here you only need three things: a sheet of cardboard, plasticine and limitless imagination. The child himself comes up with a drawing and creates all its details from plasticine.
5. Combined application. Here you can use all the techniques listed above, using or not using a template.

I would like to draw your attention to another very exciting technique - plasticine applications for the little ones. For the holidays, any picture made using this technique will make a splash. You can choose any thematic picture.
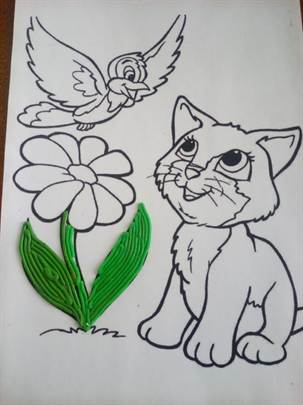
Plasticine "Cat"
Let's show by example the application of plasticine flagella on a template.
Required materials: a prepared template picture (preferably on cardboard), a syringe of at least 5 ml, soft plasticine of different colors, a glass of hot water.
1. Let's prepare the first color with which we will work. We crumple a piece of plasticine so that it fits into the syringe.

2. Place the syringe with the plasticine in hot water for about half a minute (depending on the temperature of the water and the quality of the plasticine), so the plasticine will become softer. Slowly squeeze the plasticine onto a smooth surface.
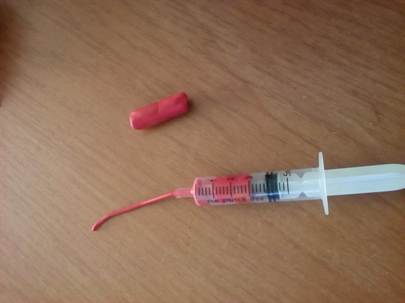
3. Repeat steps 1 and 2 for other colors. Using this method, neat flagella of the same thickness are obtained.

4. Let's start filling in the application. You need to perform each detail one by one, filling evenly. You should not be afraid of breaks - we take the next piece and continue.


5. The main part of the work is done. The background can also be made of plasticine using the smear technique. In this option, we will simply suggest using watercolors or gouache.

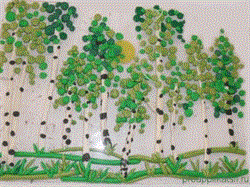
"Autumn in the forest"
Let's show another example of a volumetric plasticine applique, rich in details - "Autumn in the forest". This is a vivid example of how a plasticine application can also be trainable: to show the season, forest dwellers, tree species, bird migration, varieties of mushrooms.
We need: a sheet of orange or yellow cardboard, soft plasticine, a board and a plasticine knife.
Consider the implementation of the application for children in stages:
1. We make a trunk from white plasticine and fix it approximately in the middle of the sheet. Next, we form the branches.

2. With the tip of the knife we depict the relief of the bark.
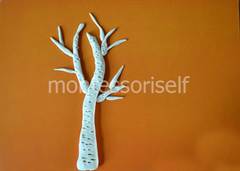
3. Finish the barrel with black plasticine by simply attaching pieces of black plasticine.

4. Now the yellow plasticine comes in handy. We tear off the pieces from it, slightly pressing them, attach them to the branches of the tree.

5. Add the fallen leaves to the ground in the same way.

6. From white, brown and red plasticine we form mushrooms - boletus and fly agarics.
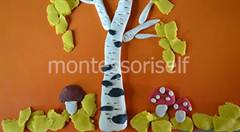
7. Making a Christmas tree. It should be formed from the bottom by the overhead method. We make "needles" with the tip of a plasticine knife. We attach the trunk to the Christmas tree.
Content
Plasticine is one of the favorite materials for children's creativity. With it, you can sculpt original crafts and even create drawings. Plasticine painting is an unconventional artistic technique, which consists in drawing with plasticine on cardboard or other dense base. Finished works can be flat, semi-volume or volumetric. Being engaged in plasticineography, the child develops fine motor skills, the movements of the fingers are differentiated. This is a good preparation for learning to write.
Plasticine painting technique
The technique of plasticine painting is a bit like oil painting - colored plasticine is rolled into balls and applied to cardboard with strokes. The young artist develops his color perception and sense of harmony. For good work, you need to choose a high-quality plasticine of the appropriate type.
The assortment is great: there are denser varieties, and there are soft, smooth, easily melting varieties. In the sets, you can find any palette: both from basic colors, and including many shades. If you are using plasticine as paint, you can mix the two colors to achieve the desired tone.
When working on plasticine paintings, you need to thinly roll out all the folds, inequalities. If somewhere the layer turned out to be thick, uneven, the excess can be removed using stacks. Strokes on a plasticine panel can be different. It is not necessary to work with your fingers, you can use tools - stacks, a knife, a toothpick, a roller, syringes with and without needles, sticks for indentation. To make a picture from plasticine, you need to prepare the base, and fix the details of the desired shape and color on it.
Plane modeling
A small child can be taught to make pictures from plasticine according to the same principle as paint. The first stage will be flat modeling - the creation of paintings of varying degrees of relief. There are forms with a protruding and in-depth image:
- High relief (the image protrudes strongly above the surface).
- Bas-relief (details protrude slightly above the base).
- Counter-relief (an image deepened into the surface of the base: the drawing is scratched or pushed onto a plane with a stack, stick).
So you can depict a picture, previously outlined with a contour on a cardboard or glass base. The child can wield a finger, learning to calculate the strength of clicks and strokes, or use improvised tools. In kindergartens, they offer to depict, for example, recognizable plots from your favorite fairy tales or cartoons using the technique of flat sculpting or to make plasticine comics.
Volumetric paintings from plasticine
When your child learns how to make simple flat images, you can try to make a three-dimensional picture, similar to a work of art. The essence is not so difficult: you need to separately sculpt the details of the work (wood, fruits, animals), and then fix them on the surface.
Parts can be of any shape and size. Various techniques are used for their manufacture: rolling, flattening, rubbing, smoothing, pulling the part away from the general shape. It must be remembered that if you are going to place plasticine drawings under the glass, the material may shrink and the work will lose its original volume.
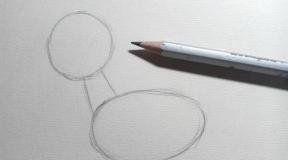
DIY plasticine paintings
Drawing with plasticine is well suited for independent study with a child, as well as for labor lessons for elementary schoolchildren or exercises for fine motor skills in kindergarten. When working, the child learns to make both large and very small details (eyes, leaves). For sculpting you will need:
- Base (you can use glass, unnecessary discs, a sheet of plywood).
- A board for rolling out plasticine and for sculpting parts.
- Knives for cutting and applying small parts.
- A simple pencil.
- Water for occasionally wetting hands.
First you need to draw on the basis of a pencil drawing a template for the future picture (field, green forest). For it, you need to rub small pieces of plasticine with your fingers. Parts can be formed from round or elongated pieces of different sizes. You can use a separate stencil for each part. Then they must be carefully pressed into the background.
If you get irregularities, smooth them out with your fingers, previously soaked in water. In addition, remember the rules for composing a composition: those details that will be in the foreground should stick out more than others and be executed more clearly (for example, bright flowers, pebbles on the seashore, animals). Fasten them on top of the rest of the parts (in the last can) and add some kind of pattern applied with a needle or toothpick.
On cardboard
A plasticine painting on cardboard for children can be the first step towards making more complex crafts. It is not necessary to buy special material, you can use, for example, cut sheets from a shoe or household appliance box. It is recommended to cover the finished painting with varnish so that it does not become dusty.
The work will require the same materials as for any other sculpting technique. Remember that it is more difficult to wipe off excess stains from cardboard, so keep napkins ready. The step-by-step algorithm of actions is as follows:
- We apply a drawing on the cardboard (you can buy a ready-made stencil with a picture in a special store, then fill it with plasticine).
- We make the background of the picture. First, let's define the background color. Small pieces are pinched off from the block and applied to the surface in the form of strokes.
- We rub the plasticine strokes with our fingers within the boundaries of the picture.

On the paper
To create a picture from plasticine on paper, it is better to choose a dense base, because too abrupt movement can tear a thin sheet. For the first works, it is recommended to start with the simplest paintings, for example, kids will like the image of a cheerful rainbow, white clouds and a bright sun in the sky, green grass with cornflowers or daisies. For the first works of a preschooler, it is better to choose a small size (about a quarter of an A4 sheet).
You need to pinch off small pieces from the bar and apply to the base in accordance with the plan. In this case, different sculpting methods are used - rolling or smoothing, smearing, sometimes pinching, flattening or flowing from one color to another is required. If your idea involves a clear drawing of a large number of small objects, a medical syringe without a needle will come in handy. They use it like this:
- Put a piece of plasticine inside the syringe, heat it carefully (on a hot battery or in a cup of warm water);
- Squeeze out with thin threads (if you want thicker, use a pastry syringe).
- Soft transitions of shades can be obtained if you first mix the necessary shades of plasticine in your hands, and only then load them into the syringe. Do not mix more than two colors at the same time.
On glass
Plasticine applications on glass are an easy-to-perform, but dangerous kind of creativity. You must follow the safety rules so as not to get hurt. To create an applique you will need:
- Multi-colored plasticine.
- Frame.
- Black ink or black marker.
- A sheet of paper with a printed pattern.
- Cotton wool and alcohol.
Since few people succeed in creating pictures for plasticinography on glass the first time, it is better to look at the master class in advance on the Internet step by step with the child, and then follow the recommendations:
- Find drawings (it is better to choose simple black and white). Remember that the younger the child, the larger the details should be.
- Remove the glass from the photo frame.
- Degrease the glass by wiping with cotton wool and alcohol.
- Place the printed sketch under glass.
- Outline the outline with a black marker on the glass.
- Get the drawing.
- Determine what colors you will use. For preschool children, the task can be simplified - leave a colored drawing under the glass. So the child will see what color the plasticine should be taken.
- Separating small pieces of plasticine of the desired color, stick them on the glass, rub without going beyond the outline of the drawing. The more the material is rubbed (into a thin layer), the weaker the pigment will be.
You can choose a method of work: either first fill in the places of one color with plasticine, and then move on to others, or first make small elements (separately sculpt the eyes of the beast, leaves, small flowers or a ladybug), then go to the main drawing from plasticine.
When the entire base is filled with plasticine, you will need the help of an adult. The picture must be turned over with the front side facing you, to examine and correct the flaws (gaps between pieces of plasticine, going beyond the contour). Then wipe the glass again with alcohol, without touching the drawing, and insert the work into the frame.

Master class on working with plasticine. Painting "Morning Tea"
I offer my job for classes with children of preschool and primary school age.
Target:
Develop a sense of form, texture, tactile sensations. Strengthen fingers and hands, i.e. useful in teaching writing and drawing, and in the treatment of dyslexia, a severe reading disorder.
Tasks:
Develop children's creativity, imagination, taste;
Education of perseverance and accuracy in work
We are familiar with this wonderful material from early childhood - plasticine. It is malleable, multi-colored, able to take any shape, in addition, it is affordable and inexpensive.
Necessary materials:
1. Plasticine
4. Marker black
5. Transparent nail polish
7. Fantasy and smile

Step-by-step workflow:
Selecting a picture. You can take it anywhere: from a book, magazines. I took last year's calendar.
We take a frame with glass, disassemble the frame. We put glass on the calendar, and carefully outline the drawing with a marker. Then I sealed the finished painting with tape, because the marker was washed off from me.
Here's a picture we got

We turn the glass with a pattern to the wrong side and start work
We start work with the smallest details. We sculpt the middle of the flowers first

Then you can the flowers themselves