Note 4 firmware w3bsit3-dns.com. Flashing the official single-file firmware
CyanogenMod 13 firmware based on Android 6.0 Marshmallow has recently appeared. This software is currently only available to users of Samsyng Note 4 N910F / N910G. Owners of the official version of the Galaxy Note 4 N910C (Exynos) need to wait a bit for now.
Note! This firmware is for N910F / N910G and does not fit N910C / N910H.
Before starting work, copy the data so that the system can be restored in case of incorrect actions (). To implement the CyanogenMod installation, you must have a custom recovery like either.
Immediately, we note that while the firmware is working a little incorrectly. NFC, fingerprint scanner does not work, and there are also minor minor bugs. However, in the next versions, the developers will eliminate all the shortcomings. According to preliminary testing, the battery runs down a little faster. If you still want to install new software, then follow these steps.
Steps to Install CyanogenMod 13 on Galaxy Note 4
1. Onboard the smartphone must have CWM Recovery or TWRP. In addition, there should be more than half of the battery remaining.2. Download,. We remind you that the firmware works correctly only on N910F / N910G models.
3. Copy files to any (external or internal) smartphone memory.
4. Turn off the device and boot into recovery (press Home, Volume up, Power).
5. Mandatory cleaning of the cache in the recovery menu: Data and Cache, Dalvik Cache, System.
6. Installing the archive firmware Zip.
7. Installation Gapps.
8. Installation Blobsv.
9. Next, we reboot
Android 5 on mine, even after a factory reset and reinstallation, is distinguished by such armor-piercing glitches (which is only the manner of the phone from time to time every second for half an hour with signals to give notifications for something incomprehensible) and with it power consumption has deteriorated so much that I decided not to hesitate and return to the bosom of the holy catholic church - that is, on Android 4.4.4. In the comments, I was asked to tell in detail about which dances with a tambourine should be used to carry out this cleansing process - well, I'm telling you. This is all in relation to Note 4, but, with some changes, it should be suitable for other smartphones from Samsung (only firmware, of course, you need to choose the appropriate one). 1. Make a backup of all your data I will not describe in detail how this is done. If you use a memory card, then your data is usually stored on this card - nothing will happen to it. You need to save the data (settings) of certain applications and desktop settings (I have Nova Launcher - she can do this). Well, or just make a full backup of all data and applications - Samsung can do it. Next, check that the Kies program is not running on the computer and that the "USB debugging" mode is enabled on the smartphone (in the section for developers). 2. Make a full reset (wipe) user data Turn off your phone. Simultaneously press "Volume up - Home (button below) - Power". As soon as the android image appears, release the buttons. This is the stock Recovery mode. Select the Wipe Data / Factory Reset item with the "Volume Down" button, there you press the "Power" button - a reset occurs. 3. Firmware version Android 4.4.4 You should know exactly which version of the phone you have. Even Note 4 has different versions - N910F, N910C and so on. You need to find the proprietary firmware specifically for your version of the phone - they are all on the site w3bsit3-dns.com. For example, here is a theme for the Note 4 N910F model - there are proprietary firmware there. The firmware you need should be downloaded to your computer - it will most likely take 2-3 GB. Next, find and download the Odin flasher (like the latest version is now 3.10, download). Run Odin as administrator (right-click on the executable file). Press the AP button in Odin and select your firmware file (it has the extension .tar md5). Odin will check this firmware and if everything is in order, it will display a corresponding message, something like that.

Check that the following parameters are set in the "Options" tab.

Next, the smartphone must be entered into download mode. To do this, you need to turn it off completely, and then turn it on, while simultaneously holding "Volume down - Home button - Power". As soon as some information appears on the screen, the button must be released. There should be a picture like this on the screen.

Connect your smartphone with a USB cable to your computer. Press "Volume up". If Odin saw a smartphone, then there will be something like this picture.

After that, click Start - and the flashing process begins. Do not disconnect your phone from the computer until the process is complete and the phone restarts. That's all, the phone will have Android 4.4.4 firmware installed, which I did for myself. If you want the device to Root (well, for example, to remove some system programs that you do not need at all) - this is done in almost exactly the same way, only a full reset is not necessary, and on w3bsit3-dns.com you need to download CF-Auto- ROOT for this version of Android, enter the phone into download mode and flash CF-Root through Odin in the same way.
Instructions for flashing a Samsung SM-N910C Galaxy Note 4 smartphone to the original or custom firmware, a new version of android, obtaining Root superuser rights on a Samsung Galaxy Note 4 phone.
How to flash a Samsung SM-N910C Galaxy Note 4? there are several ways to flash this smartphone, in this article I will tell you how to flash a Samsung Galaxy Note 4 to the official original firmware using the Odin program. And also a way to flash custom firmware on a Samsung Galaxy Note 4 phone using custom recovery, without the need for Root.
Before flashing the gadget, it is imperative to disable the reactivation lock so that the phone is not blocked. To do this, go to "Settings" there, select the item "Security" and uncheck the item "Blocking reactivation". If the data on the device is encrypted, then you need to completely decrypt it, otherwise after the firmware you will not be able to restore access to it.
1. Flashing the official single-file firmware
Before flashing, be sure to fully charge your smartphone, check if the cable is not damaged through which you will be flashing your Galaxy Note 4, Kies and its services are closed on your PC.
Be sure to first read these instructions for flashing Samsung SM-N910C Galaxy Note 4 to the end, and only then proceed to flashing your "animal".
And so the first thing to do is download and install on the PC the driver for connecting the phone to the PC - Drivers, then download the programmer program itself - Odin3 v1.85
Next, you should download the firmware you like - N910CXXU1COH4 Android 5.1.1, N910CXXU1BOE1 Android 5.0.1
Samsung Galaxy Note 4 N910 Film
We call the task manager and stop all processes with the word “Kies”. Run the Odin 3 1.85 program as administrator and see the following window:

Press the PDA (or “AP”) button and select the TAR file from the folder where we placed the downloaded firmware, and set all the checkboxes as shown in the screenshot below. In addition to the firmware, the archive may contain the SS_DL.dll file - we do not consider it - this is the remainder of the KIES (garbage).

We enter the smartphone into download mode.
To do this, turn off the smartphone and then, on the switched off phone, simultaneously hold down the Volume Down + On button. + Home, then we confirm the desire to flash by pressing the Volume Up button, a green robot should appear with the inscription “Downloading ...” and connect the smartphone to the PC using the supplied USB cable. In the upper left corner, the window with the inscription ID: COM will light up in blue - this is the PC recognized your smartphone.

Press the START button, after which the firmware process will start. In no case should you interrupt the firmware - we will get a high-tech brick. Usually the process lasts 4 - 5 minutes, it all depends on your computer. During the firmware process, the smartphone will reboot itself, wait until the message “RESET!” Appears.
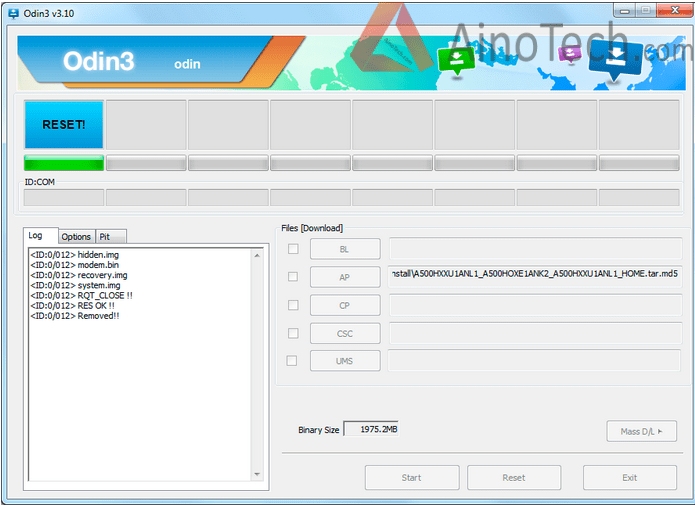
That's all, you have upgraded your Samsung SM-N910C Galaxy Note 4 to the new official firmware.
2. Instructions for flashing custom firmware on Samsung Galaxy Note 4
The custom firmware is almost completely similar to the original firmware, but the truth is with some additions, which we will consider in detail below.
And so, first you need to install custom TWRP Recovery on your smartphone. To do this, download the TWRP Recovery archive.
Next, we take out the file with the .tar extension from the archive and flash it using ODIN according to the first paragraph of this instruction (firmware of the official firmware), the difference is that we insert not the firmware into the PDA field, but our custom recovery.
It is also important that when flashing custom recovery without getting Root, when the smartphone is restarted, the stock recovery is restored, so you need to flash the custom recovery with removing the jackdaw in Auto reboot in the Odin 3 program, after flashing the custom recovery, turn off your Samsung SM-N910C Galaxy Note 4 manually (right from the Download mode, disconnecting from the computer), then from the off state go to Recovery mode (with three buttons)). After CF-Auto-Root, this is no longer relevant, the procedure for restoring the stock recovery is nailed.
The firmware itself can be downloaded - for example TeamEOS, AllianceROM or the firmware catalog - Needrom
Then we go into custom recovery. To do this, turn off the device and simultaneously hold down the buttons Power supply, Home and Volume Up.
We delete all data on the device (Optional). In recovery, we choose Wipe date / factory Reset -> Yes - Wipe all user data.
Go to Wipe cache parition and choose Yes -> Wipe cache partition.
Go to Advanced -> Wipe dalvik cache -> Yes - Wipe dalvik cache.
Go to Mount and Storage and format the partitions:
/ boot
/ cache
/ system
/ data
Go to Install Zip -> Chose zip from storage / sdcard1(Or chose zip from external sdcard depending on the recovery), select the previously copied firmware on the memory card and select Yes - install, the firmware installation will start.
After installing the firmware, in the recovery choose Reboot system now and the device will restart.
In this post, we will walk you through how to properly update your operating system. There are several ways to do this. First, these are automatic OTA updates to the latest official OS version. Secondly, a manual update to the latest official version of the operating system. Thirdly, numerous custom firmwares. We will discuss all this in detail below.
Before proceeding with the OS upgrade, you need to back up important data. Of course, for OTA updates this item can be missed, but for custom firmwares it is mandatory (if you do not want to start using your SamsungGalaxyNote 4 from scratch). In addition, do not forget that installing custom firmware is an unofficial procedure that leads to the loss of warranty. You can restore the latter by returning all factory restrictions. This will require manually installing the latest official version of the operating system.
Another important nuance is that SamsungGalaxyNote 4 there are several different modifications. In order not to break the device, carefully check its model number and compare it with the one indicated in the corresponding manual, or with the one for which the update files are intended. Do not forget that all responsibility for carrying out such operations falls solely on the shoulders of the owner of the device. Therefore, it is worthwhile to carefully follow all the points indicated in the manual, as this will avoid unwanted problems.
Updating Samsung Galaxy Note 4 with OTA
WITH OTA updates are very simple. Their appearance depends on several factors: region, mobile operator, device model. If you are lucky and OTA update for your SamsungGalaxyNote 4 ready, you will receive a notification. The update can also be checked manually. For this you need:
- Connect to a WiFi network, as you have to download a large amount of information.
- Open the menu Samsung Galaxy Note 4.
- Go to settings.
- Open a menu item with information about SamsungGalaxyNote 4 .
- Check the sub-item in which information about updates appears.
- If you are lucky and the notification is in place, then to install it, you will have to follow all the further instructions that will appear on the screen. SamsungGalaxyNote 4 .
We update Samsung Galaxy Note 4 to the latest official OS version using Odin "a
For this operation, you will have to perform several preparatory steps. First, you need to disable all antivirus and security tools on your PC. Secondly, on SamsungGalaxyNote 4 you need to activate the USB debugging option (it is located in the developer options). Thirdly, the battery of the smartphone needs to be charged so that it does not sit down during the installation of updates. And don't forget the USB cable you can connect to. SamsungGalaxyNote 4 to the computer. And now directly about the installation procedure itself.
1. Download and install Odin on your PC.
2. We put on the computer SamsungKIES and drivers for SamsungGalaxyNote 4 .
3. Download the update file and unpack its contents to your desktop. Be careful and only use files that match your model. SamsungGalaxyNote 4 .
4. Launch Odin.
5. Run the download mode on SamsungGalaxyNote 4 .
6. Connect the phablet to the PC via USB.
7.In Odin a message with the text "added" should appear, and the ID: COM section should turn yellow or blue.
8. Now in the program you need to select "PA" and find the update file on the desktop.
9. After that, you can start the installation process by clicking on "Start".
10. If the procedure was successful, then One will issue a message with the text "pass", and the ID: COM section will turn green.
11. Now SamsungGalaxyNote 4 can be disconnected from the PC and restarted.
12. If One hangs, the phablet must be disabled and restarted. After that, you need to reinstall the drivers and try again.
Updating Samsung Galaxy Note 4 with custom firmware
The preparatory stage in this situation is absolutely the same as in the previous case. As for installing any custom firmware, it is to a certain extent associated with risk: there is no guarantee, you need to do a wipe, if something goes wrong, you will have to be responsible for everything yourself. But many owners Android this does not stop devices, as a result of which they enjoy all the advantages of custom firmware. As for the installation of a custom ROM itself, the procedure includes the following points:
1. Download the custom firmware file for your model SamsungGalaxyNote 4 .
2. We save it on the desktop and do not unpack it.
3. Connect the phablet to the PC via USB.
4. Move the update file to the SD card of the smartphone.
5. Disable SamsungGalaxyNote 4 from the computer.
6. Load the phablet into recovery mode
7. We make a wipe (wipe data factory reset, wipe cache partition and wipe dalvick cache).
8. Install the firmware file (install zip from SD card and choose zip from SD card).
9. Now that the custom firmware is installed, you need to reboot the device (reboot system now).
10. If at the first boot Note 4 frozen (does not load for more than 10 minutes), then you need to go back to recovery and make a wipe (wipe data factory reset and wipe cache partition), and then restart the smartphone.
Do not forget that to install custom firmware, you need to unlock the bootloader, get root rights, install a custom recovery image, and also back up all important data and settings.
Updating Samsung Galaxy Note 4:
rating 80 of 80 based on 80 ratings.
Only 80 reviews.