How to make a broom from packages. From what you can make a quality broom for the yard. Tools and materials for work
Plastic bottles are a wonderful and versatile material that serves many purposes. Not only do we store liquid in them, but containers can also be useful for all kinds of crafts. Some may be purely decorative, while others are useful in practice. One way to use plastic bottles is to turn them into a broom. This is a useful device that you need for a home or garden. Instead of buying a broom from the store, you can spend an hour or two making one.
Everyone has the material, and a banal set of tools is required. Let's learn how to make yourself a broom from plastic bottles step by step.
Tools and materials for work
It does not take a lot of money to create a broom from a bottle with your own hands. All accessories are in the house, so you don’t have to run to the store. The set of tools is simple, and even children can work with them. What is required for work? Here is that little list:

From such a set of simple things, you get such a practical broom from a plastic bottle.

Now that you have everything you need, you can start creating a product with your own hands.
Creation technology
It will take you about an hour to produce, plus or minus. There is nothing difficult in the work. The main thing is to follow the instructions and do the job carefully. For your convenience, we have made step-by-step instructions that will help you. So, consider the creation in stages:
- Take the first bottle and a clerical knife. It must be sharp. Cut off the neck from it, stepping back a few centimeters from the top.

- Cut off the bottom of the plastic container in the same way.

Tip! Work carefully so as not to injure your hands. Plastic is a soft material, so it lends itself well to processing.
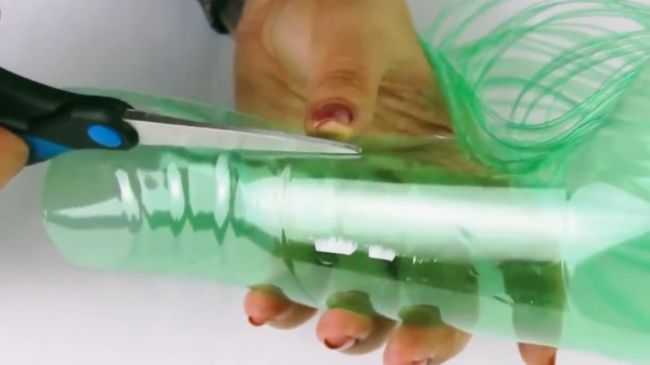
- Now you need scissors. Each broom has twigs or stalks. Your task is to create these stems. Using scissors, start cutting the workpiece along, from the bottom up. The width of each strip is approximately 0.5-1 cm. Do not cut it to the very end. Move a little above the middle, leaving about 6 cm on top.

- Treat the rest of the bottles in exactly the same way. Leave only two of them untouched. Please note that the more products there are, the thicker the broom bunch will become. It will be more effective in cleaning.
- So, at this stage, you have 3 or 5 blanks ready (depending on how much you stocked initially), with the neck cut off and the rest cut into strips. You also have two intact plastic bottles. Take one of them and, without cutting off the neck, do the same as with the rest.

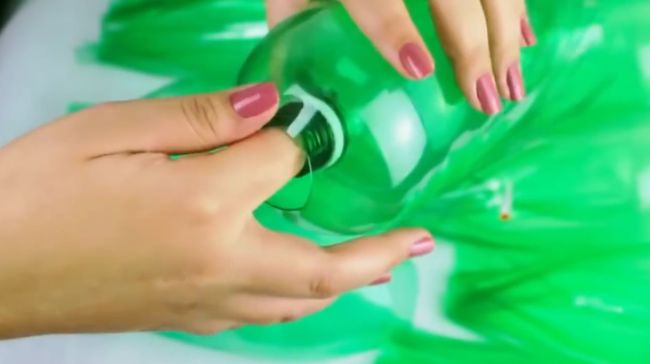
- Your bottle broom is almost ready. Take a blank with a neck and start inserting it one by one inside each part made without a neck. A product with a neck will freely enter the prepared hole. Fit all blanks completely.
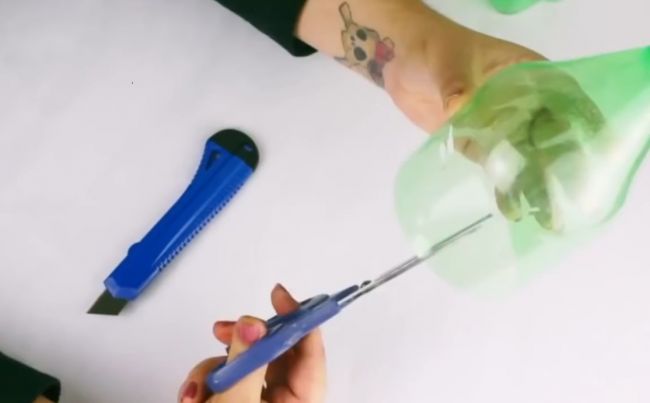
- In fact, the lower part is ready. It remains to bend (flatten) to give shape. But, we will not stop there, but will improve it to make it beautiful and practical. Take the remaining bottle, preferably with a high neck, and cut it in half with a utility knife. We only need the top.

Tip! Do not throw away the lower part, you can make a table or hanging pot, a pen container, an owl or a ladybug out of it.
- In the desired part with scissors, make two cuts on each side, opposite each other. Make the cut approximately to the middle of the plastic part.
- The finished part must be put on a blank made from the rest of the bottles.
- Using a large nail (50 or 100 mm), sew the product in two places in a horizontal plane. You can use an awl. You need to make an effort. Insert the wire into the holes formed and firmly tie all the layers. It should turn out as shown in the photo.

- That's all, the product is almost ready. It remains only to attach a stalk to it. The stick should not enter the neck of the bottle freely, but back to back. To control the thickness, cut it with a regular knife.
- When the stick enters the neck, it remains to fix it with nails or screws so that it does not fall out and does not spin. The nails will securely fasten the handle, and the broom will be one piece.
- For reliability, it is better to use not one, but two or three nails. They need to be driven into the neck with the handle inserted. For better fixation, you can use small self-tapping screws.

You have successfully created a fixture. A do-it-yourself broom made of plastic bottles will do the job perfectly. It can sweep the yard, room, paths, etc. Create multiple brooms and impress your friends with your skills. To make it clearer for you how to make a broom out of plastic bottles, check out this video.
For some, a plastic soda bottle, after drinking sweet water, becomes garbage. And for a practical and creative person, plastic is an endless source of inspiration. Today I will show you how to make a broom out of plastic bottles with your own hands. The plastic broom is very light and durable and will serve you for a long time.
Work description
For manufacturing, we need different sizes. The density and, consequently, the strength of the broom will depend on the number of bottles. Try to take bottles with the same top, for ease of assembly.

Bottles need to be prepared. To do this, you must first cut off the bottom and top of the bottle. But for one smaller bottle, we cut off only the bottom, and leave the top. Then we cut the blanks into strips with a width of 0.5 to 2 cm.  We also need to prepare a couple of covers for assembly. To do this, we cut off a threaded ring at the cap from the plastic bottle, and make a hole in the white cap from the jar.
  Next, we assemble the broom. On the smallest bottle we string all the other cut blanks.
  We fix the broom - we put on a white cap on top and screw the ring.
  The next step is to flatten our workpiece. With a nail heated on fire, we make holes on the panicle itself, and make one hole on the neck of the bottle. For strength, you need to fasten the broom. I did not find the wire at hand and fastened the entire structure with a plastic rope.
  The last thing left is to make a cutting. I had a suitable stick, but it turned out to be of a smaller diameter. I had to increase the diameter with electrical tape. At the very last stage, it is necessary to fasten the broom handle with self-tapping screws. And ready!
Plastic bottles need to be recycled, and the Sámi have to invent a variety of useful and useless uses for them. For example, making a broom out of a plastic bottle is a good idea, but absolutely useless, absolutely. Not all ideas should be implemented, because most of them do not have a rational grain.
DIY broom:
With the arrival of autumn or spring, cleaning the area from leaves and dust puts us in front of the question of where to get cheap garden tools. Many simply buy it, many make it themselves. Internet craftsmen come to the rescue with their advice, but you should be very careful and filter the information. Here, for example, there is an opinion that you can make a good broom out of a plastic bottle, I tried it and realized that this is nonsense.
 Figure number 1 - Broom from a plastic bottle
 Such a broom is practically useless, it is extremely difficult to sweep the streets and leaves with it, and in general, it only looks convenient and practical in the picture.
The thing is that plastic does not have sufficient rigidity, although some write that it can be heated over a gas stove, and due to its shrink properties, it will become harder, I personally checked this, believe me, this is far from the case. Ribbons can be cut using a special tool.
 Figure No. 2 - Cut plastic tapes
 And when you straighten them over the fire, firstly, there is a high probability of getting burned, and secondly, it is a long, painstaking and tedious procedure that will not give you the desired effect.
So do not believe everything that they write, you want to make yourself a broom, there is a way out, but this is by no means a plastic bottle.
Useful application of PET bottles:
For example, you needed to wind a ball of thread or wire or a tighter cut tape from a plastic bottle, I recommend using it as a coil.
 Figure No. 3 - What a bottle neck coil looks like
 The corks can be glued together, but it is advisable to pull them together with small screws or self-tapping screws.
 Figure No. 4 - A reel of bottles with a wound plastic tape
 Plastic bottles have many useful uses, we just recommend that you approach things wisely and do not grab all the ideas at once, you can try to make something useful from a plastic bottle, but we hope that I dissuaded you from making a broom from a plastic bottle.
More recently, an ordinary plastic bottle was just garbage that was thrown into a landfill. Today, they make a lot of various jewelry and decorations. In addition to decoration, this material can serve to create quite practical and necessary things in everyday life.
One example of the useful use of plastic bottles is a broom. Such a product can be quite used for cleaning a private yard. Making it with your own hands is quite simple. This will require some basic tools and materials.
Tools and materials for making a broom
First of all, you will need several bottles of the desired color. It is best to take a larger container volume, for example, 2-2.5 liters. In addition to color and volume, you should pay attention to the shape of the bottles - they should not have corrugations and sharp narrowing. It is ideal to choose bottles that will be with completely straight walls.

In addition, you will need the following:
- Sharp clerical knife with replaceable blades;
- Household scissors;
- Waterproof adhesive for working with plastic products;
- Insulating tape;
- Shank made of wood.
Bottle preparation
First of all, you need to properly work on the bottles. To make a simple broom, you need a frame. It is made from a two-liter bottle as follows. The bottom of the container is cut off with a clerical knife. It is desirable to remove as little plastic as possible. Usually it will be enough to remove only the bottom of the bottle, which is tougher than the walls.
The width of the stripes can be made approximately 0.5-1 cm. The wider the stripes are, the more durable the broom will be. However, with narrower stripes, it will pick up small debris better.
After making the frame, you need to make filling for the broom. To do this, you need a couple more bottles of the same size.
Optionally, you can take a container with different colors of color. The bottom is cut off from them, in the same way as in the manufacture of the frame. In addition, the neck is cut off with a clerical knife. As a result, it should turn out that the upper part has a smaller diameter than the lower one.
When the bottom and neck are cut with scissors, the same strips are cut as in the manufacture of the frame. The width of the stripes is made approximately the same as for the base.
The third bottle is processed in the same way. The result should be two prepared bottles without a neck, and one with a neck for the frame.
Assembly of the working part of the broom
After all the details of the future homemade broom are ready, you can start assembling it. To do this, you need high-quality glue, preferably waterproof. You can also use a glue gun, or at worst, mount with a soldering iron. To assemble the working part, a prepared frame is taken, on which one of the bottles without a neck is put on. Previously, the upper, conical part of the container without a neck is abundantly smeared with glue.
Similarly, the second bottle without a neck is put on the frame. It is also pre-coated with glue at the top. After that, the future broom is left to dry so that the adhesive composition grabs.
Attaching the handle to the broom
While the working part of the broom dries up, you can start making the handle. To do this, you can use the most common stick, which is made from improvised materials. The thickness of the handle should be about 3 cm. If possible, you can use a handle from another product that is no longer in use, or is out of order, for example, a rake.
The selected handle at one end should be pointed and adjusted in diameter so that it can be easily inserted into the neck of the bottle. Accordingly, the cork from the container is thrown away. You can use the remaining necks to fit the handle while the working part of the broom dries.
The prepared cutting is inserted into the bottle and secured with tape. The main thing is that the tape has sufficient adhesive properties. Instead of a tape, it is quite acceptable, and maybe better, to use a self-tapping screw screwed in the area of \u200b\u200bthe junction of the handle and the working part of the broom, perpendicular to the entire product.

Additionally, you can compress the working part of the broom and tie up the bundles of strips with wire. This will result in a broom that will have a wider working area.
Dear readers, if you still have questions, ask them using the form below. We will be glad to communicate with you;)
Plastic bottles are the material that is used quite often. In a plastic container, you can store liquid and use an already empty container for various purposes. For example, a variety of crafts can be made from plastic, which can also be useful. The most popular plastic bottle craft is the broom. Such a device is useful, both in the house and in the country. The production of such a product may take an hour of free time. You don't need a lot of tools for this. In general, next we will talk about how to make a broom out of plastic bottles.
Materials and tools
Many people are interested in the question of what to make a broom for the yard. Of course, there are not expensive options here. That's just what plastic is. In this case, a lot of money is not required. What's more, you don't even have to go to the store. And this is all because all the details will be at home. The set of tools here is also simple. In addition, this inventory will also be easy to work with. So, to work, you need the following small list:
- 5-7 plastic bottles,
- stick for cutting,
- A piece of strong wire
- A couple of nails or screws
- Screwdriver and hammer
- Stationery knife and scissors,
- Awl.
This simple set of tools will allow you to make an incredibly useful product.

We make a broom
Prepare everything you need. After that, you can make a broom with your own hands. This work is not difficult. And free time for this activity will take about an hour. Be sure to follow all steps carefully. Also, follow the instructions below.
Progress:
A utility knife must be sharp. With it, you need to cut off the neck from the first bottle. At the same time, it is important to retreat a certain amount of cm from the top.

On a note! Plastic is considered a soft material that is easy to work with. Therefore, it is important to work with it extremely carefully. Any wrong move can lead to injury.

The next step is to use scissors. You know that the broom has stalks and twigs. Therefore, they should be made of plastic. Using scissors, you need to cut the workpiece lengthwise from the bottom up. The width of each strip should be 0.5-1 cm. The strips are not cut to the very end. It is necessary to advance slightly above the middle, leaving 6 cm on top.

Using the same method, all other bottles are processed. In this case, two bottles do not need to be processed.
On a note! The more bottles you use, the thicker the broom will get. The product will more effectively cope with the cleansing of the yard and house.

Here we are talking about how to make a broom out of plastic bottles step by step. At this stage, 3 or 5 blanks should be ready. These blanks should not have a neck, and the entire part should be cut. You should also have 2 finished bottles left. Take one of the bottles and cut it into rods. But in this case, the neck is not cut off.

Now your broom is considered almost ready. Now take the workpiece that has a neck and start inserting it one by one into the inside of each part that does not have a neck. A product with a neck can freely enter the hole that has been prepared. All blanks should be planted completely.

The bottom part is finished. Now it needs to be bent. That is, squash. As a result, your product will have a shape. However, this is not all. A broom should be comfortable, beautiful and practical. For this purpose, you will need a bottle that remains. Well, if it will have a high neck. With the help of a clerical knife, it is cut in half. In the work, only the upper part will be needed.

On a note! Throwing away the bottom of the bottle is also not recommended. From it you can make a lot of different crafts.
In the upper part of the bottle, with the help of scissors, holes are made on each side, which will be opposite to each other. The incision should be made at the same time to the middle of the plastic part.

If you are wondering how to make a broom at home, then this article will answer all your questions. Let's continue with this process. The finished part is also placed on a blank that has already been made from other bottles.

In the horizontal plane, it is worth flashing the resulting product. This must be done with a 50 mm or 100 mm nail. Instead of a nail, you can use an awl. In work, as a rule, your efforts are needed. It is necessary to insert the wire into the holes that have turned out. Then it is necessary to tie all the layers firmly. As a result, it will turn out as shown in the photo above.
Of course, at the next stage, a stalk must be attached to the product. The stick should fit into the neck of the bottle. Therefore, it is important to control its thickness. You will have to cut the bottle using an ordinary knife in your work.

The stick should be fixed in the neck using screws or nails. As a result, the broom will not fall out and will not spin.
For reliability, use two or three nails at once. They are driven into the neck of the bottle already at the moment when the stalk is inserted. For excellent fixation, small self-tapping screws are used.
Finally
From this article, you were able to learn how to make a broom out of plastic bottles. Such a product will perfectly cope with the tasks that you set for it. The broom can be used to clean the yard or house. She perfectly sweeps all the paths and rugs.