How to download payments from the bank in 1c. How to download bank statements and upload payment orders. Interaction with systems such as "Bank Client"
It’s the 21st century and I’m surprised to learn that some accountants still enter bank statements into 1C: Accounting manually, although in all programs of the 1C family (starting with 7) this process is automated.
And if in 1C 7.7 there were still complaints about it, then the mechanism for loading bank statements for 1C: Accounting 8.3 (revision 3.0) truly deserves all praise.
I’ll tell you step by step how to download statements from your client bank (using the example of the iBank system as the most common now) into 1C: Accounting 8.3.
1. Launch the client bank. From the main menu, select "Settings" - "General".
2. In the settings that open, go to the "Export" tab. Check the box in section 1C and uncheck all other sections. As an exchange file in section 1C, enter any path to a file with the extension ".txt". Click the "Save" button.

3. Now get the statements for the required number, select them all (key combination Ctrl + A) and select the down arrow in the panel next to the Out button. From the list of commands that opens, select "Export to 1C...".

4. Half the battle is done! The statements were uploaded to the same file that we specified in the client bank settings.
Since you are downloading statements for the first time, this is a necessary precaution.
5. Now launch 1C and go to the “Bank and Cash Desk” section. And then select "Bank Statements" in the panel on the left.

6. In the statement log that opens, click the “More” button and select “Exchange with bank” from the drop-down list:

7. An exchange window with the bank has opened. Select the "Load from Bank" tab.
Specify the bank account and the file into which statements from the client bank were downloaded:

8. In the bottom panel, click the "Download" button. And all extracts from the file will be uploaded to 1C.

9. Done! All that remains is to view the “Load Report”.
To exchange information with banks via electronic communication channels, specialized programs like "Bank Client". "1C: Accounting 8", for its part, provides the opportunity to exchange information with such programs. To solve this problem, “1C: Accounting 8” uses special processing called from the menu.
Special processing allows:
- select payment documents in the information base "1C: Accounting 8", then upload them to a program like "Bank Client" for transmission to the bank via electronic communication channels;
- upload to the information base "1C: Accounting 8" from a program like "Bank Client" information received from the bank about transactions on the organization’s current accounts.
Data exchange between "1C: Accounting 8" and a program like "Bank Client" is carried out through an intermediate information storage, which is a text file.
When uploading payment documents, "1C: Accounting 8" creates an exchange file, and the program type "Bank Client" then it loads it.
When loading information into "1C: Accounting 8", the actions are performed in the reverse order: first, a program like "Bank Client" generates an exchange file, and then “1C: Accounting 8” downloads it.
Loading and unloading into the information base "1C: Accounting 8" can be performed alternately using processing "Bank client (upload/upload payment documents)"(menu "Bank" › "1C Enterprise - Bank Client").
Processing is intended for experienced users.
In the processing form, you should indicate the period for which documents will be uploaded or downloaded, the organization, and select the name of the program type "Bank Client".
Uploading data.
On the bookmark "Unloading" in field "Upload file" you should specify the name and path of the exchange file. (The same file must be specified in a program like "Bank Client" as a download file). In field "Bank account" you must select the account through which the exchange will be made with a program like "Bank Client".
To download payment documents, click on the button "Unload"- after this, the system will automatically generate an export file and fill it with information of all outgoing payment documents.
If after uploading to a program like "Bank Client" payment documents were changed in "1C: Accounting 8", then they can be uploaded again - in a program like "Bank Client" the list of documents to be submitted to the bank will have to change. However, it is important to understand that if the documents have already been transferred by the program to the bank, then it is not recommended to change them.
in field "Load File" you must specify the name and address of the exchange file. (Before this, the same file will have to be specified in a program like "Bank Client" as an upload file).To load payment documents from an import file (pre-generated in the program type "Bank Client") you should press the button "Download".
When loading, the following actions can be performed:
- details of payment documents previously entered in "1C: Accounting 8" are specified. If the documents are from "Bank client" arrived in a modified form, they will be corrected in “1C: Accounting 8”;
- for registering incoming payment documents, as well as outgoing ones, if the corresponding outgoing documents were not processed in 1C: Accounting 8 (that is, they were processed directly in a program like "Bank Client"), in "1C: Accounting 8" documents are created with the corresponding type of transaction, all details of the downloaded payment documents are entered in them: current account, amount, counterparty. At the same time, “1C: Accounting 8” will offer to create a new counterparty if it cannot identify it.
Send this article to my email
In this article we will look at how to set up a client bank in 1C Enterprise Accounting 3.0
To go to the settings, open the list of documents Bank statements, it is located in the Bank and cash department section. Select the More menu and find the line Set up exchange with bank in the proposed list.

A window for creating a setting will open.

In this window, fill in the basic information:
We indicate the organization whose documents will participate in the exchange of data between the 1C program and the client-bank program.
Next, select the bank account to be serviced. Since one organization may have several active accounts, it is necessary to select the one through which non-cash cash flows will be made. If an organization has several current accounts, and data for all of them needs to be uploaded to the bank’s program, then each has its own settings.
In the Program name field, you must select from the list the program that belongs to the bank with which you are setting up an exchange. If you don’t know what program the bank uses, check with the bank’s consultants.
In the File upload to Bank field, you must indicate the storage location on your computer for the file received from 1C; for this, you can create a new personal directory, used specifically for the purpose of interaction with the bank.
The upload file from the Bank also requires indicating the location, but not the file uploaded from 1C, but received from the bank.
Automatically, when choosing a storage location, the program will prompt you to fill in the names 1c_to_kl (from 1C to client-bank) or kl_to_1c (from the client-bank program to 1C) by default, or you can create files in advance and then select them when setting up.
Below are the default settings for filling in details for substitution.
The Group attribute for new counterparties is used to determine which of the existing groups the created counterparties will be assigned to. If the field is not filled in, a new group will be automatically added.
To indicate the DDS item that will be inserted into documents by default, you must follow the Cash Flow Items link, which will open the Cash Flow Items directory.
Unloading. It is indicated (by setting a flag) what types of documents need to be uploaded, whether control of the number of documents being created is required or not, and whether uploaded files should be monitored for changes by viruses.
Loading. Here you need to specify the rules for working with downloaded data. Is it necessary to automatically create documents that were not found? Is it necessary to open the exchange file form with the bank to double-check that all information has been entered correctly into the statement? If this function is disabled, the preliminary check will not be available, and the statement will be downloaded automatically. It also indicates the need to carry out the created documents received as a result of the exchange.
The created settings must be recorded.

Now you know how to set up a client bank in 1C Enterprise Accounting 3.0. . Work with the transfer and receipt of data between 1C and the client-bank is carried out in the Exchange with bank workplace. It is called by the Send to Bank command, available in the lists of documents in the Bank section.
How to set up loading of bank statements in 1C, as well as uploading, and how to make a statement in 1C 8.3?
Let's start by creating a payment order:
- Based on the document of receipt of goods and services, invoices, etc.;
- Through the creation of a new payment order/PP.
In the “Bank and cash desk – PP” block.
Fig.1
A journal with payments will appear in the window that opens, where you can, by setting up the appropriate selection, filter the necessary documents, for example, display a list by a specific organization, bank account, date or counterparty.
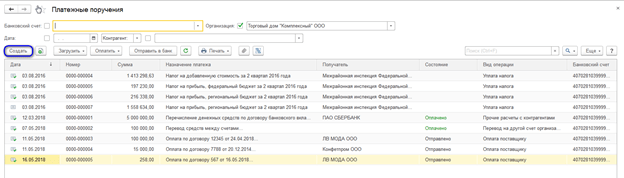
Fig.2
Filling out the main fields here begins with the “Type of operation”. Depending on what is selected, the structure of the document will change, as well as the required analytical fields.
Having filled out the basics, we open and close the document with the “Post and Close” button.

Fig.3
The payment system does not make any transactions in 1C 8.3; they are generated by “Write-off from account”, which can also be created based on the payment slip we generated, or manually, by creating a new write-off.
Creating a receipt/debit from a current account
The first option is to create it manually through the “Bank and cash desk – Bank statements” block.

Fig.4
The journal that appears shows all receipts and debits from the account. To make it more convenient to work with it, you can set filters:

Fig.5
To make the document we need, click on “Receipt” or “Write-off”, depending on what we need.
Fig.6
Here we fill out the main fields in the same way as filling out a payment order:

Fig.7
After filling out all the fields, check the correctness of the filled in details and click “Record-Post”.
In the documents “Receipt to the current account” and “Write off from the current account” we look at the transactions and check the correctness of their display through the “DtKt” button. The transactions will be displayed in the “Document Movements” window that opens.

Fig.8
After checking the correctness of the transactions, click “Post and close”.
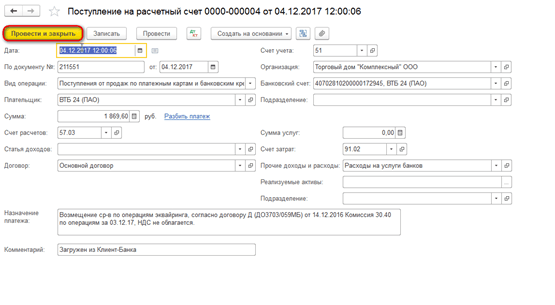
Fig.9
The second way to create “Receipt to current account” and “Write off from current account” by uploading a bank statement
Let's move on to sending documents to the bank. While in the “Bank Statements” journal, click “MORE—Exchange with the bank.”

Fig.10
In the “Exchange with Bank” window that opens, to upload documents to the client bank, select the “Send to Bank” tab:
- We select the company from which we will upload documents;
- We indicate the bank account;
- We select the period for which we need to download the bank statement;
- Select the location to upload the file.

Fig.11
The tabular part here will be filled with bills that need to be paid.
Next to each payment card that we want to pay, we put a “Flag” and click on the “Upload” button. This will open the “Check for virus attacks” window, where we click “Check”.

Fig.12
A file will be generated in the “1c_to_kl.txt” format, which must be uploaded to the client bank.
In the “Exchange with Bank” window, you can view a report on uploaded payment documents, for which click “Upload Report”. The resulting report will display the payments that were uploaded to a file for downloading to the “client bank”. It can be saved in any format or printed.
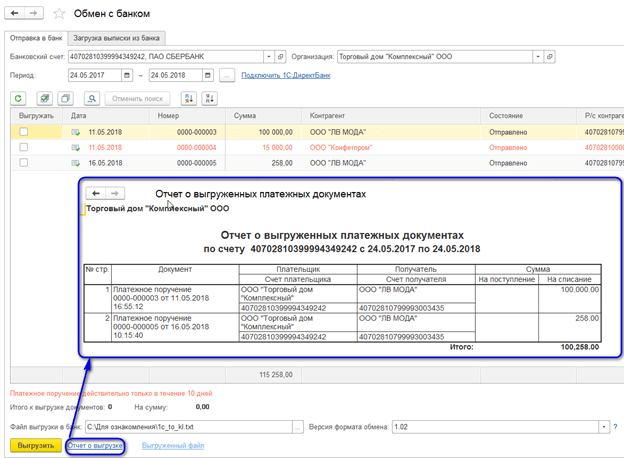
Fig.13
Loading an extract in 1C 8.3
The first option is from the “Download bank statement” tab.

Fig.14
We indicate:
- Organization
- Bank account
- Download file
Click on the “Update from statement” button.
The tabular part will be filled with data from the file, while the lines highlighted in red mean that the program did not find in the directories the data (registration account, counterparty by matching TIN and checkpoint) to which receipts or write-offs from the account should be distributed. Correctly distributed documents are highlighted in black.
Next to each document that we want to upload, we put a “Flag”. At the bottom of the window, information will be given on the number of documents to be loaded, as well as “Total Receipts/Debits for the amount”. Click “Download”.

Fig.15
If the bank statement in 1C 8.3 was partially downloaded, the system will display this information in the tabular part of the “Exchange with Bank” window. Documents that have not been downloaded will be displayed with the value “Not downloaded” in the “Document” column; for downloaded documents, the information “Debit from the current account or Receipt to the current account”, the number and date assigned to it will be displayed.

Fig.16
You can view a report on downloaded documents. To do this, click on the “Download Report” button.

Fig.17
Let's consider the second option, how to load statements into 1C 8.3.
In the “Bank Statements” journal, click “Download”.

Fig.18
Here we look for the extract download file and click “Open”.

Fig.19
The program will automatically download and post documents from the statement and display the number of downloaded documents, as well as the total receipt amount and the total write-off amount.

Fig.20
Documents in the Bank Statement journal, marked with a green flag, are posted and posted.

Fig.21
You will need to post and post the statement yourself if it is not marked with a green checkmark: open the document that has not been posted, fill in the basic required fields for posting the document, check the correctness of the filled in details, click on the “Post” button, then “Post and close”.

Fig.22
The document was processed and distributed.
If in the bank statement journal you need to display the initial balances at the beginning and end of the day, as well as the total receipts and write-offs for a given date, click “MORE – Show/Hide totals”.

Fig.23
At the bottom of the journal, the initial balances at the beginning and end of the day will be displayed, as well as the total receipts and write-offs as of the date.
Instructions
Launch the 1C: Enterprise program. Open the “Bank” section and select the menu item “1C: Enterprise – Bank Client”. If you have not configured sharing settings yet, you will be prompted to do so. Click Yes.
Start setup. In the drop-down menu in the “Program Name” section, select a certified application that matches what your servicing bank uses. For example, many credit institutions use the iBank 2 system.
Next, install the download and upload files for data exchange with the Client Bank. Be sure to check that the links are to different documents. Set the type of documents for data exchange and the encoding that matches the operating system of your personal computer.
Go to the "Download" section. Use the checkbox to mark the types of documents that you plan to work with when downloading a bank statement. Opposite them, mark the cash flow items. A group for new counterparties is selected below. Check that the changes you made are correct and click OK.
Log in to the Client-Bank system. Open the “ ” menu and select the “General” - “Data Import” section. Specify the format as 1C. From the Method drop-down menu, select Sync. Set the directory for data exchange, which must match the one specified in the 1C program.
Carry out a similar operation with the “Data Export” section. Check the entered data and click “Save”. Thus, the setup of data exchange between the Client-Bank system and the 1C: Enterprise application will be completed. When you perform any operation in one of these software, you can check that the synchronization is correct and make corrections if necessary.
Video on the topic
note
Open the “1C:Enterprise – Bank Client” item in the “Bank” menu: Since we have not yet configured the exchange parameters for our current account, the program will display the following window: Answer “Yes”. In the next window that opens, in the “Program name” field, from the drop-down list of certified programs, you must select the system that our bank uses.
Helpful advice
This is a system with which you can upload payments into the bank-client system and send them directly to the bank. Then the payment slips do not need to be entered directly into a separate bank-client program for sending to the bank. To set up interaction with the client-bank in 1C, you need to go to the “Bank” - “Bank Statements” menu. In the journal of bank statements that opens, click the “Download” button. Next, the client-bank form will open.
Sources:
- how to work in a client bank
The company makes all payments in non-cash form, transferring cash accounts from one current account to another. Based on these transactions, the bank provides an extract within the established time frame, which acts as a primary document for accounting. Many accountants encounter difficulties associated with uploading statements into the 1C: Enterprise program.
Instructions
Receive a bank statement for your current account. Study the information provided and divide all cash flows into incoming and outgoing cash flows. Collect primary documentation (invoices, acts, contracts, payment orders, etc.) that confirms the completion of the financial transactions indicated in the statement.