How to install Linux Ubuntu on another partition next to Windows. How to install Linux as a second system Installing Linux and Windows on the same disk
Windows users sometimes think of alternatives that suit them to the extent that they lack when using a commercial OS, but without removing it. This article will cover how to install Linux as a second operating system.
Why two systems
The current terms of use for Windows are far too proprietary. Not everyone likes this company policy. As a consequence, people have questions about using alternatives that don't have to sacrifice freedom for convenience.
Windows does not always satisfy the user's requirements in terms of software and he has to look for alternatives. Many people know about the existence of macOS, but the price of the system (including integration with Apple's proprietary hardware) is a key obstacle to acquiring it. Most Linux operating systems are free.
The main reason for using two systems is the wide coverage of activities. Although each OS has the ability to do any job, they provide different (including in terms of efficiency) tools. There are many programs that work on both systems (Skype, Steam, etc.). This is possible due to their open source code and is done to popularize Linux among Microsoft product users.
Benefits of Linux
There are many reasons why Linux is an order of magnitude higher than Windows. They relate to functionality, security, resource consumption, appearance, and so on. Unlike Windows and macOS, Linux allows the user to dispose of it as they please, without all kinds of coercion and restrictions.
These systems are installed on 95% of the servers of all structures, from ordinary sites to banks, because the most important advantage of Linux is security. Several factors influence this. The most important of these is the use of GNU tools.

Strictly speaking, Linux is the core of the system, and the shell is 90%+ of GNU applications and utilities, free software (or based on it). Therefore, a more "fair" (but not mandatory) distribution name is GNU/Linux, to separate the software from the Linux kernel. The advantages of Linux are based on this.
Malicious software that is created to damage the Windows OS or individual applications does not work on GNU/Linux. This is due to different file systems, user security policy, software management and OS architecture in general.
So, in Linux, you must enter a password every time you change system files, install or remove applications. This functionality cannot be disabled, but the password is requested once during one session of the program, which does not cause irritation.
Free software is a guarantee of OS security, because its code is available to any person and meets modern development requirements. Older versions of the Linux kernel are less reliable. This is used by virus developers, but for owners of new versions it is not a threat.

In the event that a virus for Linux gets into the system (which is rare in practice), only unprotected user files can be damaged, but not system files, since privileged rights must be obtained for this. But the virus does not know the password, which is stored in a highly encrypted file.
Thus, viruses for Linux are negligible. As a result, there is no need for an antivirus. But you should pay attention to programs that require a password so as not to harm the OS.
free
The main distributions of GNU/Linux are free and available for download from their official websites. This is due to the approach of developers to the life of people.

The American company Red Hat releases a paid system of the same name. It is designed for businesses. Payment provides round-the-clock support for the company in setting up and using the OS. They also have free products: Fedora, CentOS.
Stability
The Ext4 journaling file system is the most popular for disks. The peculiarity of its work is in logging, storing the state of applications and OS. In the event of an unexpected and abrupt shutdown / restart of the computer, Linux will restore performance due to these entries in the logs.
GNU/Linux distributions do not need to be reinstalled unnecessarily. Computers under their control may not be turned off for months, and this will not affect the speed and stability of work, unlike Windows.
Device support
Linux supports 95%+ of all devices connected via various interfaces (printers, scanners, modems, sound cards, etc.). Feature support - in the automatic installation of drivers; Simply connect your device to your computer.
Manual driver installation applies to Nvidia video cards, Wi-Fi modules and some types of processors on laptops. But they do not need to be searched on the Internet - in the settings of almost any distribution kit, an interface is available for selecting the driver you already need, you just need to click "Install".
Appearance
GNU/Linux has a wide range of desktop environments (Windows has one environment), which differ from each other not only in small details, but also in concept. Designs of windows, icons, animations are available for every taste and for the requirements of any hardware. By the way, many ideas for the appearance of Windows 10 were copied from Linux.
In addition to the built-in themes, third-party skins are also available, which are installed using the appropriate system tool or through an Internet search.
Terminal
In 2017, Microsoft decided to build support for the Linux terminal into Windows, recognizing its power compared to their own command line and even PowerShell.
The terminal is an effective tool for process automation and productivity acceleration. An important mechanism is available in it: the management of daemons (analogous to services in Windows), on the basis of which the OS runs.
Note! Proficiency in working with this element is not necessary for the average user.

Using the terminal, you can do the same work as with the mouse: installing and removing software, configuring and managing the network, and even browsing the web. Some of these processes can be automated using task schedulers (anacron or crontab daemons), which is especially useful when managing multiple computers.
Distribution selection
There are a lot of GNU/Linux systems. The authoritative distro popularity site Distrowatch only covers the top 100. But those that are installed for everyday work are about 20. Here we will consider the 3 most famous distribution kits suitable for home use.
Note! Choosing a Linux distribution is not easy, and getting confused in their number is not difficult. The article "" talks about this in more detail.
Linux Mint

The second most popular distribution from Ireland, the most common among the systems of the Debian family.
Downloaded programs for installation have a .deb extension (similar to .exe in Windows). These are builds of packages from source designed for easy use.
* - The indicator varies depending on the desktop environment used.
Important! With weaker computer characteristics, unstable operation is possible with its uneven load.
Elementary
![]()
The American distribution is one of the five most popular GNU/Linux operating systems. Based on Debian.
Feature Elementary - appearance, ideologically similar to macOS. Has a unique Pantheon desktop environment. Supports installation of applications via deb packages.
Manjaro

The most popular distribution of European origin in the last six months. Based and maintained by enthusiasts on the Arch OS, therefore, it includes all its working methods and principles of operation.
Manjaro's feature is a friendly interface with the power of Arch. The software is installed automatically from source codes.
This OS will be considered as an installation example.
Disc preparation
Before installation, you should decide on the location of the OS - on the same disk with Windows or a separate one. Usually, the second option is chosen if there is not enough free space on the C drive.
Via Windows
To allocate a disk partition, you should use a standard utility.
Note! The instruction is applicable for Windows 10. In other versions of the system, the location or appearance of the elements is different.

Note! You will not be able to specify a number greater than the maximum available volume.
After that, a new distributed partition will appear, indicated in black.

To burn an image to a flash drive:

Via Linux distribution
The GParted program does disk partitioning in GNU/Linux. If it is missing, you can install it through the App Center.
- Start GParted.

- Right-click on the required partition → "Resize / Move".

- Specify the required amount of partition change or drag the disk size slider using LMB → "Resize/Move".

- Click "Apply All Operations" to perform the actions.

- Wait for the operation to complete.

To write GNU/Linux to a flash drive:

Installing a second system
To start the OS installation, you need to tell the computer to boot the USB flash drive, not the hard drive.
Important! This manual describes installing GNU/Linux in Legacy mode, not UEFI.
- Restart your computer.
- During the POST test (when the motherboard logo or text about testing hardware nodes appears), press the button to select the primary device to boot. Usually, this is F11 or F12 (depending on the BIOS model).
Advice! The required button is indicated on the screen during the POST test.
- Select USB drive with Linux → "Enter".
 You can also enter the BIOS and in the Boot section select "USB-HDD" as the first boot device.
- After that, the flash drive will start with a welcome window → select "Boot Manjaro ..." → "Enter".

- When the Live system is finished loading, run "Install ..." on the desktop.

- In the welcome window of the installer, select "Russia (Russia)" from the list to change the language of further instructions → "Next".

- Specify the time zone by clicking on the map to the desired location or by selecting "Region" and "Zone" from the list. Make sure that the correct system language and regional number and date format is set. Otherwise, use the buttons "Change ..." → "Next".

- Select the English keyboard layout as the default by selecting "English (US)" on the left and "Default" on the right. After installation, you can add other layouts → "Next".

- Make sure the required hard drive is listed in the Select Storage Device field. In the list of installation types, select "Manual partitioning" → "Next".

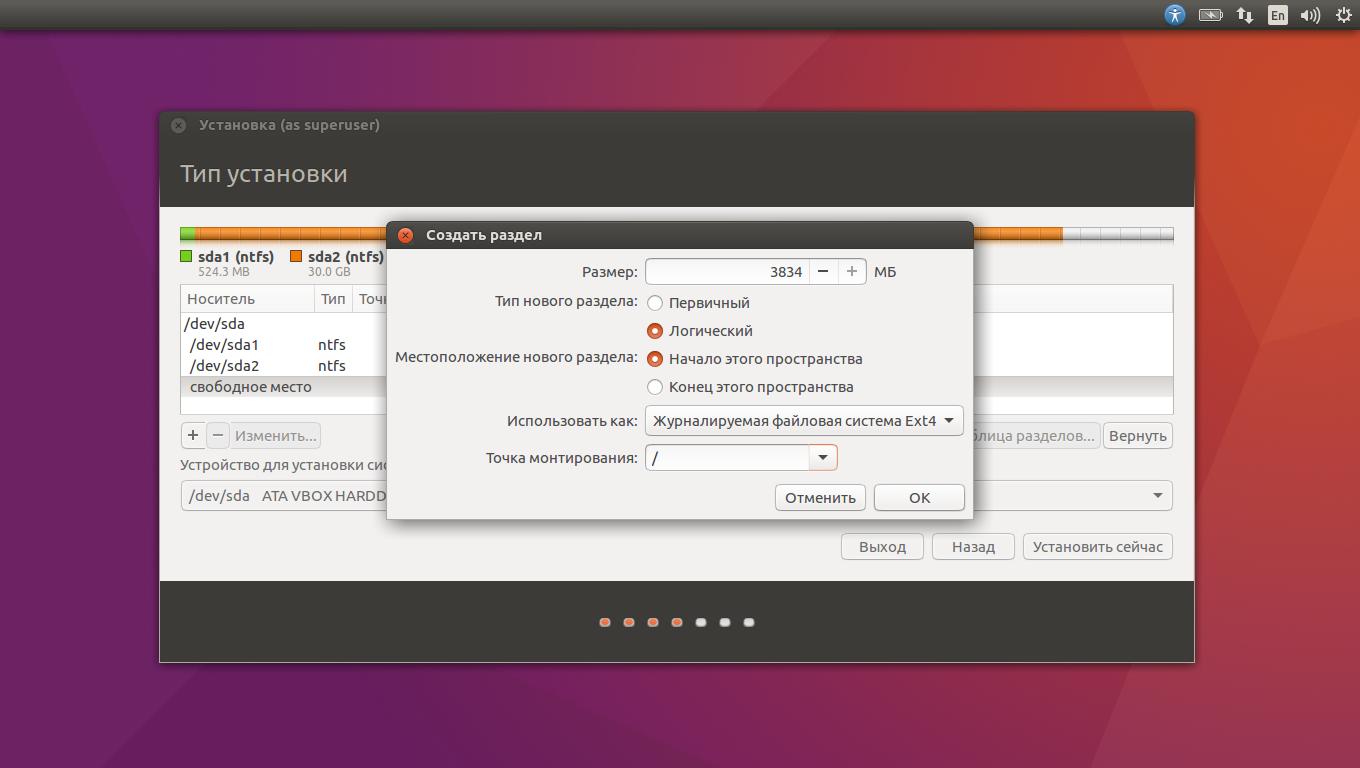
- Select the partition intended for Linux → "Create".

- Enter "Size" - 15000, specify "File system" - ext4, "Mount point - / → "OK". The root directory will be created.

Advice! If your computer has 6 GB or more of RAM, proceed to step 14 after creating the root.
- Select the remaining section → Create.
- Specify "Size" equal to the amount of RAM in megabytes, "File system" - linuxswap, "Flags" - swap → "OK". A swap partition will be created, which is used when the RAM is full (similar to the swap file in Windows).

- Create the remaining partition with the parameters: "File system" - ext4, "Mount point" - /home. The user's home directory will be created.

Advice! Creating a separate mount point for the home directory allows you not to be afraid of OS failures or reinstalling it in the future, because it does not have to be formatted, but only connected.
- In the "Install bootloader in" field, specify the installation location of the Windows bootloader (usually, its size is 200-400 MB) → "Next".

- Create a new user by filling in all fields. A checkmark for "Use the same password" will make the created user a system administrator → "Next".
Advice! When entering your name, the "login name" and "computer name" fields will be filled in automatically.

- Read the summary information → "Next".

- Confirm the installation.

- Wait for the installation to complete.

- Check the box "Reboot" → "Done".

How to choose an OS
Once installed, Linux will overwrite the GRUB bootloader that Windows was running. This means that now after the POST test, the choice of the bootable OS will be available.
To start Linux, select "Manjaro Linux" → "Enter". Windows starts in the same way. Items are selected using the arrow keys on the keyboard.

conclusions
GNU/Linux distributions are gaining popularity among home PC users. The advantages of these operating systems are security, stability and freeness relative to Windows.
To install Linux as a second operating system, you need to allocate a partition on the disk for it, burn the image from the OS to a USB flash drive, specify it in the boot device selection menu, run the installer and follow the instructions.
Various situations may prompt the user to use operating systems based on the Linux kernel. Frequent reasons are security and free software for any need. For a beginner, the easiest OS to learn will be Ubuntu. Installing Ubuntu alongside Windows 7 is a simple task if you follow the step by step instructions.
Features of installing Linux as a second system
Installing Linux as a second system involves dividing the hard disk into several partitions. There should be at least 3 of them. This solution allows you to separate the storage of system files, user documents and settings in different places, which is convenient, for example, when reinstalling the system.
So, to install Ubuntu you will need partitions:
- System. About 30-40 GB are allotted for it.
- Home. The size depends on the wishes of the user.
- swap partition. Needed when Linux runs out of RAM and transfers some of the data to a file stored on this partition. Therefore, it is enough to allocate half the amount of RAM to it.
How to install Ubuntu along with Windows 7
Installing Linux on a single Windows 7 machine is the simplest possible OS combination. The simplicity lies in using a regular bootloader, since the UEFI interface is not familiar to Windows 7.
Preparing a hard drive using Windows
Windows OS uses the entire drive. At this stage, it is necessary to allocate some space for the new system and at the same time not disrupt the current performance.
To solve the problem, you can resort to the tools of the Linux installation image, but from under Windows it is easier and safer.
First you need to go to the "Disk Management" section, which can be accessed by clicking on the "Management" item in the context menu of the "My Computer" shortcut.
Windows often has two partitions: C is where the system is installed, D is where game files, documents, and other data are stored. When splitting, it is better to affect the D drive. If it is not there, then it is allowed to cut off memory on a single disk only from the end. So, to reduce the partition, mark the desired volume and right-click to call up the menu. Here you need to select the "Compress volume" item.

Now you need to enter the volume of the volume to be created in the "Compressible space size" field. In this case, you can set the value of no more than the free space of the partition.
Attention! It is advisable to allocate a total amount of at least 100 GB if you plan to use Linux as the main system. The indicated 22 GB in the picture are taken as an example.

The main events in Windows have been completed. Now you can proceed to install Ubuntu using Linux itself.
Create a bootable flash drive
The next step is to download the current version of the OS from the official Ubuntu website and write it to removable media, for example, to a USB flash drive. On Windows, the simplest tool is Rufus.

In the program, you need to specify the drive for recording and, opposite the "Create bootable disk" option, select "ISO image". An explorer window will appear to search for the downloaded image. The recording will start after clicking on the "Start" button. When finished, you need to restart your computer.
Ubuntu installation process next to Windows 7
After rebooting, at the stage of checking devices, you must enter the BIOS and select the USB flash drive on which the Ubuntu installation image is recorded to boot.
When Ubuntu starts, you need to immediately press any key to select the language. The next step is "Run Ubuntu without installing". Now you can run the installer, and then step by step (after each action, press the "Continue" button):

After installation, every time you turn on your computer, you can change the system from Windows to Linux, and vice versa.
How to install Ubuntu along with Windows 10
The process itself is exactly the same as described above. The only difference is that the bootloader now requires a separate efi partition. It has already been created since Windows 10 was originally installed. Therefore, after partitioning the disk in step 3 of the steps above, you need to select it. Usually this partition takes no more than 100 MB, and its file system is fat32.

If for some reason efi is missing, it is easy to create it using the GParted utility for Linux. After starting Ubuntu without installation, a workspace will open, where you need to enter Gparted in the search for Dash.
In the program, you need to open the Devices submenu, in it - “Create Partition Table”. In the window that opens, select the gpt parameter. Further, according to the usual principle of creating a partition, only now its label is Label, and the file system is FAT32.


Installing Ubuntu alongside Windows XP
Windows XP is even older than Windows 7, so you can also forget about the EFI interface here. As for disk management, it is identical in all operating systems of the family. Therefore, to install Linux as a second system, you need to follow the same steps as described for Windows 7.
Possible difficulties
Sometimes it happens that after installing Linux, Windows still boots from the hard drive. This problem occurs for those who use versions of Windows 8 or 10, and it is caused by the enabled Secure Boot feature in UEFI. This option prevents old boot devices from starting.
To restore the original BIOS settings, you must set the Secure Boot option to Disabled. Depending on the BIOS version, it can be located in different places. The reference for the search is the System Configuration menu, and inside the “boot options” (Boot Options). An alternative name for the option is Boot Devices Options.
After completing these steps, it is important not to forget to save your changes.
Now, when you turn on the computer, the bootloader will prompt you to select the operating system.

Conclusion
Installing Ubuntu alongside Windows 7 is a doable task. So if you need a second system, do not be afraid to install it. Having two operating systems on a computer - Linux and Windows - it is possible to distinguish between the performance of various tasks: the first one is used for office work, editing audio and video materials, and the second one is for entertainment.
It's quite popular among new Linux users to use two operating systems on a computer - Windows as a secondary system just in case, and Linux as a primary system to learn. One of the most popular systems for beginners is Ubuntu, and most users still use Windows 7 and consider it the best operating system. Despite all the problems, she remains popular.
In this article, we'll take a look at how Ubuntu is installed alongside Windows 7. If you think about it, this is the easiest option that could be.
Installing Ubuntu alongside Windows 7
This is Windows 7, it uses a regular bootloader and does not yet know what UEFI is, so there will be no problems during installation. I am assuming that you already have Windows 7 installed on your computer and that you are going to install Ubuntu as a second system.
Preparing a hard drive in Windows
I have already written in more detail about what partitions and why are needed in the article partitioning a disk for Linux. But that's not the point. Now you have Windows and it takes up the entire hard drive. We need to separate a little space from it, and at the same time make it so that nothing breaks and everything works. We could use the Gparted program directly from the Linux or Acronis boot image, but the safest way is to use the standard Windows tools. Click on the icon "My computer" right click and open "Control":
Then select from the left column "Disk Management":

Here you need to find a way to allocate some memory under Linux. Usually Windows has two disks, let's switch to Linux terminology and call them partitions. The first is C: this is the main partition on which the operating system is installed. The second is the D: drive, where files, games and other data are located. It is advisable not to touch the system partition at all, but to separate the space from drive D. But if you have already decided to reduce the system partition, for example, because you only have drive C, then in no case do not touch the beginning of the partition, you can only cut off from the end. And so, first we need to reduce the section. Therefore, mark the desired volume, right-click on it, click "Shrink Volume":


In the window that opens, you need to enter the amount of free space to which you want to shrink this volume:

We will need about 100 GB for Linux, at least 30 GB for the root partition, 10 GB for other partitions, and about 60 GB for the home partition. This is quite enough for you, so that later you don’t have to think about what to do in order to have more memory. When you select the volume, click "Compress".

When the compression is complete, an empty space will appear in front of you. This completes the work with Windows. Further partitioning is best done from Linux. Almost everything is ready to install windows 7 and ubuntu.
Burning bootable media
Next, we need to burn Ubuntu to our media, for example, a USB flash drive. Since we are working on Windows, we will use the Rufus utility. Download and run the program. In it, select the flash drive you are going to record on, then go down below and find "Create Boot Image", select "ISO image":

Then select the disc image you want to burn and click "Start":

When the recording is completed, you can restart your computer.
Preparing a disk in Ubuntu
Next, you need to restart your computer and boot from the media you just burned. I won't tell you how it's done. If you are going to install Linux, then you probably already know how to work with the BIOS. When the Ubuntu image starts, you will need to immediately press any key to select the language:

Select "Russian" and press "Run Ubuntu without installing". We need to run the system without installation because this way you will have more freedom in case of any problems.

When the system starts, immediately open the installer. While I will be looking at Ubuntu 16.04 stable, this will definitely work for Ubuntu 17.04, 17.10 and newer. Nothing has changed there, except for the desktop wallpaper.

In the first step of the installer, select the language:

Then do not forget to check the boxes that you need to install updates and additional software:

On the next screen, we can already move on to working with the disk. The installer itself identified Windows 7 and beginners, those who are afraid to go into the disk setup themselves can select this item and install Ubuntu next to Windows 7 in automatic mode. But we will go the other way and look at manual disk partitioning, so choose "Another variant":

Here we see the free space that we have allocated for Linux, I have 22 gigabytes, this will be more than enough to install the test system, but I recommend you take about 100 GB and definitely not less than 50. We have to create three partitions - a swap partition , root partition and home partition. First we make a swap partition. To do this, select free space and click the button "+" :

The size of the partition must be equal to the amount of RAM, and select the file system "Swap Partition":

The next partition is the root one, the size of the partition is from 30 GB, the minimum size is 8 GB, but it's better to take more so that you don't have to think about where to get the memory later. For example, in my working system, which has been installed for a year now, 17 gigabytes have been used on the root partition, despite the fact that I did not install any games or heavy applications. We select the Ext4 file system, and the mount point, the place where this partition will be connected in the file system, is naturally "/".


The last one is the home partition. It takes up all the remaining space, the file system is also ext4, and the mount point is /home.

System installation
Now everything is ready to proceed with the installation. We leave the bootloader as it is, let it be installed on this disk. It will transfer the Windows bootloader to the system partition, and write itself to the MBR. The installed Widnows will be detected and you can access it from the menu during boot. When finished press the button "Install Now":

Next, you still have to create a new user, select a time zone, keyboard layout and wait. There is nothing specific here, so see Installing Ubuntu 17.04 for information on that.


If you want to surf the Internet securely without a firewall or spyware antivirus, "loading" the system; any free editing of video, photo and audio files, reading books on PC from the sofa if video effects Windows heavy and unwieldy for your computer, as well as the cheapest rates anywhere in the world or free PC-to-PC calls, Ubuntu is your best bet.
But you need to be aware that some peripherals may not be supported in Ubuntu, since manufacturers often do not make drivers for their devices under Linux, considering such production to be unprofitable, and those drivers that are created by the free community are not always fully compatible with this equipment. In addition, some highly specialized programs developed under Windows, in linux may not earn. Also, modern resource graphic games are released mainly for Windows. And although wine can save the day, it’s still worth looking for an alternative solution in the form of similar application programs. linux.
Anyway, in Linux nobody restricts the user; and you can always install Windows, and ubuntu on one computer (dualbut-“
Installing Ubuntu as a second system after Windows.
First, connect to the Internet and download the latest ISO disk from the official download page.. Next, we write the installation disk using programs for burning DVD images or flash drives. Then in the BIOS ( UEFI) set boot from CD or USB, and install Ubuntu second after Windows system. There shouldn't be much difficulty. We set the HDD partitions "manually" using the arrows on the keyboard.
Line with Windows to work in two systems necessarily must be brought to the form so that the result is as follows, otherwise Windows will not be recognized:
First line with Windows
:
Change partition size: ~40-1000 GB (depending on how many games you install)
Use file system: ntfs
Mount point: /windows, (we prescribe, because there is no word windows in the drop-down menu-list)
Second line: root section /
. Since the root /- root will contain all mount points except /home, we must allocate space up to 20 GB or more. . Unlike Windows, Ubuntu system files can also be installed on a logical partition. File system - well developed in Ubuntu ext4
Resize partition: 20 GB or more
Format: yes
Mount point: /
Under swap on the PC an amount equal to the computer's RAM, but not more than 2 GB, is allocated. (With RAM of 4 GB or more, swap on a PC is not needed, as on a laptop.). Swap partition is desirable to create at the beginning of the disk.
Use: swap partition
Mount point: not specified.
The last partition for Linux which is for your home directory is /home.
In general, for the convenience of reinstalling in the event of a "crash" of both systems, Windows or ubuntu, all your documents: movies, music, photos, etc., should be stored in a separate section - /home. Then you can reinstall systems, and /home do not change size and do not format, and then all documents and settings of programs and browsers will be safe and sound!
Resize partition: 5 GB or more
Use: ext4
Format: yes
Mount point: /home
If you have multiple hard drives - make sure the bootloader is installed on the drive that will boot first -( hd 0) already points to the first hard drive to boot.
Everything, confirm your actions<Yes> . Then, you need to answer simple questions, think over a username and password, and that's it. The system is installed automatically. At the end of the process, you need to reboot and transfer the boot to the BIOS by factory default - from the HDD.
After starting, two operating systems will run on the computer!
10 Seconds
waiting and, if you do not select the axis with the keyboard arrows, it will load by default ubuntu. By the way, the interleaving, timeout and other bootloader settings of the two systems, Linux and Windows, GRUB can later be changed in the utility " Grub Customizer". Installation available from repository-PPA via terminal (Ubuntu 16.04):
sudo add-apt-repository ppa:danielrichter2007/grub-customizer && sudo apt update && sudo apt install grub-customizer.
Verified disk partitioning (differs in speed and stability in operation):
Approximately, installation with flash-cards a little over 7 minutes. Installation, of necessity
, video driver - 5 minutes. If it works without a video driver, then it's better without it. Updates about 15 minutes. That is, the entire system is installed in about 30 minutes! Windows not much faster, but you still need to install drivers, antivirus, Windows updates, archivers, programs and much more (exactly, in that order). And Ubuntu is ready to go!
Thus, the installation order of the two systems is as follows: first install, if you need to reinstall, Windows. After all operations c Windows, (installation, drivers, antivirus, etc.), install Ubuntu. The system will have two axes. If with two systems you need to reinstall Windows, then after reinstalling the bootloader GRUB will disappear and will only be recognized Windows. Will have to restore GRUB, how
.
And further, in order to read any format, you need to put down all the codecs in the terminal with the command:
sudo aptitude install ubuntu-restricted-extras
Also separately for packages of archivers rar, unrar and p7zip-full command:
sudo aptitude install rar unrar p7zip-full
After installation, the system is immediately ready for use. Program set basic configuration quite suitable for most tasks. Subsequently, it will be possible to select programs from Application Manager or Synaptic and add the missing ones for you.
Some useful information about Linux:
Redshift is a very useful program ubuntu, which helps those who spend a long time in front of a computer monitor. During twilight and early morning, the color temperature smoothly transitions from night to daytime settings, allowing the eyes to gradually adapt. To install it, just open Ubuntu Application Manager, in the Search window type Redshift and install.
V Applications that start automatically command to run Redshift, effective after reboot (in Ubuntu 14.04-16.04 LTS):
redshift-gtk -l 55.54:37.45 -t 6500:4500 & exit
[Coordinates of Moscow–55° 45" N 37° 37" E ||| Mytishchi–55° 54" N 37° 45" E]
(In Ubuntu 18.04 LTS, by default, there is a "Night Light" program in "Settings - Screen Settings")
It is not advised to remove default programs from the installed system, because. the necessary dependencies may be pulled, and the system may become inoperative, and it is also undesirable to use third-party utilities to configure and “clean” the system, such as Ubuntu Tweak, BleachBit, GTKOrphan, etc. It is recommended that you use only your own terminal commands to clean up the system.
Remove unused packages from the cache ( in Ubuntu 12.04–16.04 LTS
):
sudo aptitude autoclean
Clearing the cache in Ubuntu:
sudo aptitude clean
Removing unnecessary dependencies ( at 14.04-16.04 LTS
):
sudo apt autoremove
This is quite enough. Ubuntu, like Windows, doesn't get clogged if you don't experiment with defaults.
What are the individual directories of the file system responsible for and what is stored there:
File system:
/bin-basic binary user modules (programs) in single user mode.
/boot- contains the files needed to boot the system - for example, the GRUB bootloader files and your Linux kernels are stored here. There are no configuration files used by the boot loader - they are located in the /etc directory along with other configuration files.
/dev-Basic device files (printers, disks, etc.)
/etc-(name comes from et cetera) contains configuration files that can usually be edited by hand in a text editor. Note that the /etc/ directory contains system-wide configuration files; user configuration files are located in each user's home directory.
/home-Contains the user's home directories, which in turn contain the user's personal settings and data, with the exception of the root user.
/lib- contains the libraries required for the main binaries located in the /bin and /sbin directories. The libraries required by the binaries found in the /usr/bin directory are located in the /usr/lib directory.
/lost+found- recovered files. Every Linux filesystem has a lost+found directory. If a file system failure occurs, a file system check will be performed at the next boot. Any corrupted files found will be placed in the lost+found directory, so you can try to recover as much as you can.
/media-The directory contains subdirectories in which removable media inserted into the computer are mounted. For example, when you insert a CD on a Linux system, a corresponding subdirectory will be automatically created under the /media directory. In this subdirectory you can access the contents of the CD.
/mnt- temporary mount points. Historically, the /mnt directory is where system administrators mount temporary filesystems when they use them. For example, if you are mounting a Windows partition in order to perform some file recovery operations, you can mount it in /mnt/windows. But you can mount other filesystems anywhere.
/opt support packages. The /opt directory contains subdirectories for optional software packages. This directory is widely used by proprietary software that does not follow the standard file system hierarchy - for example, a proprietary program may dump its files to /opt/application during installation.
/proc- kernel and process files. The /proc directory is similar to the /dev directory in that it does not contain standard files. It contains special files that provide information about the system and processes.
/root-The home directory of the root user. The /root directory is the home directory of the root user. Instead of being in /home/root, it is placed in /root. This directory is different from the / directory, which is the root directory of the system.
/run application state files. The /run directory is a fairly new directory that allows applications to store the auxiliary files they need, such as sockets and process IDs, in a standard way. These files cannot be stored in the /tmp directory because the files in the /tmp directory may be deleted.
/sbin- system administration binaries. The /sbin directory is similar to the /bin directory. It contains important binaries, which are usually intended to be run by the user during system administration and configuration, for example, init, iptables, ifconfig.
/selinux- SELinux virtual file system. If your distribution uses the SELinux package for security (such as Fedora and Red Hat), the /selinux directory will contain special files used by SELinux. This directory is similar to the /proc directory. Ubuntu does not use SELinux, so having this folder in Ubuntu is probably a mistake.
/srv service data. The /srv directory contains "data for services provided by the system". If you're using an Apache HTTP server to serve a website, you'll most likely be storing your website's files in a directory located inside the /srv directory.
/sys-This directory has been used since the v_2.6 kernel and "sysfs" is mounted into it, with information about the kernel, devices and drivers. /sys/block - Here are the directories of block devices that are in the system in real time. /sys/bus - List of kernel buses: eisa, pci, etc. etc. /sys/class - List of devices grouped by classification: printer, scsi-devices, etc. etc.
/tmp-temporary files. Applications store temporary files in the /tmp directory. Such files are usually deleted whenever your system is rebooted and can be deleted at any time using utilities such as the tmpwatch utility.
/usr- custom binaries and read-only data. The /usr directory contains applications and files used by users, as opposed to applications and files used by the system. For example, non-critical applications are in /usr/bin instead of /bin, and non-critical system administration binaries are in /usr/sbin instead of /sbin. The libraries for them are located inside the /usr/lib directory. The directory also has other subdirectories - for example, the /usr/share directory contains files that are independent of the system architecture, for example, used for working with graphics. The /usr/local directory is where locally compiled applications are installed by default.
Linux can be useful to you for many reasons. For example, your old computer can't be upgraded to new versions of Windows or macOS, or you need Linux-specific apps, or you're just curious to try something new. Or maybe you just bought a new computer without an operating system and want to save money by choosing free Linux.
Installing Linux is easy. Of course, there are distributions like Arch that are quite difficult to install for a beginner. But most modern distributions are very easy to install. Perhaps even easier and faster than Windows.
Before you install Linux on your main computer, back up your important data. When working with partitions on your hard drive, you can inadvertently erase something important. Of course, if you follow the instructions and read carefully what you are doing, then nothing unexpected will happen. But - not superfluous piece in any case.
You can install Linux on computers running Windows and macOS, or on an empty hard drive. You can choose Linux as your primary system, or you can use it side by side with your old system.
1. Download the Linux distribution
First of all, you need to choose a Linux distribution. The DistroWatch.com rating will help you decide.
Then you need to download the selected distribution. It's easy to do this: open the site of the desired distribution, find the download section and choose what suits the bitness of your processor.
As a rule, Linux distributions on official sites are offered to download in two ways. The first way is a normal download. The second is through P2P using a torrent client. The second way is, of course, faster. So choose it if you want to save time.

When the distribution in ISO format is downloaded, you need to burn it to a CD or a regular USB flash drive.
Burning to a CD can be done using standard system tools: Windows Disc Image Burn or macOS Disk Utility. It is enough to click on the downloaded image with the right mouse button and select the appropriate item in the menu.

To write ISO to a USB flash drive, you will need special utilities. For Windows, it's best to choose Rufus, and for macOS, UNetbootin. These programs have a very simple interface, it is quite difficult to get confused in them.
3. Prepare disk partition
This step should be followed if you want to keep your system installed and use Linux at the same time as it. If you decide to transfer your computer to Linux completely or install the OS on an empty hard drive, skip the paragraph.
Windows

Open Windows Disk Management. Select the drive or partition from which you plan to carve some space for your Linux installation. Most distributions will be fine with 10 GB. But if you plan on installing a lot of apps, take more. Right-click on the partition and select Shrink Volume. Enter a size and click OK.
The process can take quite some time, so please be patient.
When Disk Management has finished resizing the partitions, the disk will have empty unallocated space marked in black. This is where we will install Linux.
Later, if you don’t need Linux, you can delete partitions with it and give the freed space back to Windows using the same Disk Management Tool.
macOS

You can allocate a place for installing Linux through the "Disk Utility" macOS. Select your drive and click on the "+" sign to create a partition for Linux. It may take some time to create a new partition.
4. Prepare the bootloader
Windows
This item only applies to new computers that are pre-installed with Windows 10, 8.1, or 8. These computers use a UEFI bootloader that will not allow you to boot to any system other than Windows.
To fix this, go to your computer's BIOS settings and disable the Secure Boot option. Then reboot. Done, you can now download and install other systems alongside your Windows.
macOS
Unlike most computers, a Mac requires a couple of extra steps to install Linux in a dual boot with macOS.
First of all, disable SIP. Restart your Mac and press Cmd + R. The Recovery menu will appear. Select "Terminal" in it and enter csrutil disable .
Restart your Mac again. SIP is disabled.
Manual
Suitable if you want to set the sizes for your partitions yourself or, for example, create a separate partition for your files. To do this, select "Other option" and click "Continue".

Linux will display what partitions you have on your computer. You can delete them, format them, or, conversely, leave the sections with the information you want to keep intact.
To install Linux instead of your system, select the partition with the installed system and delete it with the "-" button. Then create new partitions on the freed space.

- Root partition for Linux system files. Select the Ext4 file system and mount point /.
- A swap partition, or a swap partition, comes in handy if you don't have enough RAM, but a fast SSD drive. In the list of file systems, select Swap Partition.
- The Home section is where your files will be stored. Select an Ext4 file system and a /home mount point.
Click "Continue" and confirm the changes. The installer will erase the partitions you selected and create new ones in the freed space.
How to install Linux next to the current system
There are two ways to install Linux next to your system.
Auto

Most Linux installers detect the systems you have installed right away. If you have not created a separate disk space for Linux, you can try selecting the "Install next to Windows" option. The installer will automatically create the necessary partitions, and you do not have to do anything manually.
Manual
If you want to determine how much space to allocate the system yourself, and followed the instructions in step 3, click "Another option" and click "Continue". You will see your disk partitions and the empty space we prepared for Linux. Create a root partition there (mount point /) as described above. The home partition is not required in this case: you will be able to copy and modify files on your main system.
Click Continue. The installer will leave your files where they are. It will simply create new partitions in the free space. You will be able to choose which system you want to boot at startup.
8. Complete the Linux installation


You will then be asked to introduce yourself. Enter your name and create a password. Don't forget your password, as you will need it at all times to complete tasks on behalf of everyone. Optionally, you can encrypt your home folder.
Then just wait. When the installation completes, you will be prompted to remove the installation disk and reboot. Do not forget to disable booting from external drives in the BIOS if you enabled it.
What to do after installation
When you reboot and your Linux desktop appears in front of you, you will be able to do everything you can on Windows and macOS: surf the web, edit documents, and listen to music. Don't forget to update and look in the "App Store" (or its equivalent, depending on the distribution) to install the applications you need.
Try Linux and you will see that in everyday life it is no more complicated than Windows or macOS.