Schemes to make a peony from foamiran. Peony from foamiran: a master class on creating a spectacular flower with your own hands. To make a bouquet of peonies, we need
See what a delicate beautiful foamiran peony flower you can do with your own hands. A master class with step-by-step photos will tell you all the details of its creation. The method is actually simple and affordable. We will cut the petals without templates, which will significantly reduce the time.
Recall that last time we showed a master class on creating.
To create a peony, we will prepare the following materials:
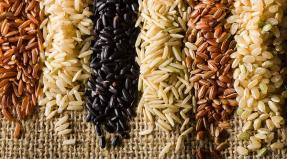
- white, yellow and green foamiran;
- green, brown and coral dry artistic pastels;
- floral wire;
- foam sponge and water;
- a light bulb or other round object;
- curly scissors;
- awl or needle;
- scissors;
- mold for leaves as needed;
- green floral tape;
- hot glue.
Work steps:
We prepare peony petals very simply. We cut out two strips with a width of 4 cm from white foamiran and divide one strip into triangles with a base width of 3 cm (28 petals), the second into triangles with a width of 4 cm (20 petals). We cut the third strip 5 cm wide and divide it into triangles with a base of 7 cm (10 petals).

The next step is to transform the triangles into petals. You can put several blanks together and cut several at once. We cut off the wide edge of an arbitrary shape, and cut off the edge of the largest petals with curly scissors in the shape of a heart.

With a damp foam sponge, we tint the edge of the petals in a delicate coral or other shade. We process blanks on both sides.

If you are not making a peony from marshmallow foamiran, then we will process the petals with an iron. In the first case, it is not needed. We apply the workpiece to a hot surface and twist the petal with our fingers. We straighten each and slightly stretch the middle to give volume.

We will make the largest foamiran peony petals using a round convex object, for example, a light bulb. Then the blanks will turn out to be voluminous and we will get the desired effect from the extreme petals of the peony. We fix the light bulb, cut out squares of foamiran with dimensions of 15x15 cm approximately. We apply the square to the iron for a few seconds and pull it onto the light bulb, first from two sides, and then very quickly from the other two sides.

We fold a square with a convex surface in half and cut it out in the shape of half a petal. We make the top edge wavy.

We slightly tint the edge of each petal and twist only it, leaving almost the entire petal intact.

Since the petals are ready for assembly, let's make the middle of the peony. We cut a strip 2 cm wide from the yellow fom and cut it into a thin fringe. We apply it to the iron and twist the fringe very carefully in the same way as we twisted the petals.


We cut out 4 droplets from a yellow fom 1.5 cm long, apply it to the hot surface of the iron for a couple of seconds and just leave it to cool. We tint the blanks in a light brown haze.

We turn the end of the floral wire into a small droplet and fasten the yellow blanks symmetrically opposite each other.


We distribute the last petals of the peony in one row and make sure that they overlap at least a little the upper part of the petals. In this case, you can make the peony more open without fixing the petals too much, or you can carefully fasten their edges together and the bud will be more dense.


On the green foamiran, we draw a small sepal and blanks for foliage, which will be slightly longer.

With the help of mold and heat treatment, we give texture to the leaves, slightly tint with a darker green pastel. We make notches with scissors along the edge. If there is no mold, then draw the veins by hand with an awl or needle.

We string a sepal with five ends and attach it to the bud, and glue the rest of the leaves symmetrically between the first layer. Wrap the stem with floral tape.

We arbitrarily cut out the leaves of the peony, give texture and shade, fasten the wire on the back side.


As a result, we get a magnificent and very beautiful foamiran peony.


A spectacular gift in the form of a luxurious hand-made bouquet for family and friends - what could be nicer? We offer a master class on making a beautiful flower that attracts with the luxury of colors and splendor of forms - a foamiran peony.
Foamiran (revelure, plastic suede, fom, fom eva) relatively recently appeared on our market and immediately fell in love with needlewomen, thanks to its qualities. This material is not afraid of water, when heated, it easily acquires and perfectly holds the desired shape. Foamiran products are stretchable, do not shed and do not change texture.
Our master class with step-by-step explanations, photos and videos, using the example of a peony, will help you learn how to create the first masterpieces from foamiran with your own hands.
Learning to collect a beautiful and lush peony from foamiran: a master class
For work, we need the following materials and tools:
- Foamiran of several colors (light pink, dark pink, dark green).
- Acrylic paints in yellow, dark pink, dark green.
- Thick wire for the stem.
- Thin wire for leaves.
- Tassel.
- Sponge.
- Glue gun.
- Toothpick.
- Foil.
- Floral tape.
- Manicure scissors.
- Iron.
Tools and materials are ready, you can get to work.
Let's start with a template for the future petals and leaves of our peony.

We cut out the patterns according to the template, apply each of them to the foamiran and circle the edge with a toothpick.
Now we cut the blanks according to the following scheme:
- petals a, b, c- ten to fifteen pieces
- petals d, e- five pieces
- leaves h- three jokes
- leaves m- six pieces
- sepals to and l- five pieces
- basis and in the form of the sun - one piece
You can use any color for the petals, at your discretion. In our master class, we use, alternating, light pink and dark pink petals.
Let's start processing our blanks. With the help of acrylic paints and a sponge, we tint the petals, giving them the inherent heterogeneity of the shade. We color the petals in a variety of ways: first, darker closer to the base, then to the edge of the petal. To give the leaves a natural look, use a brush to draw dark green veins on them, distributing them all over the leaf.
Now let's give the petals a natural shape. For this petals a and b alternately heat for a few seconds on the iron, then take it in your hands, fold it into an accordion, twist both ends of it in different directions. Expanding.

petals d will be in the shape of "boats". To create a recess, heat the petal with an iron, press with your thumbs and gently stretch the foamiran, making a cavity in the center. Next, you need to slightly stretch the petal across with your fingers. petals e and With processed in exactly the same way.
Let's move on to the leaves. We heat up, twist the ends a little. Fold them in half, stretch a little around the edges. To simulate the veins on the sides of the sheet, fold it in half, then collect the half in folds and pinch it between your fingers.
We start assembling the flower. For the base on which we will attach the petals, we roll a ball from a piece of foil. We make a hole in it, fill it with glue from a gun and immediately insert a thick wire.
We put a blank on the wire in the form of a sun, we connect the “rays” with a thread from above, above the ball. Lubricate the tips with yellow paint, imitating stamens.
Using a glue gun, glue all the petals to the base of the stamens a.
Now glue the petals b in a circle - first light pink, then dark pink. We fold the bottom of the petals with an accordion, forming a fold. So the flower will be more magnificent. Next row - petals With in a checkerboard pattern. Next, glue the petals in a checkerboard pattern e. The final row is the petals e.
Glue the sepals to the resulting bud. Little ones first l, and sepals between them to.
The flower is ready, we proceed to the collection of leaves. We apply glue to the base of the leaves and roll up the leaf, glue a thin wire to all the leaves. We fasten one sheet together with the help of floristic tape h and two sheets m.
We attach the resulting branches with leaves to the stem of the flower. We wrap the stem with tape. Our peony is ready.

Now it can be used as a great decoration for your interior. And if you stick a hairpin or an elastic band instead of a stem, you get a fashionable female hair accessory.
We hope that our master class will facilitate your work, making it interesting and enjoyable thanks to step-by-step recommendations and high-quality photos.
Video on the topic of the article
At the end of our master class, we also want to invite you to watch a video on this topic, which contains detailed step-by-step instructions for making a peony. Happy viewing!
This master class describes in detail how to make foamiran peonies. The difference between these peonies and other similar flowers is that they are closed. This version of peonies look great in a bouquet, but can be used for a wreath, brooch, hairpins. Our article has a photo and video selection with a simple MK on how to make a foamiran peony!
The master class describes a simplified way of making peonies - without the use of special devices that not every needlewoman has. In the process of the master class, you will need to give the peony petals a round shape. To do this, you will need special round bulbs (stacks) as in the photo:

If you do not have such a device, you can use any round object that is suitable in size - a large bead, ball, etc.
We analyze a step-by-step MK for creating a peony from foamiran
In addition, you will need the following materials:
- Foamiran for petals of any color you like, and green for leaves
- Glue gun or strong adhesive
- Toothpick
- Bead up to 1 cm in diameter
- Wire
- Household sponge
- floral tape
- Yellow and pink paint for tinting petals (gouache or acrylic)
Now you can proceed to the exciting microcosm of creating a peony from foamiran with your own hands. It will be ready in about an hour!
Preparation of petals and leaves
The manufacture of any flower begins with the creation of a pattern. For this peony, you will need 5 types of petals and 1 piece for the middle of the peony. The photo shows the size of the petals and their shape, if you follow these dimensions, the finished flower will be about 9 cm in diameter. The petals need to be transferred to paper and cut out, it is not necessary to copy exactly, you can draw the petals by eye - after all, fresh flowers do not have clear shapes.

Then the petals need to be cut out of foamiran. The contour of each petal is enough to circle around the foamiran with a toothpick. You can take foamiran sheets of different colors - for example, white and pink, or one color.
Number of petals:
- №1 – 10
- №2 – 15
- №3 – 10
- №4 - 5
- №5 – 5
- №6 - 1
After all the petals are cut out, they can be tinted with pink paint, for this a little paint is applied to a piece of sponge and each petal is stained with light movements on both sides with a sponge. In principle, this stage is up to you - a non-tinted flower will also be beautiful in its own way.
Shaping the petals
Now, perhaps, the most exciting stage of working with foamiran is giving the petals a shape characteristic of a living flower. Foam can be shaped by heating on an iron or over a candle flame, or by the warmth of the hands. For this peony model, petals No. 1, No. 2 and No. 3 are formed by hand, and larger No. 4 and No. 5 will be more convenient to form with an iron.
How to shape the petals by hand: the petal is folded like an accordion, twisted into a flagellum and rolled several times between the palms. Then the petal is gently straightened.
Larger petals are first heated on the surface of the iron (the iron must be heated in the “wool” mode), as soon as the petal begins to wrap itself from heating, it must be removed from the surface, put on a sponge and pressed in the middle with a round bulb or other round object (for example, bead attached to a hairpin):

Making the middle of a peony with stamens
For the middle, we will make the following blank - we will thread the wire into the bead, twist the ends of the wire so that the bead is fixed. In detail No. 6, we will make a hole in the middle, and thread the ends of the wire into it. Then we wrap the bead with foamiran and tightly tie the ends with a thread - we get the middle of a flower with stamens. We paint the tip of each stamen with yellow paint and let the parts dry. After that, we will prepare the glue gun and start assembling the flower.

To collect the flower, glue all the petals to the middle in a circle. If the petals are of different colors, alternate them. First, we glue thin petals No. 1, glue is applied to the base of each petal. All the petals do not fit in one row, just below the first row we begin to stick the second one, etc., you need to place the petals of each subsequent row between the petals of the previous row. Petals No. 2 will follow petals No. 2 and further in ascending order, as a result, the base of the middle bead will be completely closed. The last row will consist entirely of the largest petals No. 5.

Our lush peony is ready. If desired, you can supplement it with green leaves, or leave it as it is - it is good and so! How to use it - depends on your imagination. You can make several peonies and collect them in a bouquet or a romantic wreath, decorate a hairpin with them, make a brooch.
If you liked making peonies from foamiran, we suggest watching a selection of videos that describe the process of making various options for peonies, as well as an unusual flower - a peony (or English) rose.
A selection of training videos on the topic of the article
An unusually beautiful handmade flower can be called peony from foamiran, it will look very attractive on a headband or hairpin, decorating a hairstyle, or you can make artificial flowers on a stem, put it in a vase and decorate your home interior.
Peony from foamiran - a master class for beginners
If you are just trying your hand at this type of needlework, we recommend that you pay attention to this “quick” peony from foamiran master class. You will not need to do detailed tinting, scrupulously count the details, use molds and other professional tools. As a result, you will get a not very realistic, but very beautiful and lush peony.Cut with large scissors the amount necessary for work from a roll of Iranian foam 0.5-1 mm thick. You should get three strips 4-6 mm wide - two pink and white.
Once you're skilled enough, you can cut out pieces without using cardboard templates. But at the initial level, you should practice a little in drawing petals. All of them should approximately have the same height, but the thickness will be different. Thinner ones will be in the core, and wider ones will need to be glued along the edges. In total, approximately 70 fom blanks will be required for work.
You can cut out the details without the use of templates and patterns. If you have trained enough in drawing, you can even cut out such a shape with your eyes closed. Wrap a piece of pink foma about 2 cm and start cutting - along the upper edge, the cut out part should have arbitrary waves. However, when you finish cutting, you will find that you have 2 pieces. Wrap the edge of the material again and turn it over so that the previous cut goes up diagonally (this is used to save material). Those. the right edge of the petal will now be cut along this cut. One strip of foma should be enough for you to cut 30 blanks 1.5-2.5 cm wide. Use the second strip to make wider ones - 2.5-3.5 cm, while not using any template for cutting a wavy edge. White fom will go to cutting the widest, extreme, blanks having a width of 3.5-5 cm.

The blanks should take shape, and their edges should become more elegant and thinner, which is why processing on the included iron is indispensable. At the same time, it is very important not to overheat, because then the petal can curl up, become unnecessarily rigid and decrease in size. Fold the warmed workpiece like an accordion, roll it with your fingers to stretch and make the material thinner. Then expand and straighten the edges, slightly stretch in the middle, arching like a boat. Narrow ones can be processed quite simply, but with wide ones you will have to work hard - do everything very carefully, stretch with not very much force, because there is a very high risk that the fom will tear. Lay out the curved blanks in order - the narrowest should go first, complete the widest.
The base for the flower can be foil or foam, but perhaps the most convenient and hassle-free option would be a wooden bead, you should thread a piece of floral wire into it, and then grease the surface with superglue. Glue the first narrow petal, then a few more in a circle. Continue gluing subsequent rows. When the peony gets large enough, it will be convenient to turn it upside down and glue it further in this position. Glue five white blanks in a circle, pay attention to the fact that they should go with some distance. These gaps will need to be closed next row. So the wonderful is ready, now you will probably be interested to know how you can transform it into a hairpin.
Cut off the floral wire with powerful scissors or bite off with side cutters. The voids in the middle should be filled with hot glue, while leaving a slide of glue in the middle. Press the metal blank for the hairpin.
If you want stamens to be glued into the middle, this will make the craft look more realistic. You can make them yourself, or you can buy ready-made ones. Spread the petals, place a small amount of hot glue in the center of the bead, fix the stamens, then press the middle petals together.
To make the flower even more attractive, you can crumble the dry pastel, dip a damp cloth into it and walk along the edges of the petals with swiping movements. Use a clean damp cloth to smudge the paint.
Peony from foamiran - photo:

Peony from foamiran - photo master class
According to the proposed patterns of peony from foamiran cut out the necessary details.
You will need to prepare 10 pieces according to patterns No. 1,2,3, 8 pieces - according to pattern No. 4, 17 pieces - according to pattern No. 5, 7 pieces - according to pattern No. 6. Tone all blanks. For tinting, you can use dry or oil pastels, even oil and acrylic paints are suitable. First give the desired color, and then cut everything out.
Pretty weakly heat the iron and attach each part to it, twist, and then straighten and form in the shape of an arc.

Take a piece of floral wire and bend the edge with round nose pliers - this will help the flower to hold on and not fly off during use. Glue the first petal first with second glue, opposite it - the second. Glue the next ones with a slight overlap in a clockwise direction. When peony bud from foamiran is ready, then you will need to continue gluing larger petals

Peony from foamiran - MK
And here is a master class on making a not quite typical yellow peony. If you can’t find templates on the Internet, then you can “disassemble” a real plant, attach petals of each type to paper and circle. Prepare the resulting cardboard templates and use them throughout the year.Cut out 14 pieces of the smallest, all the rest will need 8 pieces. Cut and leaves from the green Iranian foam. Tone the yellow blanks-petals on both sides using acrylic paint.

Heat each petal by holding it with tweezers near a heated iron. Twist and stretch wide. Heat the green leaf, then attach and press it to the mold.
To make the core, you will need a foamiran strip 3 by 20 cm. It should be folded in half and glued. Then, as shown in the photo, cut and, smeared with second glue, roll up.

So, start building. Glue miniature petals in a checkerboard pattern or in a circle. Then the next two rows will go in size. You will have two sizes of petals left - they should be glued in pairs, then glued to the flower, trying to observe the principle of uniformity. Don't forget green leaves.

You can find out what other flowers can be made using such a wonderful material as Iranian foam.
Peony from foamiran master class step by step
This master class will teach you how to make a flower brooch hairpin - everything is very simple and fast. For work, use an A4 foamiran sheet, painted in the desired color, for example, pink.Because peony has petals of different sizes and shapes, you must first draw patterns of several types. You can use the photo provided.

Lay out the cut out templates on A4 sheet and circle the contour with a toothpick, then cut out. The largest variety will need 20 pieces, all the rest will be enough for 10. If you want to get a more magnificent craft, then this number can be increased.
Set the iron to the “two” or “wool” mode (depending on your model), then attach each blank to the surface in turn. By all means, each should be added to realism - to do this, twist the heated part along to get a kind of roll, then stretch this roll a little in length, and then straighten it. We draw your attention to the fact that overheating is very dangerous at this stage, because the fom can shrink, when stretching with your fingers it is important not to overdo it, because you can tear the petal. In general, do not be afraid to experiment.

The assembly of the flower will be carried out on the most common toothpick (if you wish, you can also use floral wire). Glue the first narrowest workpiece onto it with superglue (you can use both Moment and a thermal gun - which you have available). Glue the petals in a circle, slightly overlapping each other. When the entire amount is exhausted, it is necessary to cut off the toothpick and glue the result of the efforts on the universal basis for the brooch hairpin.

Finally, it should be noted that the finished result for all master classes will differ when using material of different origins. So, you can choose fom Iranian or Chinese production. There are more bubbles on the surface of the Iranian, which makes it very pleasant and velvety. It should be noted that fom produced in Iran will be more varied in thickness - somewhere in the roll it will be thinner, somewhere denser. Chinese will be more subtle and uniform. But at the same time, you should not worry - during the process of heating and molding, the Iranian petal can become unusually thin, because the bubbles partially disappear due to such processing, which allows you to get an unusually realistic craft. It should be noted that Chinese still shines a little - this can sometimes be attributed to disadvantages if you are trying to make interior peonies that cannot be distinguished from real ones. And if your goal is a hairpin and a headband, then glitter will definitely not be superfluous. The advantages of Chinese material include a good "memorization" of the form - this is an indispensable quality in the manufacture of leaves.
So, you just have to choose the material and the master class you like the most, and you can start exquisite needlework.
What is Foamiran? A year and a half ago, this question baffled me, since there was very little information about it in Runet, and even from what I found, it was not entirely clear what foamiran was.
Now this mysterious material has finally become available to the Russian buyer. It has several other names: plastic suede, foam (fom), foam eva, foam rubber. In fact, it is a sheet of foamed porous material that is pleasant to the touch, which lends itself well to stretching (about 10%). Thanks to this property, it is easy to give it the desired shape: bulge / concavity, bend, create corrugated folds, etc.
Foamiran is used to make dolls, flowers, and simply various decorative elements for decorating bags, shoes, household items, hairpins, hairbands, scrap-works. The list is endless. It is better to take the material in hand and start working with it, most likely, you will find more than a dozen possible options for its use.
For the master class, I chose the topic of creating flowers. We will make a terry pink peony from foamiran.
For work, we need the following materials:
- Foamiran. I used, 1 mm thick, the following colors; light pink (), dark pink (), dark green ();
- Green colour;
- , yellow, dark green () and dark pink () colors;
- Thick for the stem 1-1.5 mm and thin wire for the leaves. I used 1.4mm floral wire and #26 Fleur fine wire;
- : foam brush or sponge, and elastic art brushes;
- and nail scissors with straight or curved tips. Which scissors will be more convenient to use is up to you;
- For the base of the flower, you will need another piece of foil or a bead with a diameter of about 1.5 cm.


Click on the picture to enlarge.
1. Cut the details of the flower
From Foamiran we cut out the following blanks according to the pattern:

- 10 petals a light pink color
- 15 petals b: 10 pieces light pink and 5 pieces dark pink.
- 10 petals with light pink color.
- 5 petals d dark pink
- 5 petals e dark pink
- 3 sheets of dark green
- 6 sheets m dark green
- 5 gluing sepals to and l of dark green color.
- And for the base of the flower and the imitation of stamens, we need a blank in the form of a sun. To do this, cut out a circle from light pink foamiran according to the pattern and cut the “rays” so that their ends are sharp.
2. Toning the petals and leaves
Peony petals have a non-uniform color, and each petal is unique, so with the help of paint we create this heterogeneity. Tone each petal differently: either darker closer to the base, then to the edge of the petal. Thus, it is necessary to tint all the petals of a light pink color, and on both sides.


To make the peony leaves look believable, we will also slightly tint them with a green paint of a darker shade than the color of foamiran. First, we draw the central veins in the center of the trefoil and then distribute the paint from the central veins to the edges of the sheet.
The reverse side of the leaves can not be tinted, since the leaf on the reverse side of the peony is lighter and even slightly whitish.

3. Corrugation of petals and leaves.
Now we need to give a believable shape to the petals. In order to understand the principle of their processing, we will begin to corrugate the petal b


We fold the petal in small folds into an accordion.


We unscrew both ends in different directions and now carefully roll the folded workpiece between the fingers.


Especially diligently in this way it is necessary to process the upper part of the petal so that the foamiran stretches out and becomes thinner in this place. We unfold the petal.
Corrugate petal a in the same way.

The shape of the petal d is somewhat different, concave like a "boat". To create a recess on the petal, with the fingers of your left hand, grasp the upper edge of the petal, place the thumb of your right hand in its center and gently pull the foamiran, forming a recess in the center with your thumb and thereby giving it a rounded concave shape.


Now slightly stretch the petal across: put two thumbs in the center of the petal and slightly stretch the foamiran, turning your fingers towards each other.
We process petal e in the same way.
We corrugate the upper part of the petal c according to the principle of processing the petals b, that is, we fold it with an accordion and roll it between the fingers (thumb and forefinger), and stretch the middle with a boat, while giving the petal a slight concavity.


We corrugate the leaves. Fold the sheet in half along the veins. At the top of the sheet, stretch the edges of the sheet, at the bottom - the middle (along the vein of the sheet).


Now you can imitate the side veins, for this we fold the foamiran in small folds at an acute angle, rub it and roll it between the fingers (thumb, index and middle).


The tips of the leaves can be twisted.


flower assembly
Now for the fun part: assembling the flower.
Let's prepare the base for the flower, on which we will attach a lot of peony petals.
To do this, form a ball with a diameter of about 1.5 cm from a piece of foil. Instead of foil, you can use a bead of a suitable size and a hole. We make a hole in the ball with a wire (or other sharp object: an awl, a knitting needle). We fill the hole with glue from a thermal gun and immediately insert the wire into the hole.


We put a blank on the wire, and we tie all the “rays” with a thread from above, above the bead.


We paint the tips of the imitated stamens in yellow. I put them in a tube of thick acrylic paint.

We attach 10 petals to the base of the stamens using a hot glue gun, and


Then glue the petals b. To make the flower lush, glue the petals folded like an accordion at the base, creating small folds. Thus, in a circle we glue 10 petals of light pink color and the last row of 5 petals of dark pink color.