How to draw a line parallel to a given line and passing through a given point. Point, line, straight line, ray, segment, broken line How to draw a straight line parallel to a given one
Content:
Parallel lines are lines the distance between which does not change and which never intersect. In some problems, you are given a line and a point through which you need to draw a line parallel to the given one. Of course, you can take a ruler and draw a straight line parallel to the given one by eye, but there is no guarantee that the constructed straight line will be parallel to the given one. Using geometric laws and a compass, you can plot additional points through which a real parallel line will pass.
Steps
1 Construction of perpendiculars
- 1 This point does not lie on this line - most likely, it is located above or below the line. Designate this line as m 2 Draw an arc that intersects this line at two points. To do this, install the compass needle at point A 3 Draw the first small arc opposite this point. First increase the compass solution. Place the compass needle at point B 4 Draw a second minor arc that will intersect the first minor arc. Do not change the compass solution. Place the compass needle at point C 5 Draw a line passing through the intersection point of the two arcs and the given point. Label this line as n
- Remember that a perpendicular is a segment (in this case a straight line) that intersects another segment (a straight line) at an angle of 90 degrees.
- 6
Draw an arc that intersects a perpendicular line at two points. To do this, install the compass needle at point A 7 Draw the first small arc to the right (or left) of this point. Increase the compass solution. Place the compass needle at point E 8 Draw a second small arc to the right (or left) of this point. Do not change the compass solution. Install the compass needle at point F 9 Draw a line through the intersection point of the two arcs and the given point. The resulting line will be perpendicular to line n. Thus, the resulting line is parallel to the given line m
2 Construction of a rhombus
- 1
Label this line and this point. This point does not lie on this line; most likely, it is located above or below the line. Consider this point as the vertex of a rhombus. Since opposite sides of a rhombus are parallel, by constructing a rhombus you will get a parallel line.
- Find the second vertex of the diamond. Place the compass needle at a given point and draw an arc that intersects the given line at one point. Do not change the compass solution.
- The width of the compass opening is not important - the main thing is to draw an arc that will intersect a given straight line at any point.
- Draw an arc so that it not only intersects this line, but also goes just above this point.
- For example, set the compass needle at point A 3 Find the third vertex of the diamond. Without changing the angle of the compass, install its needle at the second vertex and draw an arc that intersects this line at a new point. Do not change the compass solution.
- Draw a short arc so that it only intersects this line.
- For example, set the compass needle at point B 4 Find the fourth vertex of the diamond. Without changing the angle of the compass, install its needle at the third vertex and draw an arc that intersects the first arc (which you drew by installing the compass needle at this point, and with the help of which you found the second vertex).
- Draw a short arc so that it just intersects the first arc.
- For example, set the compass needle at point C 5 Draw a line through the first and fourth vertices of the rhombus. This line passes through a given point and is parallel to a given line, because these lines are opposite sides of a rhombus.
- For example, a straight line passing through points A
3 Construction of corresponding angles
- 1
Label this line and this point. This point does not lie on this line; most likely, it is located above or below the line.
- If the straight line and the point are not yet marked, do so to avoid confusion.
- For example, denote this line as m 2 Draw a line through a given point and any point that lies on a given line. Using such a secant line, you can construct the corresponding angles, and then draw a parallel line.
- Draw a long secant line so that it goes beyond the given point.
- For example, through point A 3 Take a compass. Make the width of the compass opening less than half the length of the resulting segment.
- The exact width of the compass opening does not matter - the main thing is that it is less than half the length of the resulting segment.
- For example, make the width of the compass opening less than half the length of the segment A B 4 Construct the first corner. Place the compass needle at the point of intersection of the secant line with the given line. Draw an arc that intersects the secant line and the given line. Do not change the compass solution.
- For example, set the compass needle at point B 5 Draw a second arc. Without changing the solution of the compass, install its needle at this point. Draw an arc that intersects the secant line above the given point and goes just below the given point.
- For example, set the compass needle at point A 6 Take a compass. Make the width of the compass opening equal to the width of the constructed (first) angle.
- For example, the constructed angle is angle C B D 7 Construct the corresponding angle. The opening of the compass should be equal to the width of the first corner. Place the compass needle at a point that lies on the secant line above this point, and draw an arc that intersects the second arc.
- For example, set the compass needle at point P 8 Draw a line through this point and the intersection point of the two arcs. This line is parallel to the given line and passes through the given point.
- For example, draw a line through point A (displaystyle A) and point Q (displaystyle Q). You will get a straight line f (displaystyle f) parallel to a straight line m (displaystyle m).
- For example, set the compass needle at point P 8 Draw a line through this point and the intersection point of the two arcs. This line is parallel to the given line and passes through the given point.
- For example, the constructed angle is angle C B D 7 Construct the corresponding angle. The opening of the compass should be equal to the width of the first corner. Place the compass needle at a point that lies on the secant line above this point, and draw an arc that intersects the second arc.
- For example, set the compass needle at point A 6 Take a compass. Make the width of the compass opening equal to the width of the constructed (first) angle.
- For example, set the compass needle at point B 5 Draw a second arc. Without changing the solution of the compass, install its needle at this point. Draw an arc that intersects the secant line above the given point and goes just below the given point.
What you will need
- Pen or pencil
- Ruler
- Compass
- 1
Label this line and this point. This point does not lie on this line; most likely, it is located above or below the line.
- For example, a straight line passing through points A
- Find the second vertex of the diamond. Place the compass needle at a given point and draw an arc that intersects the given line at one point. Do not change the compass solution.
- 1
Label this line and this point. This point does not lie on this line; most likely, it is located above or below the line. Consider this point as the vertex of a rhombus. Since opposite sides of a rhombus are parallel, by constructing a rhombus you will get a parallel line.
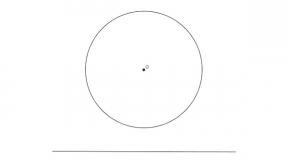
Given a circle with center ABOUT and period A outside the circle. A) The diameter of the circle is drawn. Using only a ruler*, lower the perpendicular from point A to this diameter. b) Through the point A a straight line is drawn that has no common points with the circle. Using only a ruler, lower the perpendicular from point ABOUT to this straight line.
*Note. In construction tasks, a “ruler” always means not a measuring tool, but a geometric one - with its help you can only draw straight lines (through two existing points), but not measure the distance between points. In addition, a geometric ruler is considered one-sided - it cannot be used to draw a parallel line by simply applying one side of the ruler to two points and drawing a line along the other side.
Hint 1
Use the ends of the diameter rather than the center of the circle.
Hint 2
An angle with a vertex on a circle based on its diameter is a right angle. Knowing this, you can construct two altitudes in a triangle formed by the ends of the diameter and the point A.
Hint 3
Try to solve first a simpler case than the one given in paragraph b), - when a given line intersects a circle.
Solution
A) Let Sun- given diameter (Fig. 1). To solve the problem, just remember the first two tips: if you draw straight lines AB And AC, and then connect the points of their intersection with the circle with the desired vertices of the triangle ABC, then you get two heights of this triangle. And since the altitudes of the triangle intersect at one point, then the straight line CH will be the third height, that is, the desired perpendicular from A to diameter Sun.
b) The solution to this point, however, even in the case given in the third hint, does not seem simpler: yes, we can draw the diameters, connect their ends and get a rectangle ABCD(Fig. 2, in which, for simplicity, the point A marked on the circle), but how does this bring us closer to constructing a perpendicular from the center of the circle?
Here's how: since the triangle AOB isosceles, then perpendicular (height) OK will go through the middle K sides AB. This means that the task is reduced to finding the middle of this side. Surprisingly, we no longer need a circle at all, and period D also, in general, “superfluous”. And here is the segment CD- not superfluous, but on it we will need not some specific point, but a completely arbitrary point E! If we designate as L intersection point BE And A.C.(Fig. 3) and then extend A.E. until the intersection with the continuation B.C. at the point M, then straight L.M.- this is the solution to all our worries and problems!
Is it true, is very similar, What L.M. crosses AB in the middle? This is true. Try to prove it. We will postpone the proof until the end of the problem.
So, we have learned to find the midpoint of a segment AB, which means we have learned to lower the perpendicular to AB from the center of the circle. But what to do with the original problem in which the given line does not intersect the circle, as in Fig. 4?

Let's try to reduce the problem to something already solved. This can be done, for example, like this.
First, we construct a straight line symmetrical to the given one relative to the center of the circle. The construction is clear from Fig. 5, on which this straight line is horizontal under the circle, and the one constructed symmetrical to it is highlighted in red (the two blue points can be taken on the circle completely arbitrarily). At the same time we’ll take you through the center ABOUT another straight line perpendicular to one of the sides of the resulting rectangle in a circle in order to obtain on this straight line two segments of equal length.

Having two parallel lines, on one of which two ends and the middle of the segment are already marked, let’s take an arbitrary point T(for example, on a circle) and construct such a point S, which is straight T.S. will be parallel to the existing two straight lines. This construction is shown in Fig. 6.

Thus, we obtained a chord of a circle parallel to a given line, that is, we reduced the problem to the previously solved version, because we already know how to draw a perpendicular to such a chord from the center of the circle.
It remains to provide a proof of the fact that we used above.
Quadrangle ABCE in Fig. 3 - trapezoid, L is the point of intersection of its diagonals, and M- the point of intersection of the extensions of its sides. According to the well-known property of a trapezoid (it is also called remarkable property of the trapezoid; you can see how it is proven) direct M.L. passes through the middle of the bases of the trapezoid.
Actually, once again we actually relied on the same theorem already in the last subtask, when we drew the third parallel line.
Afterword
The theory of geometric constructions using a single ruler, when an auxiliary circle with a center is given, was developed by the remarkable German geometer of the 19th century Jacob Steiner (it is more correct to pronounce his surname Steiner as “Steiner”, but in Russian literature the spelling with two “e” has long been established). We have already talked about his mathematical achievements once in the problem “In short, Sklifosovsky”. In the book “Geometric Constructions Performed with a Straight Line and a Fixed Circle,” Steiner proved the theorem according to which any construction that can be performed with a compass and ruler can be performed without a compass if only one circle is given and its center is marked. . Steiner's proof boils down to demonstrating the possibility of carrying out basic constructions usually performed using a compass - in particular, drawing parallel and perpendicular lines. Our task, as is easy to see, is a special case of this demonstration.
However, Steiner’s solution to some problems was not the only one. We will also present the second method.
Take two arbitrary points on this line A And B(Fig. 7). First we construct a perpendicular from A to the (blue) straight line B.O.- this is actually the solution to our first problem, because this straight line contains the diameter of the circle; all corresponding constructions in Fig. 7 are in blue. Then we construct a perpendicular from B to the (green) straight line A.O.- this is exactly the same solution to exactly the same problem, the constructions are made in green. Thus we got two heights of the triangle AOB. The third altitude of this triangle passes through the center O and the point of intersection of the other two heights. It is the desired perpendicular to the line AB.

But that's not all. Despite the (relative) simplicity of the second method, it is “excessively long”. This means that there is another construction method that requires fewer operations (in construction problems, each line drawn with a compass or ruler is counted as one operation). Constructions that require the minimum number of operations among the known ones were called by the French mathematician Emile Lemoine (1840–1912) geometric(see: Geometrography).
So, we bring to your attention a geometric solution to the point b). It only requires 10 steps, with the first six being “natural” and the next three being “amazing”. The very last step, drawing a perpendicular, should perhaps also be called natural.
We want to draw a red dotted perpendicular (Fig. 8), for this we need to find some point on it other than ABOUT. Go.
1) Let A is an arbitrary point on a line, and C- an arbitrary point on a circle. We carry out a direct A.C..

2)–3) We draw the diameter O.C.(secondarily intersecting the circle at the point D) and straight line AD. Mark the second points of intersection of the lines A.C. And AD with a circle - B And E, respectively.

4)–6) We carry out BE, BD And C.E.. Direct CD And BE crossed at a point H, A BD And C.E.- at the point G(Fig. 9).
By the way, could it happen that BE would be parallel CD? Yes, definitely. In case the diameter CD perpendicular A.O., then this is exactly what happens: BE And CD are parallel and the points A, O And G lie on the same straight line. But the opportunity to take the point C arbitrarily assumes our ability to choose it so that CO And A.O. were not perpendicular!
And now the promised amazing construction steps:
7) Conduct G.H. until it intersects a given line at a point I.
8) Conduct C.I. until it intersects the circle at the point J.
9) Conduct B.J., which intersects with G.H.... Where? That's right, at the red point, which is located on the vertical diameter of the circle (Fig. 10).

10) Draw the vertical diameter.
Instead of step 8, you could draw a straight line D.I., and then in step 9 connect the second point of its intersection with the circle with the point E. The result would be the same red dot. Isn't this surprising? Moreover, it is not even clear what is more surprising - the fact that the red dot turns out to be the same for the two construction methods, or the fact that it lies on the desired perpendicular. However, geometry is not the “art of fact”, but the “art of proof”. So try to prove it.
3 votesGood day, dear readers of my blog. It would seem, what does it cost to draw a straight line in Photoshop? Hold down Shift and there you go. Nevertheless, this can be done in as many as three ways. Everyone's result will be different.
In this article you will learn three ways to draw a straight line in Photoshop. Which filter to use to create a wave. How to do this using another interesting tool. I'll show you how to achieve a dotted line and draw at a certain angle.

A lot of information awaits you. Shall we get started?
Line Tool
First, I'll show you how to use a tool that is designed to create straight lines. In this place you can have a rectangle, oval, ellipse or polygon. Just hold down the left mouse button for a few seconds to open a menu with additional tools.

First things first. One of the most important parameters is thickness. Thanks to the line, you can even draw rectangles. You just need to make it fatter.

Next comes “Fill” and “Stroke”. Click on the color block to the left of the inscriptions and select a shade. If you want to make a stroke, enter its width. Now, my screenshot shows the option without it. The no color icon looks like this. Gray line crossed out in red.

You can see the settings and the result in this screenshot. It's not very visible, but the thickness here is 30 pixels. In a large picture, 30 pixels may look like a modest stripe. Everything needs to be adjusted to your own dimensions.

This is what the line will look like if you select red for the stroke color.

The next button will allow you to create a dotted stroke.

If you reduce the thickness and remove the fill, you will just get a dotted line.

Here you can align the stroke to the inner edge, outer edge, or center of your outline.

And round the corners. True, it will not be so noticeable.

If you press Shift while you are drawing a line, Photoshop will automatically create a straight line. Horizontal or vertical. Depending on where you are taking her.

If you need a line at a certain angle, then the easiest way is to look at what the information window shows and adjust it manually, pointing it in a certain direction.

Well, now I’ll show you another one.
Brush Tool
I drew these rectangles using lines drawn with a brush.

Choose the type and size that suits your brush line.

Place a dot at the expected beginning of the line, hold Shift and left-click where the strip should end.

There are two lines in front of you. The yellow one was painted using the Line tool, and the purple one was painted with a brush.

How to make a wave
No matter what tool you use, the easiest way to create a wavy line is to use a filter. Go to this category, find “Distortion” and select “Wave”.

Based on the preview picture, you will quickly understand what's what and how to set it up. The amplitude should be approximately the same. If it doesn’t work, you can just click on “Randomize” until a suitable one appears.

The last applied filter is always quickly accessible. I apply it to the layer with the yellow stripe drawn with the tool.

This is the result I got. As you can see, it is different.

Pen tool
To be honest, I still can’t use a pen professionally. I know that you can draw anything with it: smoothly, quickly, fun and cool, but it takes me a lot of time and the result is not always at the level I expected. And yet I can even draw straight lines with a pen. It's worse with curves, but I'll try. I choose “Feather”.

I put a dot, then a second one. While I haven't released the mouse button, I adjust the smoothness.

I do the same thing with each new point.

After all the manipulations are completed, right-click and select “Stroke outline” from the menu that appears.

You can choose several tools: pencil, brush, stamp, pattern, and so on. Now let this one be a brush.

I press the right mouse button again and select “Delete outline”.

This is the result I got.

Well, don’t forget that you can always use your collage making skills. Read the article about how to take a line from any picture and insert it into your image.
If you want to learn how to professionally use the pen and other tools found in Photoshop. I can offer you a course " Photoshop for beginners in video format ».
Lessons created by professionals will teach you everything you need to know about this program. You will save a lot of time searching for answers to this or that question. Ideas will spontaneously appear in your head on how to complete the task.

By the way, do you know how to make sure that you always have interesting needs related to Photoshop? This could take your relationship with this program to the next level. All you need is to be passionate about web design. People of this profession never sit idle. There are always clients, projects and new tasks.
There is a job for everyone, and you can do what you really like and bring good money. Read the article about or. Stop inventing tasks for yourself, let someone else pay money for your time.
Don't know where to start? Take the course " Commercial Web Design Basics " Try a few free lessons, it will help you understand yourself and understand whether you are ready to explore new horizons.
 An online course with the support of the author is a reliable investment in your future profession.
 OK it's all over Now. It's up to you. Decide when you are ready and start conquering new heights. If you liked this article, subscribe to the newsletter and take one step closer to your cherished goal every day.
Learn as much as you can about the Internet, write your success story, stop sitting around waiting. Take action. Your dream is realized by others every day. Today they are doing what you have been wanting for so long. Do they think about preparedness? The right moment is right now. Don't miss it. You have the strength to do this.
I wish you good luck. Until next time.
The cross section of a tetrahedron is a polygon whose sides are segments. It is along these lines that the intersection of the cutting plane and the figure itself passes. Since a tetrahedron has four faces, its sections can be either triangles or...
Restoring a perpendicular to a plane is one of the important problems in geometry; it underlies many theorems and proofs. To construct a straight line perpendicular to the plane, you need to perform several steps in sequence. To you…
When constructing various geometric shapes, it is sometimes necessary to determine their characteristics: length, width, height, and so on. If we are talking about a circle or circle, then we often have to determine its diameter. The diameter is...
Median is a segment that starts at one of the vertices of a triangle and ends at a point dividing the opposite side of the triangle into two equal parts. Constructing a median without doing any math is quite simple. To you…
Often, solving any complex problem in descriptive geometry comes down to solving many small problems, including problems of finding a straight line parallel to a given plane. Instructions 1 Mark the plane with three points and...
Tasks on constructing regular geometric shapes train spatial perception and logic. There are a large number of very simple problems of this kind. Their solution comes down to modifying or combining already...
Being one of the integral parts of the school curriculum, geometric problems for constructing regular polygons are quite trivial. As a rule, construction is carried out by inscribing a polygon into a circle, which is drawn...
A regular polygon is a convex polygon in which all sides and all angles are equal. A circle can be drawn around a regular polygon. It is this circle that helps in its construction. One of the regular polygons...
In geometry you often have to construct perpendiculars. The task of constructing a perpendicular using a compass and ruler is one of the basic ones in geometry. In particular, to construct the perpendicular bisector. You will need a compass, ruler,...
Parallel lines are studied in geometry lessons at school. But the concept of them and the skill of constructing them will be useful in everyday life and professional activities far beyond the threshold of school. You will need Paper, pencil, ruler,...
This article will tell you how to use a compass to draw a perpendicular to a given segment through a certain point lying on this segment. Steps 1Look at the segment (straight line) given to you and the point (denoted as A) lying on it.2Install the needle...
This article will tell you how to use a compass (without a ruler) to divide a given segment in half and draw a perpendicular through its middle. Steps 1Look at the segment given to you or draw it yourself (of any length).2Set the compass solution,…
This article will tell you how to construct a bisector of a given angle (a bisector is a ray dividing the angle in half). Steps 1Look at the angle given to you.2Find the vertex of the angle.3Place the compass needle at the vertex of the angle and draw an arc intersecting the sides of the angle...
Read also...
- All-Russian Olympiad for Schoolchildren Directions to the venue of the stage
- Aporias of Zeno. Philosophy of the Eleatics. Aporia of Zeno Why are aporia of Zeno needed?
- Finding metals in nature What metal is common in the earth's crust
- Point, line, straight line, ray, segment, broken line How to draw a straight line parallel to a given one