What to cook the stove into the garage. How to make a garage stove. Instructions for the manufacture of a horizontal oven for the garage with their own hands
For heating the garage, you can easily make it easy to make the furnace on firewood. It does not take much time and will cost completely inexpensive, because the use of infringement materials is allowed.
Why do you need to give a non-residential premises?
State standards found that in the garage the air temperature should not fall below + 5 ° C. If you do not adhere to these standards, the engine will not start, especially after the length of the car downtime.
With a strong frost, even antifreeze can freeze. Significantly increases the number of vehicle breakdowns due to the negative effects of hardened water. Also, agree, carry out the repair of the vehicle is much more comfortable in heat.
Advantages and disadvantages of heating firewood
By choosing solid fuel as an energy source for garage heating, you can get such advantages:
- low cost of firewood;
- no need to buy expensive installations and additionally spend money on electricity;
- small dimensions of the stove at high productivity;
- the heating device can be additionally used for cooking and warming up;
- simplicity of manufacturing and mounting installations on firewood. No further equip the massive foundation.
The disadvantages include that such heating devices are quickly heated, but at the same time they also quickly give heat into the environment. To maintain the optimal temperature, you need to constantly throw up fresh firewood. Fuel consumption increases significantly.
Varieties of heating devices
For the heating of the garage, you can make such types of stoves:
- bourgehog with a metal case;
- brick oven;
- heating device for long burning.
To independently install the burzhuyk, you need to have skills to work with the grinder and the welding machine. Brick masonry in this case make much easier.
Bourgesic - Production Features and Constructive Elements
Bourzuyki scheme
This is a fairly simple design that consists of elements such:
- boot chamber or firebox;
- grate;
- confused;
- solnik;
- metal door;
- chimney.
For the manufacture of the installation, use a thick metal with a thickness of 4 mm. When fastening the chimney pipe to the upper wall of the cooler camera, it is necessary to strengthen it. This place is considered the weakest, the metal is most often here it is here.
As a grasp grille, use a solid metal grid. You can take ready or make your own hands from a corner or wire. In the grate grid, make a lot of fine holes to remove ash.
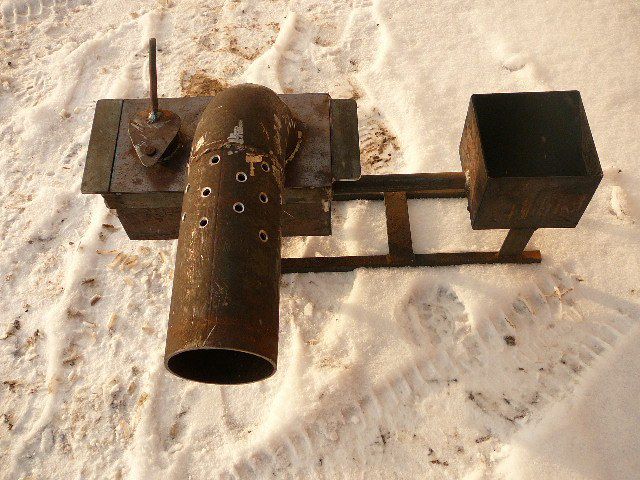
Step-by-step manufaction of steel pipes made of steel pipe
- Use a steel pipe with a diameter of 0.4-0.5 m with a length of 1 m, to which you need to fight legs.
- From the steel sheet, cut two circles of the same diameter as the pipe.
- In one circle, make the door for the firebox and the hole under piste.
- The length of the grate grate is equal to the length of the bourgeitors, and the maximum width is the diameter. It is best to use a metal mesh wide, which is slightly less than the diameter of the case. Insert it into the pipe and brew to the walls.
- We weld metal circles to the pipe. Follow the quality of the seam to achieve the tightness of the stove.
- Near the hole in the circle, attach a loop for which you suck the doors.
- On the cover of the case closer to the rear wall, make a hole with a diameter of 100 mm under the smoke pipe.
The next scheme of the furnace on the firewood for the garage is suitable if you do not have a metal pipe. Make it with your own hands is very simple, using metal trimming.
Manufacturing technology:

Brizuyka of bricks
To install a brick furnace for the garage with your own hands, you will need an additional fill of a small slab foundation with a depth of 200 mm. Machine chamber completely stick from refractory brick.
On the front wall of the design, leave the window for the door and pondered. From the parts of the brick, at the bottom of the heating device, small protrusions for the installation of a grate grid.
To mount the cover, put the valves on the walls. Top to make a laying of 1-2 brick rows.
Also, a metal sheet can also be used to arrange the upper wall. Squeeze it on the burzhuyk, after which the gaps are gratifying chammed clay. In the upper part of the device, refer to the chimney hole.
Construction of long-burning furnaces
Due to the presence of a special damper, homemade furnaces of this type are very effective because the firewood is not lit, but for a long time. With the help of purges, the intensity of the flame and the power of the heating device can be controlled.
Conceptual image of a long burning oven
To make the installation for heating the garage, you need to use a metal tank with a volume of 200 liters. In its top, make a hole for the chimney with a diameter of 150 mm. Also, refine a hole for the pipeline through which the fresh air will flow into the barrel.
For cargo, cut the circle of metal, which corresponds to the diameter of the barrel. We will breed the ranks. Also make a hole with a diameter of 100 mm, where to insert a small piece of the pipe. Such a cargo placed in a barrel under the cover. In the heating instrument housing, make two holes for supplying fuel and removing ash. Each of them additionally equip the doors.
Make a heating device with your own hands simple enough, using simple materials - metal sheet or barrel, corners, pipes, brick.
Video: Super Bourgeois for Garage
The garage furnace operating on cheap fuel is an excellent way out for those car enthusiasts who do not want to equip the "car house" a full and expensive heating system.
Garage heating - what are the options?
Vehicle owners (TC) know that the car must be left for rest in garages with a temperature of +5 ° C and higher. If this indicator is not withstanding, the driver after a long parking lot will be quite difficult to start the engine. At low temperatures, antifreeze sometimes freeze, which brings a lot of problems during the operation of the vehicle. Even more serious trouble happens.
It is easy to avoid them - to provide in the garage that the most desired temperature at +5 levels. In cases where the "car house" is built as an extension to a residential structure, where there is central heating, the garage is usually equipped with a heating unit by connecting it to a common network. But in those garages that are far from heated houses and buildings, it is necessary to establish autonomous heaters.
These include:
- Buleryan stoves - devices with a high efficiency, functioning on any solid fuel (wood waste, coal, peat and so on). These aggregates work up to 8-10 hours on a single combustible material tab. They are very compact and easy to use. It would seem - the perfect version for the garage. But there is a problem - objectively high cost of such installations.
- Oil, infrared or electrical heater, heat guns - Instruments connected to the power grid. There are no difficulties with their installation, but they consume many electricity. Such devices economical people are not used as a garage oven, as the costs of them are truly high.
- Bursuyka is a simple stove working on firewood. It is well suited for garages heating. Its not necessarily buy in the store. Elementary and at the same time, very effective in the operation of "bourgeois" is easy to make himself.
Also, any driver with due diligence can make an economical oven for the garage with their own hands, which will work on spent oil. On how to make such a design itself, as well as "bourgeois", we will also tell me further.
Homemade oven on firewood - elementary and efficient
Simple "Burzhuk" for the garage is characterized by a number of advantages:
- low cost of installation and maintenance;
- "Omnory" (fuel for such a stove can serve as coal, and firewood, and wood sawdusts);
- a sufficiently high efficiency with objectively small design sizes;
- the possibility of cooking or warming up on the "bourgeitry" of food;
- the lack of necessity in the construction of the foundation under the heating device.

Firewood stove can be manufactured in different ways. In this case, any such design necessarily has the following components:
- Camera combustion - furnace. Geometrical parameters and configuration of this part of the "bourgeitors" each chooses to its taste.
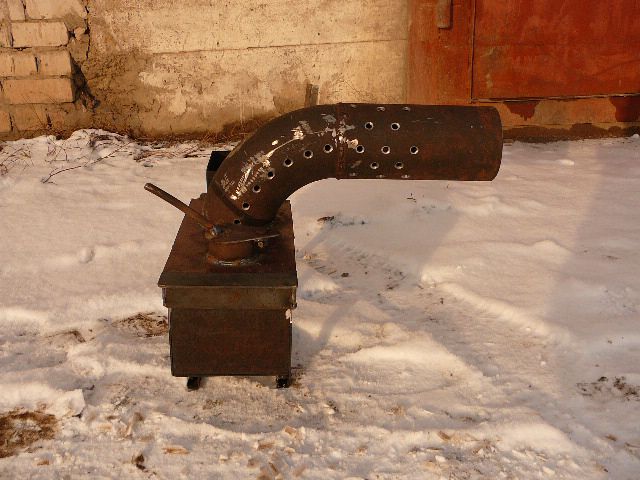
- Pipeline for the exit of smoke. It is performed in a spiral or curved form. If you plan to use direct pipe segments to create a furnace, consider that their length cannot be more than 100 cm.
- Copyright - a special grille on which solid fuel is placed. It is necessary to create good thrust in the heating device. Colonsets are always posted at the base of "bourgeitors".
- Solnik is a small compartment under the grateproof. It is assembled asking from burnt fuel.
The curved form of chimney is due to the need to reduce the speed with which the air heated in the oven moves along the pipe. "Turns" of the pipeline is delayed smoke. As a result, it does not go into the pipe, but actively gives the garage thermal energy. As you can see, such a garage oven has a simple and understandable design. We apply the drawings of such devices for heating. Make a furnace, guided by them, not at all difficult. It is only important to remember two things:
- Installation of "Bourgeisy" is performed in the part of the garage where expendable combustible materials and a variety of lubricants, wooden elements, objects subject to light ignition are not stored.
- In the garage, it is necessary to make holes through which air from the street will constantly come to it, as well as the simplest exhaust ventilation for removing the exhaust combustion products.
Making "Burzhuk" on your own
The wood stove is made of metal. Can be used:
- pipe with a cross section from 30 cm;
- metal sheets with a thickness of 5-8 mm;
- barrel with walls from 5 mm thick.

Metal sheets should be cut by a grinder to the sizes you need and combine them into a cubic design with. The barrel or pipe is used in the form in which they are, cutting them into the given geometric parameters. On the back wall of the design (or on its top) you need to mount the pipe for the removal of smoke. The diameter of the pipe product takes about 12-16 cm. The thickness of its walls is 2-3 mm (otherwise the pipe is simply frit).
Then cut in the design of the sector for the furnace, and under it we make a place where the ash will fall from the burnt fuel. These two plots are separated from each other by sparking, which are made of a metal horizontal plate with several slots (the finished product can be bought on the market or in a construction store).

If you plan to build a fairly large heating device, the grid slits are required to have parameters about 4-5 cm. For a small stove that you will fuse with small wood and coal, sufficiently slotes in 1-1.2 cm.
The ash tick itself is usually made in the form of a removable metal container. It is made of steel (sheet) 3 mm thick. Such a drawer is easy to remove as needed and free from ash. To improve the efficiency of the functioning of the device, experts advise to weld to the sides (perpendicular to them) of the homemade design of 4-5 mm steel plates. At the expense of this contact area of \u200b\u200bthe stove with the surrounding air will increase, and the garage is much faster heated.
Heating device for burning spent oil - "Darm" heat
The homemade stove for the garage of this type is very popular among motorists. It works on any form of oil (transmission, machine, shale, industrial), on a furnace and diesel combustion and even on the remains of paints and varnishes. By the magnitude of the heat of heat into the air, such a design is identical to the usual heater operating on electricity.
The scheme of the device described is simple. The stove is performed from two tanks. They are connected by a pipe located vertically. In this pipe will definitely need to make holes. Recommended geometric dimensions of such a furnace - 0.7x0.5x0.35 m, total weight - in the range of 30-35 kg, the volume of tanks used is 12 liters. As the latter, old compressors from Soviet refrigerators or cylinders in which propane was kept.
- Metal corner makes 20-25-centimeter legs, which are horizontally install one tank.
- We weld the container to the legs-supports.
- At the top of the first tank and on the bottom of the second (approximately in the middle), drill holes and vertically weld the pipe, connecting two containers in one design. Pipe product thickness - 5-6 mm. Even better - make a collapsible design. In this case, the lower part of the pipe in this case, you weld to the bottom baca, and the upper tight on the opening of the second container. The collapsible device will be much easier for you to clean from soot and soot.
- Drill 10-14 holes in the pipe (on the average site). Note - the holes are not made within 9-10 cm from tanks.
- Cut a small hole at the top of the bottom tank, equip it with a simple lid, which will be convenient to open and close. This hole is necessary for filling the oil (other combustible used).
- At the top of the second tank, you also make a hole, weld the nozzle to it and mount the pipe-hood on it. The latter is best to do from the "stainless steel" (galvanized).
We hope that the drawings and videos we have provided this article will help you quickly make an effective stove for the "home" of your car.
For most people, the word "garage" is associated simply with a box for storing the car. However, there is a fairly large category of car owners for whom the garage is truly the "second home". They are ready to spend all their free time in it - good, the work here is probably always found. In addition, the garages fairly fixed the steady reputation of a kind of "male club", where the uninitiated, especially women, not recommended.
But only winter is trying to make adjustments to the active garage life - in the freezing room and it is extremely uncomfortable, and just talking to friends - very uncomfortable. However, the inventive masters always find the way out - install homemade stoves, designing them on their own or using the advice of comrades how to make burgundy in the garage.
We will introduce our contribution to this noble male business. The publication will consider several ways to make burgundy with their own hands.
Bourgeisters wood-haired materials
The principal design of the simplest bourgeitry operating on solid fuel is very uncomplicated. In essence, this is a metal thick-walled container, divided into two main compartments.
To the top - firewood, firewood or other fuel is laid, for which the loading door must be provided. The grate grille separates the furnace from the lower compartment, much smaller sizes - the ash bar, which also often plays a role confused. It also recommends that the appropriate door is also recommended, through which the bourgeois can be performed from ash. In addition, the opening of the door to a certain width regulates the air intake in the flue chamber, and therefore the intensity of burning firewood. In the upper heat chamber welded the nozzle for removing the combustion products into the chimney pipe.
Such a scheme gives space for independent design of uncomplicated bourgeokes, and a variety of materials are going to move as blanks or served their items and devices. Learning how to cook burzhuyk to the garage, real masters, perhaps, there is no need - probably, it is better to simply give a number of interesting ideas that can be taken as a basis and add your refinement on the basis of available opportunities and preferences.
1. One of the easiest options - Bourgehoga from the old metal barrel.
The design presented in the figure is simplified to the limit. The master manufacturer decided to abandon two separate doors, combining them into one common. The top of the barrels are welded a metal frame, which allows you to lay a metal sheet on it, which becomes a kind of "cooking panel" - it is possible on it, for example, to warm the water.
 Bourgehinka from the barrel - the design is simple, but with a weighing of flaws
 The dignity of such a design is perhaps only one thing - simplicity and speed of manufacture, accessible to almost everyone. The shortcomings are much more.
- Firstly, the Barrel itself is not the best option for the bourgearies - the walls are thin, they are low with them, and they will not last long - they will quickly ruin.
- Secondly, the intensity of burning is difficult to regulate.
- Thirdly, the design is cumbersome, takes a lot of space. You can, of course, think over the vertical location, but the main problem is the subtleties of the walls, iteverything Equally N. eliminate
- And, fourth, such a burzhuyak is very unsafe in fire ratio.
A similar stove is better to have in the garage, but somewhere on the street, to utilize the garbage.
2. Something similar, with the same basic disadvantages, but more compact can be made from standard 40-liter beadon.

Scale of work, including welding, is even less here. In fact, only legs (3) and chimney tube (2) are welded to the housing (1). The door is ready - it remains regular, only two rows of holes (4) are drilled in it for air access. Inside the homemade grate grid is stacked, conditionally dividing the bidon for two compartments - and mini-bourgeitis is ready.
3. Very wide opportunities in the manufacture of garage-bourgeoque furnaces provides the use of old gas cylinders. These vessels have thick-haired walls that are easily welding and themselves have a good heat capacity.
The main difficulty is to properly prepare a cylinder for further work, since even with a neck, there may remain a pair of explosive concentration. You can meet the advice to fill the balloon with water at night, and then, after draining the liquid, begin to cut it. However, as practice shows, and this does not give a complete guarantee of work safety. In this light, it seems the optimal approach:
- The vertically supplied balloon is to stick in the ground with such a calculation so that it is reliably fixed for its cutting with grinding.
- Fill it with water for the sickness, let it stand for 2- 3 hours.
- Apply around the circle line marking of the future cut.
- On the planned line to start cutting until the end-to-end hole appears. Water will flow out out. It is necessary to wait until its level drops to the slice level, and then gently continue working with grinding and remove the cover completely.
- Now water can be merged and continue further work - no danger of the balloon will not represent.
Variants of bourgeoque stoves from cylinders - a lot.
- often it is made in horizontal performance. The capacitance of the cylinder itself is, in fact, the finished flopping chamber. Sharing it with such a two-time orientation - irrational, it is better to make a sheet metal and welded below solnik-pissed with your own door.

In this case, the rows of holes drilled in the cylinder housing can be in this case:

If there was a real cast-iron appropriate size, you can enter and otherwise cut into the wall of the cylinder window, which will provide a dense adjacent to this part:
 Another option - a window for the installation of a conventional cast iron grate
 Machine door can be made independently using a fragment carved for this window, or to privar the finished part that can be purchased in a shopping store.

The design is installed on their welded pipes or a corner of the legs on a comfortable height. In the back cut the nozzle to connect to the chimney.
- In order to save the garage space, the cylinder can be placed vertically. In this case, it is divided into two chambers, welding inside the brackets, to which the homemade round grate grill is stacked, made of a steel bar with a diameter of 10 - 12 mm. Two two ptsi are made - floppy and infancy.
The upper cut part can be drowning - in this case a peculiar cooking surface will appear. Another option is to purchase the cast-iron cauldron of the desired diameter, which is exactly suitable as a "plug" and turn into a container for heating water or even for the preparation of a variety of dishes.
 Original solution - Instead of the top cover, a well-adjacent cauldron is used
 For the output of combustion products, the standard discharge by 90 degrees with a diameter of 100 or 110 mm is boiled, and the vertical part of the chimney is then attached to it.
An original design offers another craver. As a ready-made piece for burzhuyk, he used an air tank receiver from the braking system of a truck.
The wizard did not install ordinary doors. For pushed the nozzle equipped with an adjustable flap limiting the air intake. Luke loading on the side wall of the burzhuyki is also no - it uses the principle of the upper loading of solid fuel. The top cover is folding, for convenience, equipped with an arcuate handle.

The inner space of the cylinder on the furnace and the ashpan shares the homemade grate grille:

The design itself is simple in the manufacture, but when operating requires caution during the lining of firewood. In addition, the process of cleaning such a burzhuyki from the accumulated ash will also be completely convenient.
Similar burzhuyki designs can be made from cropping thick-walled pipes with a diameter of 300 - 500 mm.
4. Steel sheet - Excellent material, from it can be made of a bourgeois stove with their own hands the drawings of which is easy to find on the Internet.
For example, it is possible to draw a drawing in the work of the stove on a solid fuel, for which the sheet metal will be needed with a thickness of at least 4 mm (the walls from the more subtle simply will quickly ruin).

On the drawing offered, the drawing shows all sizes, and any master will be easy to cut the parts necessary for work. The main "highlight" of this design is the presence of two partitions (1). They create a kind of labyrinth for the exit of combustion products that do not fly immediately into the chimney pipe, and provide maximum heat transfer from the burzhuyki.
A metallic plate (2) with rows of drilled holes with a diameter of 12-15 mm is used as a grate grid.
It is advisable to "wear" bourgeitake in the metal casing, using a sheet metal with a thickness of 2 mm for it. The plates (3) are cut on the sizes of the side and rear walls and are attached to the stove body or on the threaded racks, or using bushings with a length of 50 mm (4).
Such an addition to the design of the burzhuyka will solve three tasks at once:
- It will reduce the likelihood of random burn from the hot walls of the stove.
- The effect of hard infrared radiation from it will decrease, not always pleasant and necessary.
- The resulting clearance of 50 mm MM walls of burzhuyki and screens will create a powerful convection flow of heated air, thanks to which a quick and uniform heating of the garage room will occur.
This is not all possible options for garage bourgeoque on solid fuel. And with detailed technology of their manufacturer can be found on other pages of our portal dedicated to this issue.
Video: homemade garage stove made of metal sheet
Now, probably, it makes sense Bliki to get acquainted with the design of the stove, which uses so as fuel common In garages, practically "thrus" material like spent engine oil.
Find out how to study the step-by-step process that is understandable even for beginners, from our new article.
How to make a burzhuyka on working out
In fact, having in the garage the stock of firewood for the bourgeitoke firebox is not always comfortable. But the working out is almost constantly or easy to find it. This becomes especially relevant in large garage cooperative partnerships, where, often, set special containers to drain the old oil, or in the auto repair shops. So why not take advantage of the opportunity to use almost free fuel for heating?
The design of such stoves and their layout can also be very diverse - from compact bourgeookes designed for a small room to large and bulky devices with high heat transfer, capable of heating already significant areas.

Nevertheless, the principle of operation and the basic elements of the design in all them are similar. They consist of two tanks. The bottom is designed to refuel the waste oil - it produces its surface ignition and bringing to a boiling state. Pair of oil climb up By pipe having perforation for access of oxygen. Here it begins the process of surviving vapors, and their final oxidation and combustion takes place in the upper chamber, which is already associated with the chimney system.

If you look at the photo of the working, then the intensity of the stains of infrared radiation is very clearly visible the temperature distribution in this heating device. The lower capacity with oil is not heated: a light spot is only a visible part of an open flame on the surface of the burning oil. The main download begins in the upper third of the vertical perforated pipe, and the peak values \u200b\u200breaches the temperature in the upper chamber - even a thick-walled cabinet is rapidly in the literal sense of the spelled. It is this part of the burzhuyka that gives the maximum heat exchange with air indoors.
The principle of operation of such a stove is necessary. This will help correctly determine the materials necessary for it - it is obvious that the most heat-resistant parts of the vertical pipe and the upper chamber should be.
Below are the drawings of the bourgeois furnace with their own hands working according to such a scheme. Almost all sizes are affixed in them, but still for the manufacture of such a heating device, a number of explanations are required, considering this process more.

So, work on the manufacture of such a stove begins with the selection of materials. First of all, it is necessary to have two cuts of the pipe for the housings of the lower and upper chambers (pos. 2 and 8). The drawing shows a diameter of 352 mm and 344 mm, but such a standard simply does not exist. It is easier to change the data slightly and apply pipe cuts 355.6 × 6 or 325 × 6 mm.

The thickness of steel sheets used for the manufacture of other parts is 4 mm, with the exception of the upper cover (pos. 10) and partitions (pos. 9), for which a metal thickness is required.

For a vertical chamber, a pipe with a diameter of 100 mm with a wall thickness of at least 4 - 5 mm is used. The same pipe will be required for the flue of the chimney.
The process can be started with the manufacture of the bottom chamber. To do this, to the trimming of 355 mm tube height of 115 mm (pos. 2) is welded carved around the circumference of the bottom (pos. 1). All seams in the stove design must be absolutely hermetic.

The upper part of this container must be removable. It means that it is necessary to have a cylinder (pos. 3) which would be tight, almost without clearance, would be dressed on the lower. Pick up it according to the standard sizes of pipes - it will not work, it means that you will have to make it yourself. A metallic strip of 60 mm wide, which, with the help of heating with a gas torch and, with the use of clamps is enveloped around the body of the bottom capacity, and then coarsened vertical seam.

Now, according to the incident ring, you can accurately measure and cut the lid for it (pos. 4). It immediately cuts out two holes - the central Ø 100 mm (pos. 4.1) for the option of the vertical perforated pipe, and the Ø 60 mm is shifted to the edge, Ø 60 mm - it will be used to refuel the fuel, ignition and adjust the receipt of primary air for the combustion of the oil. A sliding lid is prepared (pos. 4.3), which will be fixed in the hole (pos. 4.4) with a rivet or bolt (pos. 4.5).

Then the finished cover is welded to the ring.
Cut pipe 100 × 5 mm 360 mm long is placed to drill holes in it. The top row should defend from the edge of 55 mm, the lower - by 20 mm. It is necessary to place uniformly 6 rows of 8 holes in each, so that they are in a checker order. The diameter of the holes is 9 mm. From both ends of the pipe, the chamfer is immediately removed for further welding in the assembly process.
The next step is mounted the upper chamber. For the beginning, two covers are prepared that have the same dimensions, but differ in the thickness of the metal - the lower (pos. 7) - 4 mm, and the upper (pos. 10) - 6 mm. In each of them, the hole Ø 100 mm is cut - so As shown in the drawing. The diameter of these covers, of course, should accurately correspond to the diameter of the thick-walled pipe used, from which the cylinder is cut with a height of 100 mm (pos. 8).
Immediately it is necessary to prepare and jumper (pos. 9), which will serve for more complete burning of rising vapors, not allowing them to quickly exit the chimney pipe, thereby creating an additional surge chamber.
The assembly is starting with the welding of the upper, thicker cover to the cylinder.

After the sealed seam is made, set the jumper with its maximum displacement to the chimney hole, and cope with three sides.

Now you can breed and the bottom cover. Its hole should be located strictly diametrically top.
Very accurately referring to the coal, achieving perpendicularity in all planes, set, grab, and then cools the perforated pipe to the bottom cover.

Then you can prigerate the flue of the chimney (pos. 11) to the corresponding hole of the upper cover.
 Woven nozzle of chimney
 From the opposite end of the perforated pipe, also, with observance of perpendicularity, the lid of the lower fuel capacity is welded.


This sealing ring is then welded to the bottom of the "pans".
 ... and its fixation to the walls of "Pans"
 In fact, it remains only to fight legs (pos. 6) and the stove can be finished. For greater stability, the stove can be welded the rack (in Scheme - III), which will add stiffness of the structure.

You can, if you wish it, after stripping, cover the heat-resistant paint and boldly operate.

It is possible to fill it through the neck of the lower capacity, but it can be safely done only when the ear-filled oil is completely fused. To avoid similar inconveniences of pr and exploitation, it is recommended to supplement such a burzhuyk on the development of another "option" - a device for controlling the oil level in the heat chamber and safe refueling during work.
To do this, you will have to make another open container, about the same as the lower "pan". The form of this vessel does not matter. Both of these tanks will be located on a shared stand of two parallel metal corners.
 Both tanks are welded to the guides - corners ...
 In the bottom of both tanks, the holes of the same diameter are cut, which are connected by a curved tube.
 ... and connected by tube
 So, it turned out two reporting vessels. According to the laws of physics, the fluid level in both is always the same. Thus, the owner of the stove always sees the level of oil testing remaining in the furnace chamber, and maybe without any problems to replenish the fuel supply, the bay of its open container.
True, to provide greater safety, it is better to provide a protective screen that will cover the open vessel from the direct thermal radiation of the heat chamber.

Now you can talk with full confidence that I am ready. It remains only to install it in place, connect to the chimney pipe, fill the fuel and spend a trial ignition.

For ignition, there are usually liquid for fireplaces (furnaces), pour about 100 ml over the oil into the filling neck. There are also lowered lit wicks them impregnated with the same liquid of vet or paper. A superficial burning should begin, which will take place in a few minutes to boil the oil, the formation of vapors and the transition of the entire burzhuyka in its "regular" mode of operation is usually accompanied by the characteristic hum.
In the model under consideration, ready-made details were used - trimming of thick-walled pipes. If they failed to find them, then the same stove can be made from the steel sheet, with box-made refueling and survival cameras, simply observing certain proportions of their volume in relation to the parallelepiped. The effectiveness of the stove from this does not suffer. The thickness of the material used is the same, 4 and 6 mm.
Video: Stove on working with box-type cameras
Prices for popular models of welding machines
Welders
And what to do those owners of the garage, which already have ordinary bourgeitake, working on solid fuel, but are interested in the possibility of applying as a fuel oil work? Nothing terrible - and there is an acceptable way out for them. You can make a special "console" that will make the bourgeois universal.
 Such a "prefix" will be able to turn the usual bourgeitake in working on spent oil
 In fact, it is the bottom capacity of the stove on the workout, also with a perforated pipe, but only bent at an angle of 90 degrees (using the order of the standard removal).
 She is in another perspective
 But instead of the final survival chamber, the usual wood bourgeois is used, where this curved tube is connected using an adaptation device. For example, in the usual bourgeitogo, you can make the windshield door removable and replaceable. One, normal, will be installed using firewood, and the other having the appropriate hole to insert a pipe -for using "consoles" on working out.
 As an "adapter" in this case, a round plug with a hole for the pipe input is used. Startup furnaces of the furnace is simply collected in the direction
 Another option is to boil the pipe on the side, into the wall of the bourgeitogo - then the stove will generally get universal. Only necessary to provide a flap so that when using firewood and flames, it does not apply, and the ash from the furnace did not fall into the perforated tube and the oil container.
Advantages and disadvantages of bourgeoke
In order for the operation of the bourgeitakes on the workout did not deliver special X Lopot, it is necessary to know its features, advantages and disadvantages that must be taken into account when using it.
The following qualities can be attributed to advantages:
- The stove is unpretentious, does not require interference in its work - the main thing is to properly adjust the air gap on the filler neck (usually it is 10 - 15 mm). It has good heat transfer, able to quickly warm the closed room.
- With proper operation, such a burzhuyka does not smoke, Gary is not distinguished from the chimney pipe.
- The oven can be considered a fireproof in the fact that fuel (testing) in itself in itself is never lit in normal conditions, and in the chamber only around the vapors allocated to them.
However, there is a lot of similar schemes and disadvantages:
- Already mentioned about the noise of the stove work. In addition, it is impossible to get rid of the characteristic smell. However, for garage conditions it should not have much importance. Sometimes masters find a different solution to such a problem. For example, an additional air heat exchanger is installed on the upper chamber, through which the air heats the adjacent room is driven by air.

- And the combustion chamber (perforated tube), and the chimney will quickly overcome the sediments of combustion products, require frequent prophylactic cleaners.
- Burning oil in the bottom chamber always leaves the cocked layer, which is quite difficult to clean.
Video - stove on working out
During the operation of the stove, a number of required rules should be observed:
- It is not allowed to use oil testing with combustible impurities, such as gasoline. Development must be necessarily filtered so that it does not contain solid suspension.
- Presents the danger and testing with water - this can lead to the boiling of the liquid and spraying the oil with its possible ignition. The workshop for further use in the form of fuel should be carried out under conditions that exclude water entering.
- In no case cannot be placed such a stove on a strong draft - it can cause a flame echoing on the surrounding items. There should be no flammable substances and materials around the stove. It is necessarily a reliable thermal insulation of the walls of the room.
- The room must necessarily have reliable ventilation, since the work of the stove is associated with the intensive absorption of air oxygen and the allocation of carbon monoxide and life.
- It is strictly forbidden to use as fuel any other flammable liquids - this may end the explosion in the upper chamber or chimney pipe.
- You can never leave such a bourgeois without supervision. It is strictly forbidden to go to bed in a room with a working stove. Before leaving, make sure that the oil completely burned out, the process of the survival of his vapor ended.
- It is forbidden to water the stove with water for cooling it, apply water to extinguish fire - it will only aggravate the dangerous situation.
- The stoves should not have horizontal sites. An inclined area is allowed to change the direction at an angle of 45 degrees. The minimum length of the chimney pipe must be 4 m, and the recommended - from 5 to 7 m.
- Recommended Pouring level at the initial refueling of the stove - up to ⅔ the volume of the lower tank.
- When using such a burzhuyka in the garage, a powder fire extinguisher or a box with sand must be near it.
So, it will be able to make burguly to the garage, probably everyone who has stable skills and fitter work. It is enough to show fantasy or take advantage of the drawings of finished developments - and everything should work out. The main thing, and in the manufacture, and during the operation of such stoves - constant compliance with the elementary safety measures so that the heating device does not cause a big trouble.
Private garage - a specific room and in winter is usually very cold. Neither for a person nor for the car such a microclimate is completely useful. At the same time, the use of standard electrical heaters is often too expensive and ineffective.
It remains to make an oven for the garage with your own hands by choosing one of the appropriate options. We offer for consideration four ways to improve furnace heating, each of which has its own characteristics in creating and operating.
Visual schemes and video instructions will help to determine the design of the furnace, make the assembly and connection of the aggregate yourself.
Capital garage with insulation is not available to every car owner. Most often at the disposal of the owner of the vehicle is a metal structure devoid of any insulation. Any thermal energy leaves such a structure almost instantly.
When solving the problem of heating garage premises, it is not necessary to evaluate its need for warmth, based on similar experience with the residential house. And it's not only in the absence of thermal insulation.
There is a so-called Squared Cuba law, which states that when the dimensions of the geometric body decrease, the ratio of the surface size of this body increases its volume.
For normal storage of the car in the garage, the temperature inside the box should not fall below + 5º and rise above + 18º during the presence of owners and perform repair work. Requirements regulated SP 113.13330.2012
This affects the size of the object heat loss, therefore, for heating one cubic meter of a small room, such as a garage, it is necessary more heat than when heating a large house.
If a two-story building may be enough for a heating device with a capacity of 10 kW, then a significantly smaller garage will need an aggregate with a capacity of about 2-2.5 kW of thermal energy.
To maintain a very modest operating temperature at 16 ° C, enough and stove with a capacity of 1.8 kW. If you need to maintain only the optimal temperature for storing the car in the parking lot - 8 ° C - the unit is suitable for 1.2 kW.
It turns out that the fuel consumption for heating the unit volume of the garage space can be twice the similar indicator for a residential building.
In order to carefully warm the entire garage, its walls and the floor, it will take even more heat energy, i.e. An even more powerful heater. But even in the presence of insulation, heat will leave the room too fast. Therefore, it is recommended to carry out heating not the entire garage, but only the so-called workspace.
Using insulation: pros and cons
Economy garages almost never be insulated outside by a very simple reason - it is too expensive for the premises that do not constantly use. Yes, this is not always possible, for example, in garage cooperatives of the structure put very close to each other, the clearance does not allow the insulation installation.

For the insulation of the garage, it is possible to use materials such as fiberboard that fade during fire. The use of plastic in such a room is unacceptable
But the internal thermal insulation of the garage room may be problematic. When mounting the insulation material directly on the metal walls at the place of their contact, the so-called dew point arises, i.e. Place of cluster condensate. Almost always, in contact with moisture, the insulation comes into disrepair pretty quickly.
And for the structure of the structure, this situation may be destructive. In the metallic garage, insulation can be put, but it is better to establish a suitable material at some distance from the wall, about 20-50 mm.
From the floor should be retreating by 50-70 mm. As a profile, it is best to use washers to avoid creating closed circuits under the coating.
With this embodiment, condensate will also appear, but due to the circulation of air under the moisture insulation layer will gradually evaporate, without applying tangible harm to the structure.
However, for the garage, which is heated constantly, this option is not suitable, since the moisture of indoors most of the time will be excessively high. It will risk both the health of people and the condition of the car.

When the metal construction is insulated between it and the warming material, it is necessary to leave the ventilation gap for regular condensate removal
As a material for such a "ventilated" insulation, it is recommended to use plates, such as fiberboard, chipboard, that is, woody materials, self-tapping when fire. The recommended thickness is about 5 mm.
Flat ondulin or its analogues fit perfectly. These materials have the ability to reflect infrared radiation, which ensures efficient heating.
But plastic, even possessing the properties of attenuation, is not categorically recommended in the garage. Such materials during the fire are distinguished by poisonous evaporations, due to which people who avoided the fire can simply choose. It is forbidden to use the plates as insulation, which includes asbestos.
When insulating a cold brick garage, it is recommended to first shook the walls with a vermiculite composition to protect them from moisture. The walls of the metal garage should be painted in two layers, pre-trusted the base.

Walls of the insulated garage must be treated with water-repellent composition to protect the construction from the destructive effects of condensation
Overview of possible options
For the garage, most often use the following options for homemade furnaces:
- brick wood stove;
- bourgeois;
- long burning furnace;
- overbilling oven.
Each of these embodiments for the garage furnaces made with their own hands has certain advantages and disadvantages. Some units can be combined to expand the possibilities for the heating of the garage and make this process more convenient and profitable.
In the construction of a small tube in the garage, you can use actual challenges and materials, it is:
Gallery of images
Conclusions and useful video on the topic
Video presentation of the device in the garage of the autonomous heating system based on the stove:
Options for homemade furnaces are quite varied, and the designs of such devices are not particularly complex. You will need the skills of working with metal, welding machine and quite affordable materials. Properly manufactured furnace works efficiently and serves a long time.
Sort an effective way of heating the garage? Or is there experience manufacturing and using stoves? Please leave comments on the article and ask questions on the topic.
Often in the garage do not install a full-fledged heating system. This is due to the relatively rare use of the room and its small area. But for long work during the cold season, it is recommended to make a furnace for a garage from a metal, which is quite possible with your own hands. Drawings and characteristics of the structure may differ depending on the requirements for heat supply.
Homemade garage furnace: parameters and operating conditions
It is important to initially determine the location of the structure. It should not take a lot of space, while working should not prevent the free move on the garage or the implementation of certain operations. Most often choose the corner location of the furnace.
The manufacture and installation of the furnace is carried out according to the following conditions:
- Mandatory arrangement of chimney. Its height must be at least 3 meters.
- Selection of fuel. The optimal option is the use of firewood, coal or diesel fuel. Much less often make electric furnaces or operating on a balloon gas.
- Preparation of the base for installing the boiler, installation of heat-resistant materials on the walls.
Before starting these works, you need to choose the optimal design of the oven for the garage. The choice depends on the volume of the heated area, the presence of a cooking surface and the overall budget. As an example, you can consider the drawings of the most suitable homemakes.
Simple simple "bourgear"
This is the best option to save space. Structurally, the furnace consists of a cylindrical or cubic shape housing, separated on the combustion chamber and the coxy. It can be made from barrels. The thickness of steel should be at least 1.5 mm. The chimney pipe is located in the rear of the design for connecting the vertical nozzle.

- A gas cylinder can be used as a housing. It is pre-cleaned from paint, the holes for the door are made, ace is installed.
- With independent making of the metal case, steel is used with a thickness of 1.5 mm, the connection is performed using welding.
- Adjusting the intensity of fuel combustion occurs by changing the position of the cooker's door. Thus, the thrust is controlled.
- Additionally, you can put the cutter - the shelf on 2/3 of the height of the combustion chamber. This contributes to the economical flow rate of the fuel.

The advantage of this design is the simplicity of manufacturing and the possibility of mounting the hob. Disadvantage - high fuel consumption.
Long burning mini-boiler
For long heating of the garage, it is recommended to consider long burning. The essence of her work is to use wood gases as fuel. They arise as a result of firewood. Unlike the above version, the oven for the garage made of long-burning metal has a large chamber to load fuel, a pressure system consisting of a telescopic tube and a flat base. This unit is located in the upper part of the design.

After loading the fuel, it is falling below. The restriction of the flow of oxygen provokes the process of tension. The resulting gas enters the chamber of the surge, where it is enriched with oxygen and flashes.
Features of manufacturing design:
- You can use a barrel or gas cylinder as a housing;
- To enrich gas oxygen, a low-power fan is installed;
- The nozzle for connecting the chimney is horizontally;
- The low temperature in the chimney pipe can cause condensate, so it is recommended to use a sandwich design.
The average operation on one fuel load can be 8-12 hours. It depends on the volume of the furnace and the air supply speed in the download chamber.
Garage oven on spent oil
The principle is to use fuel vapor. For its manufacture you can also take a small gas cylinder. At the bottom there is a tank for fuel. Couples climb the pipe with holes, there is a fire.

Use such a model for the garage is not recommended. This is due to the high probability of the size of the room, since the combustion products partially fall into the garage before entering the chimney. There may also be problems with the storage of fuel.
When choosing a drawing of a garage furnace, it is necessary to take into account the complexity of its maintenance and frequency of use. But the defining factors are the cost of construction and the complexity of its manufacture.