How to create a rhythmic gymnastics exercise. Rhythmic gymnastics for beginners. viii. financing conditions
(Told by master of sports in rhythmic gymnastics Yulia Sitnikova)
You've probably had the opportunity to watch gymnasts perform on TV more than once, how they masterfully perform the most complex technical elements. All this is many years of training. And where did it all begin? Mothers bring little tiny creatures to rhythmic gymnastics at the age of 4-5 years. The first year is one of the decisive stages: girls learn the basics of gymnastics - the basic basic elements, they are stretched, they do a lot of flexibility exercises, they pump up the muscles of their legs, abs, back, arms, and learn to pull their toes and knees. And most importantly, girls begin to feel (control) their bodies. In this article we will look at the main (basic) elements with which rhythmic gymnastics begins.
I. Twine.
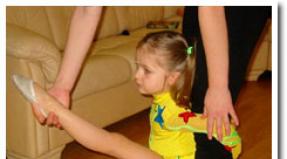
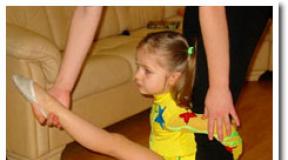
There are several types of twines: right, left, transverse and vertical. The vertical one is a more complex element and here, in addition to stretching, you also need to be able to maintain balance on one leg. Stretching is very important for a future gymnast. Therefore, the element needs to be given a lot of attention, especially to the correct execution. Before doing stretching or flexibility elements, you must first “warm up” the child. Jump a little, run with him, do squats, squat (like ducks) so that the child’s muscles are elastic and easier to stretch. Remember - never pull on an unheated (“cold”) child; in addition to pain, you can also damage the baby’s ligaments. Do not do anything abruptly, only with smooth movements and springing several times.
There are several ways to stretch for splits:
Correctly executed twine:
- right or left split: the child sits on the split, shoulders and hips are on the same line, the back is flat, the knees and toes are tense; - transverse split: stand on the side and look, if the legs are on the same line, the knees and toes are tense, then the child is sitting Right. If there is no line (i.e. a corner instead of a line), then it is not a split, but legs apart).
If you want to achieve results in stretching, then it is advisable to do the exercises daily, then the muscles will become more elastic. And of course, the sooner you start doing it, the better. Another important element for twine is the fold.
II. Fold.
A fold is when a child sits on his butt, legs together in front of him, and his tummy lies completely on his legs, his hands clasped his heels, his knees are stretched like “strings.” 
Exercises to help prepare for the fold:
- The child sits on his butt - his legs lie together in front of him on a small chair and we bend forward (put the tummy on the legs) trying to grab the heels.
- The child sits on his butt, legs in front of him - we do exercises with both feet together: towards ourselves - pull towards the floor (20-30 times), knees stretched. Then we fixed our feet towards ourselves and leaned towards the legs, trying to reach the feet and grab them.
- Standing position: legs together, knees extended, bend forward - you need to put your palms completely on the floor, then try to hug your legs. This exercise can also be performed in motion: we take small steps with our legs together with a forward bend and reach the floor with our hands (or place our palms on the floor), the tummy should lie on the walking leg.
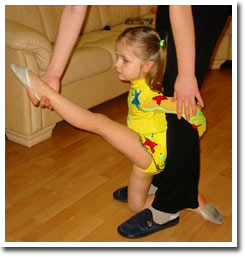
- We stand facing the wall bars - we throw one leg onto the wall bars at the level of the hips (hips and shoulders on the same line) - and bend towards the leg (to the right and to the left).
Your baby will be better able to do these exercises - if you are an example for him! Do these exercises opposite each other and point out your baby’s mistakes. Be a positive example for him! What the fold exercise does is stretch the hamstrings, which play a big role when stretching into splits.
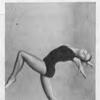
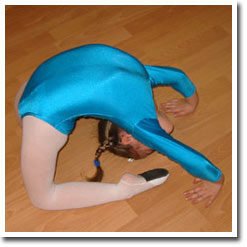
III. Bridge.
Your little one has probably tried to stand on the bridge on his own more than once. Even when they are very small, they often bend over, making their first funny parodies of the bridge. How to make bridges correctly? The correct bridge is when the fingers are as close as possible to the heels of the feet (touching is desirable), the feet are shoulder-width apart (a little wider is possible). The bridge turns out to be beautiful and high. 
Exercises to develop flexibility and pump up the back muscles of a child:
When the child’s back is already a little prepared, it’s time to start teaching him how to make a bridge “from above”, i.e. bridge from a high position. First, it is better to lay something soft on the floor (so as not to hit your head), since the child’s arms are still weak and will creep to the sides, and of course, do this exercise at first only with mom (dad) nearby. Then you should take the correct stance: feet shoulder-width apart, hands at the top near the ears, eyes raised up and looking at the tips of the fingers. Then hold the child under the back (it’s better for you to take a position on the side of the child and he will, as it were, lie on your hand), the baby little by little (slowly) begins to tilt back. When the deflection is so good (the eyes see the floor), then you can lower your hands to the floor. You can also hold the child by the swimsuit (T-shirt, blouse) while standing in front of him. Each time, reduce the degree of your participation in the process of standing on the bridge. When you are sure that the child will not fall on his head, try to have the child make the bridge on his own. And another very useful exercise that will help your child learn to do a “bridge from above” - the child stands with his back to a wall (preferably a Swedish one) at a short distance from it, bends and begins to gradually move his arms to the very bottom of the wall and then, moving his arms and on the floor itself (if it is a wall bars, then he intercepts the sticks alternately with his right and left hands).
The back has been stretched, the legs have been stretched, it’s time to pump up the abs. There is a good exercise corner for this.
IV. Corner
Corner - sitting position on your butt, legs together, lift your legs and arms off the floor and hold the corner. Hands to the side (will help maintain balance), legs point up towards the ceiling. It is advisable to hold the corner for 5 seconds to begin with. Then, each time you repeat this exercise, increase the time it takes to perform it. Your child will have more fun doing this exercise if you keep him company.
Several exercises to strengthen your abs:

There are also very good exercises for strengthening the lateral back muscles: - you lie on your side with your baby facing each other, one hand under your head, the other lying in front of you. The legs are extended and one of them is raised 45 degrees. We make movements - we pull one leg up to the position of the other (as if we are kicking up the raised leg), the lateral back muscles are included in the work. - you are in the same position, but now you raise your body, leaning on the hand that is in front of you. Second hand behind the head.
V. Birch
Birch - lying on your back, legs up at the ceiling, holding your butt with your hands (arms bent at the elbows, legs together). You’ve probably done this exercise yourself more than once; now teach your child how to make a birch tree. At first it will be very difficult for the baby to hold his butt in his hands)), but with your help (hold his legs up) he will do it much better. 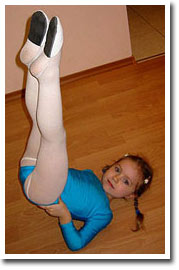
VI. Martin
Swallow - standing position, back straight, arms to the side, legs together. We raise one leg back, preferably so that the body remains vertical and the leg is raised as high as possible (horizontal to the floor and both legs extended). For a baby, this is a rather difficult exercise, since you need to learn to transfer the center of gravity of your body to one leg and be able to maintain balance. To begin with, start practicing the “heron” exercise with him: standing on one leg, the other leg bent at the knee and the toe pressed to the supporting leg, arms to the side (help to maintain balance). Alternate your supporting leg. As soon as the “heron” starts to turn out, move on to the “swallow”. In addition, walking along one line is a very useful exercise: lay out a ribbon or jump rope and let the baby walk along it. 
VII. Somersault
Somersault is an element that young gymnasts learn in the first year of training and then use throughout their entire sports life. Standing position, one leg extended slightly forward, arms also directed forward. We take a step with our legs, touch the floor with our hands, bend our heads towards our tummy, sort of group ourselves, roll onto our back, bend our crossed legs under ourselves and rise on the same leg with which we took the step. What mistakes can be made when performing this element: - make sure that the child does not stand on his head when performing a somersault (dangerous, it can damage the neck), - the somersault must be done in a group, then it will be neat and fast, and this is especially useful when the somersault is performed in a bunch of gymnastic exercises.
After you have worked out, it will be good to “unload” the spine. To do this, if you have a wall bars, then you can hang on the wall bars, if not, then take the child by the arms (or legs) and lift him off the floor.
 |
 |
Article added with permission from Yulia Sitnikova
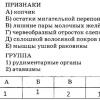
IN rhythmic gymnastics widely used exercises with various items: small and medium ball, rope, hoop, ribbon, pennant, scarf. They contribute to the development of fine muscle sense, eye, teach precision in movements, and improve their coordination. In addition, they allow you to create beautiful, interesting movement patterns.
All exercises with apparatus in rhythmic gymnastics are based on movements without an apparatus. Therefore, you should switch to them after systematic training in performing exercises without objects. Include one item in each workout. Start with a small (tennis) ball.
Ball exercises
Exercise No. 1
Place the ball in the palm of your right hand and lift your left hand to the side. Squatting slightly and lowering your head to your chest, throw the ball up. When finishing your throw, straighten your body, raise your head and look at the ball. (Fig. 1 a, b)
Now catch the ball with your right hand, also squatting slightly and tilting your head. At the moment the ball touches the hand, it continues to fall, thereby passing (softening) the impact of the ball on the palm. (Fig. 1 c, d)
Exercise No. 2
Repeat the upward throw with your left hand, following the same requirements. Make 4-6 throws with each hand.
Exercise No. 3
Throw the ball with your right hand and catch it with your left (4-6 times).
Exercise No. 4
At the moment when the ball is at the top, clap your hands above your head, behind your back.
Exercise No. 5
Throw the ball higher and, when it is at the top, turn in place, stepping on your toes. Stretch your arms to the sides. (Fig. 2)

Repeat the throws with the other hand, turning in the opposite direction 2-4 times.
Exercise No. 6
Hold the ball with your fingers on top. Squatting slightly and rounding your back, hit the ball on the floor. (Fig. 3 a)
After the rebound, pick up the ball in your palm and, without stopping its movement, kick it slightly upward. Do the same with your other hand. Repeat the movements 4-6 times.
Exercise No. 7
Take a step with your left foot, bending your right foot forward, and at the same time throw the ball up with your left hand. (Fig. 4).

After catching the ball, step with your other foot and throw the ball with your right hand. Repeat 6-8 times. Now complicate the throw by doing it not while walking, but by jumping on the supporting leg (8-10-12 times).
Exercise No. 8
Throw the ball with your right hand under your left, stretching it forward (Fig. 5 a), and catch it with your left palm. Then, without holding the ball, throw it with your left hand under your right (Fig. 5 b) and catch it with your right. Throw the ball continuously with each hand 4-6 times while looking at the ball.
Exercise No. 9
Throw the ball with your right hand under your left leg bent at the knee (Fig. 6 a) and catch it with your left hand. Without holding the ball, throw it under your right foot. (Fig. 6 b). Throws should be done 2-4 times under each leg.

Exercise No. 10
Make jump throws, that is, while throwing under a bent leg, the other leg should push off the floor. During "jumps" move forward or backward. (Fig. 7). Repeat all 2-4-6-8 times.
Exercise No. 11
Combine throws under the arm (Fig. 5 a, b) with throws under a bent leg (Fig. 6 a, b) into one continuous exercise.
Exercise No. 12
Holding the ball with your right hand, move it down and back, simultaneously bending at the elbow and then at the wrist joint. Then throw the ball in an upward arc over your right shoulder (Fig. 8 a, b) and catch it with your right hand.

This throw is called a "twist". Repeat with your left hand. Make 4-6 throws with one hand and the other. This movement can be performed while dancing the Polka.
Exercise No. 13
Extend your arms to the sides, place your legs apart. Hold the ball in your right hand. Then, slightly squatting on your right leg and tilting your body to the right, throw the ball “twisted” behind your back so that it does not touch your back and flies in an arc from behind to your left hand (Fig. 9 a, b)

Having caught the ball with your left hand, do not hold it, but throw it “twist” behind your back to your right hand. Repeat this 4-6 times.
Note:
Once these basic movements with the ball have been mastered, you can combine them together at your discretion into short exercises and do them as a group, standing in a circle or moving to the music with Polka or Gallop dance steps.
From a small tennis ball, move on to a medium one. This is an ordinary rubber ball with a diameter of 15-16 centimeters. It is more difficult to do exercises with it, so first you should learn to control a small ball well.
Exercises with a jump rope
Having mastered the ball, you can move on to exercises with a skipping rope in rhythmic gymnastics. It is sold in sports stores. To choose a rope that suits your height, stand with both feet in the middle of the cord and pull the handles toward your shoulders. (Fig. 10). You can make a jump rope yourself: thread a hemp rope, thick cord or rubber tube through wooden handles.

Exercise No. 14
Rotating the rope forward, make jumps, straightening one leg and then the other (Fig. 11). Keep your body straight and your toes pulled up. Rotate the rope using only the wrist joints. Do 8-12 movements.
Exercise No. 15
Repeat the previous exercise, rotating the rope backwards (Fig. 12).
Exercise No. 16
Jump on one leg, bending the other forward (4 times). Without stopping the forward rotation of the rope, repeat the jumps on the other leg (Fig. 13)

Perform the same movement while rotating the rope backwards.
Exercise No. 17
Rotate the rope forward one time simply, and another time with your arms crossed. Do the jumps at the same time, pushing off with both legs. (Fig. 14 a, b). Do 8-12-16 jumps continuously. Then repeat the same thing, rotating the rope backwards.
Note: After doing two or three exercises with a skipping rope, rest, but do not stand still, do not sit down, but walk a few steps, breathing deeply.
Exercise No. 18
Fold the rope in half and take both handles in your right hand. Lean forward and rotate the rope with your right hand under your feet, jumping over it with one leg or the other (Fig. 15).

Do this 6-8 times, rest and repeat the exercise, rotating the rope with your left hand.
Exercise No. 19
Pushing off with both feet, make an energetic jump up so that at this time the rope rotates twice under your feet. This will be a double rotation. Repeat it 2-4-6 times.
Note: Individual exercises with a skipping rope can be combined in different ways. They are good to perform to Russian dance melodies.
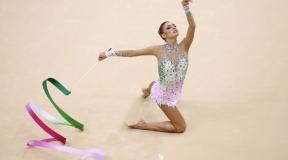
Exercises with tape
Ribbon exercises in rhythmic gymnastics can be done in a large room, in a hall or outdoors. The length of the tape is 5 meters, width 3-5 centimeters. Attach one end of it to the stick using a ring. Stick length 65-70 cm (Fig. 16 above)
Exercise No. 20
Stand on your toes, take the stick with the ribbon in your right hand and make an energetic swing to the left in a large arc, and then, without stopping the movement, return it to the right with the same swing. The legs are slightly bent at the knees. (Fig. 17) Repeat this 4-6 times.

You can make circles rather than arcs by rotating the tape several times in front of you. Or do circles overhead while standing on one leg. (Fig. 18). During rotations, you can move forward with steps and jumps.
Circles can also be done in the lateral plane (Fig. 19), standing on one leg or moving forward with dance steps.

Exercise No. 21
Standing slightly bent over on two or one leg, make short rhythmic movements with the tape up and down. (Fig. 20). With this movement, the tape will wriggle like a “snake”. This “snake” can also be done with a turn in place (Fig. 21), but in this case the tape should not touch the floor.

Exercise No. 22
By rotating the tape in continuous circles in the front plane, you can jump over it, as if stepping first with one and then with the other foot. (Fig. 22)
Exercise No. 23
Running with a ribbon, during which the ribbon snakes through the air. (Fig. 23)

Combine movements in an arc and in a circle with “snake”, running, jumping and turning. It will be a nice exercise.
Exercises with a scarf
To exercise with a scarf, get a piece of silk, very light material, 2 m long and 80-90 cm wide. A gas scarf is suitable for this purpose. With it you can do many of the movements described in the exercises with the tape, for example, arcs and circles in the front (Fig. 24 above) and lateral (Fig. 25) planes. The scarf should be held with one hand by the narrow edge.

Swing the scarf, holding it by the wide edge.
Run quickly with the scarf raised above your head (Fig. 26 above)
Make jumps, holding the scarf with both hands by the wide (Fig. 27) or narrow (Fig. 28) edges.

Lean back (Fig. 29)

Stand on one leg, maintaining balance. (Fig. 30)

Note: Individual movements with a scarf can also be combined into short exercises, performing them to music.
Several guidelines for exercises with objects
Starting with the first exercise, make sure that your whole body is involved in the movement. So, when throwing a ball up, the movements should be performed in a “wave”. The free hand should remain in the same position if it is not actively participating in the movement.
At the moment of catching the ball, in most cases it is necessary to soften its impact, as indicated in exercise No. 1 (Fig. 1 c, d). The whole body takes part in passing the falling ball: body, legs, arms. A sort of “round” half-squat occurs. In general, in all exercises with apparatus in rhythmic gymnastics the active participation of the whole body is necessary.
Each exercise should be repeated, doing it with your right and left hands. Combine the previous exercise with the next one to get new short “ligaments”.
Be careful with the jump rope. Don't overload your body with jumping!
Alternate movements with rest, gradually increasing the number of jumps.
An indispensable condition for all exercises is proper breathing. He cannot be detained. Always breathe deeply and rhythmically. Remember about posture too.
After your workout, don't forget to do some final calming exercises.
Compose your own short exercises with individual subjects. Perform them as a whole group.
According to the magazine...
elements, tracks, music
Setting up a routine for rhythmic gymnastics
Our head coach Polina Gennadievna Zotova does an excellent job of preparing exercises for performances at competitions. She has already worked on more than 100 routines for gymnasts from 6 to 15 years old. Her students took first places in competitions at various levels.
Zotova Polina
Main coach
“...Each performance is unique... Rhythmic gymnastics exercises cannot be churned out like on an assembly line; you need to find a common language with each child, understand his capabilities and character. Elements and tracks for each gymnast's performance are combined in a new way. This requires time, investment of mental strength, patience and creativity...”
“...Performance music is a special area. The composition sets the mood of the performance and can enhance the impressions of the audience and judges. Sometimes good music brings both joy and tears, you can be endlessly happy, and then suddenly become sentimental. And when a gymnast performs her routine on the mat to such a masterpiece, the result is a true work of art that lives only for those minute and a half. In addition to the fact that it sometimes takes several days to find a suitable composition, it also needs to be processed, arranged for movements and tracks, and set to exactly 1:30 in duration. This requires the trainer, in addition to pedagogical skills, to also have a developed sense of beauty and skillful handling of music editing software..."
The preparation of exercises occurs in several stages:
- selection of music. Together with the coach, music is selected that is most suitable for the gymnast, emphasizing her character and individuality.
- meeting a gymnast. Our choreographer identifies the strengths of the gymnast: her physical abilities and skills, mastery of the apparatus
- setting up the exercise. In combination with musical accents, the choreographer composes an exercise and learns it in pieces with the gymnast
The duration of one exercise is from 2 to 3 hours.
Articles→
Exercise birch or candle, or shoulder blade stand
The exercise we will study today is called “birch” by some, “candle” by some, and “stand by” by some...