Runic workshop. Runes made of wood. Rune blanks. Creating runes with your own hands How to make runes from wood yourself
In case you decide to do rune magic or fortune telling on runes, you need at least one set of runes. You can buy a ready-made kit in the store, or you can make it yourself.
Moreover, given the low quality of ready-made runes sold in occult stores, I highly recommend making a set with your own hands. However, there are some subtleties in making runes at home. We will tell you more about them below. So how do you craft runes? Material for runes.
The main rule is that the material for the manufacture of runes must be of natural origin. Very high quality runes are obtained by making them from hard wood. This material is fairly widespread and easy to process. If you decide to make runes from wood, then choose the breed that suits you. This can be done, for example, according to the horoscope of the druids. In fact, wood is practically the only "living" material available for processing, apart from skin and bone. However, leather is quite difficult to process, and bone suitable for processing is not very easy to get nowadays. You can also use clay. It is convenient in that it easily changes its shape, and after finishing it becomes hard like a stone. However, it should be remembered that after firing, the clay becomes brittle and, therefore, your runes can be easily damaged.
Another option for rune material is stone. Very high quality runes come out of the stone, however, it takes a very long time to make them, since the stone is extremely difficult to process. Instead of carving runes into stone, they can be drawn. In this case, choose a paint that is resistant to liquid and abrasion. Another natural material for making your runes is metal. However, making runes from metal is still not recommended.
The rest of the materials - paper, plastic, rubber, concrete, synthetic resins, plasticine - are unsuitable for making runes. They are not natural, so working with them will be difficult, inconsistent, and most importantly, ineffective. What paint to use. It is not necessary to paint over the signs obtained on your blanks, but it is desirable. When painted, the rune symbol will differ from the material from which it is made, so the image will be clearer and more contrasting. In addition, when coloring a rune symbol, the rune receives a certain energy charge, which is extremely necessary in the process of magical action. Aesthetically colored runes look much more pleasant, and the sensations from the runes in the process of fortune telling are far from the last component of success.
It is believed that the most effective material for coloring runes is one's own blood. This is indeed the case. By painting the rune symbols with your own blood, you seem to give them a part of yourself, a little of your own energy, and therefore your connection with the runes in the future will be much stronger, and the interaction will be effective. If you have opted for a regular paint, use only natural dyes, preferably red.
How to make runes. You have prepared the necessary materials and now you can start actually making the runes. I will say right away - haste in the manufacture of runes is unacceptable. There is no conveyor belt. Each rune must be crafted separately. First, we prepare the rune itself, then we cut out the symbols on it, and finally paint the cut out symbols. You should not do all the runes in one breath, for example, overnight, but you should not unnecessarily stretch the process either. Just pick your own rhythm for this  process and do it as you like. In the process of making each sign, try to “feel” its essence, the material from which it is made. Try to merge with him internally. Imagine that this piece of clay (wood, bone) is as if it is a part of yourself. After that, you should start processing and drawing the rune sign. When drawing a sign, try to think about its meaning and the message that these symbols contain.
Each rune should become for you not just a piece of clay with signs drawn on it, but a meaningful sign, a combination of meanings, some images and feelings.  Then paint the rune, following this process in much the same way as for the manufacturing process. After you have finished making the rune, look at it carefully. If something does not suit you, which parts you don’t like, then you should immediately get rid of this rune and start the process of making it again. It is important that the runes that you have prepared are ideal for you, so that you like them and be close.
Keep your runes away from prying eyes. After all, if strangers look at your runes, or God forbid taking them into their own hands, then the runes lose not only their energy, which you put into making them, but also the connection with you, with your inner world, your essence. If someone begins to use your runes for their intended purpose, he will be able to use the energy that you have enclosed in them. Therefore, try to keep your runes in a secluded place. When transporting, keep the runes in a pouch, which can be made from either leather or a dense cloth tied with woolen thread. If you want to maintain the energy potential of your runes at the proper level, I advise you to take them out more often, touch them with your hands, look at them. These actions will support the energy of your runes at the proper level.
Although the rune set can be purchased from esoteric stores, it is best if you make it yourself. Runes are best crafted from stones or wood.
Search for material.
Choosing a tree.
Description of different tree species:
Getting started on the amulet, use the list of tree species and make a choice of your own.
ACACIA: Acacia is a tree that gives birth to life. There used to be a belief that you can't stand under an acacia for a long time if you don't want your family to have an addition. Acacia affects fertility and birth and awakens the reproductive instinct in the same way in both men and women.
BIRCH: Birch is a tree of kindness, protection against all misfortunes, fertility, birth and new beginnings. Two runes are associated with birch - these are Berkana and Uruz. Cradle for newborns was made from birch branches. Birch amulets are good for sick, weakened and recovering people. Since ancient times, birch has been credited with the ability to drive away evil spirits
ELDER: The runes Feu and Otal are associated with the elder. It is a tree of healing, protection, and success. But this is a "dark" tree. Elderberry actively and aggressively protects, and therefore from ancient times it is believed that when the elderberry grows at the gate of the house, it is good, but it is not advisable to bring it into the house. Before you take an elderberry branch for an amulet, you should seriously think about it.
BEECH: The beech is associated with two runes Nautiz and Perth. Beech - this tree is a kind of symbol of ancient knowledge. Beech is considered a guide from knowledge of the past to knowledge of the future.
HAWTHORN: The runes Turisaz and Otal are associated with the hawthorn. It is considered the tree of the goddess of carnal love. Hawthorn is a tree of hope and marriage. Amulets made of hawthorn will help a girl get married as soon as possible and protect her marriage.
ELM: Elm is associated with the Gebo rune. Elm is a male tree, a tree of protection. It is a tree with a strong masculine character and supports only strong spirited men. In magic, the elm brings stability and support to the spell.
OAK: Oak is a symbol of immense vitality and longevity. The six runes of the Elder Futhark are associated with the oak - Turisaz, Eyvaz, Raido, Teivaz, Yer and Dagaz. The oak is used in spells aimed at protection, healing, increase in physical strength, prosperity, and the achievement of lasting success. Oak is a strong energy donor. His aura is very powerful; it only perceives well healthy people. Oak always gives preference to warriors, fighters, strong and healthy people. Amulets made from it are also good for the elderly, to whom it is of great benefit.
SPRUCE: Spruce is an energy donor, but it will not give more energy than you need. Spruce helps to control emotions, adjusts to a philosophical mood. There are no runes defined for her. Before making an amulet from spruce, it must be dried well so that the resin does not interfere with you during carving.
WILLOW: Willow is a female tree and the rune of water Laguz is associated with it. She is associated with the Moon and all the rites dedicated to earth and water performed by women. Willow obeys the laws of balance and justice. Her energy gives amazing strength to women, and amulets from it are good for love magic for various love spells and cuffs.
CHESTNUT: Chestnut is also a female tree, capable of washing away your discomfort with the flow of its energy. But the chestnut is an egoist and do not expect energy supply from it.
MAPLE: Maple gives peace of mind to all people, brings calmness and self-confidence. This is a tree of inner strength and balance. Maple also promotes love, love amulets are good from it, aimed at strengthening the union between lovers.
KIPARI C: Cypress is also an exclusively male tree, does not perceive the female body. It has a good effect on the sexual strength of men and on sexual activity. Amulets from it are very good for increasing masculine strength.
CEDAR: Cedar is a tree of tranquility and height of spirit. It is a tree with amazingly healing energy. Cedar amulets contribute to purification, mainly spiritual and energetic, as well as prosperity in all areas.
LARCH: Larch is a soothing tree. It heals severe nervous disorders, especially those accompanied by bouts of melancholy and depression. Using it for your talisman, you will feel its influence and see the best sides of life.
JUNIPER: Juniper is a shrub with strong cleansing and protective properties. Its power is directed not at people, but at the objects around them. Juniper amulets can help remove the evil eye or spoilage, and even get rid of the effect of a love spell.
ALDER: The rune Mannaz is associated with alder. Alder protects the family. She strengthens family ties and unites all family members. This tree is for women. If you make an amulet out of it, the alder will help you "tie" your husband to the house.
ASPEN: Aspen absorbs negative energy well, drives away evil spirits. Aspen amulets alleviate the effects of damage, cleanses your aura from harmful influences and protects you.
HAZEL: Hazel is a magical tree and is used to create magical protection. Hazel is a very powerful tree with a strong character. Its energy will help turn your mind to an impartial view of the situation from different angles.
ROWAN: Runes Nautiz and Algiz are associated with rowan. Protective talismans are made of mountain ash, since it protects well from witchcraft. Such a talisman has always been considered the best protection against alien magic of any kind.
PINE: The pine tree is associated with the Kano rune. The aura of this tree is very strong, and amulets from it will take away irritation, annoyance and relieve stress. Pine is able to cleanse a person's aura from outside influences and partially remove spoilage.
YEW: Yew is directly related to the rune Eyvaz. Yew is a symbol of eternal life, because this tree is one of the most long-lived. Yew wood makes good protective amulets.
POPLAR: Poplar is a tree completely indifferent to humans, but its peculiarity is that it absorbs everything negative from the environment. Poplar is an orderly tree.
Cheryomukha: Bird cherry is a very delicate tree. It heals the emotional disappointments of the young, helps to show tender affection, youthful passion, but does not allow anything base.
ROSE HIP: Rosehip is responsible for the emotional side of love, maintains tenderness, passion, spiritual harmony in people. The good magic of the rose hips is concentrated in flowers and fruits. And from its wood good amulets for passionate and ardent love are obtained.
APPLE TREE: The apple tree is a tree of rebirth to eternal life. The Inguz rune is associated with it, personifying eternal life. The apple tree is a tree of love and fertility. And its wood has long been used in love and healing magic. This tree of feminine power, feminine sexuality, awakens the sensual side of nature in a woman. There are no moral rules for the energy of the apple tree, it is guided only by the call of nature. So when making an amulet, be sure to take into account this important feature of it.
ASH: Ash is a tree of revival and renewal, with which the Gebo and Vuno runes are associated, and also correlates with the Ansuz and Evaz runes. Ash is a tree traditional for all types of magic and fortune-telling. It is from its wood that the best sets of fortune-telling runes and powerful protective amulets are made that can protect against any impact.

Runes made of stone.
Finding twenty-five pebbles for your set should be done without haste. The lesson is not limited to mindlessly collecting any stones that are suitable in size that catch your eye while walking.
Actively focus your intent on finding the right stones as you search. Say to yourself: I am asking that the stones needed for my rune set can show themselves. Look for small, flat stones, about two to three centimeters in diameter.
If a stone catches your attention, pick it up, take it in your right hand, and ask yourself if this is the stone you want. If the stone is right for you, you will receive an intuitive inner confirmation. If there is no answer, return the stone to the place where you found it. After bringing the pebbles home, wash them thoroughly and store them in a well-lit place.
Preparation for manufacturing.
For practice, first draw each rune with a pencil on a piece of thick paper and accompany it with a title with a short commentary.
Stone processing.
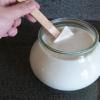
To process a set of runestones, you will need the following materials: pencil, paint brush, blue enamel paint, clear varnish, paint thinner, cocktail sticks, soft cloth.
Rinse and degrease all stones thoroughly. Apply a layer of clear varnish to each stone. For a rune set, it is best to take a paint with a strong coloring pigment, which dries quickly and is waterproof. Apply paint with a cocktail stick. While applying the next portion of paint, whisper the name of the rune and feel how the flow of rune energy is formed. Vertical lines should be drawn from top to bottom, and diagonal lines should be drawn from left to right. The 25th rune is the rune of Odin. It is left empty after varnishing.

Runes made of wood.
A rune set can also be crafted from any natural material, such as clay or leather. However, the most suitable material is wood.
Since runes have historically been associated with trees, rune shamans generally preferred wood to make them.
For a wooden rune set, you need round blanks of approximately the same size; the branch should be cut from a wild tree. When finished, the entire set should fit in your cupped palms. The diameter of each piece is 3-4 cm, the thickness is 0.5 cm. You will need to cut 25 circles of the same thickness.
It is best to use a thin jigsaw or model saw to avoid damaging the wood structure. Before work, firmly grip the branch in a vice. Then sand the surface of the finished circles with the finest emery paper. Before applying paint, each circle must be carefully varnished.
This work, again, requires patience and should not be rushed. For wood carving, you will need a curly chisel or a sharp penknife purchased specifically for this purpose.
Before starting the carving, draw the outline of the rune with a pencil on the surface of the workpiece. This will be the template for the job. The vertical lines should be cut in three separate cuts. First cut the center line from top to bottom or along each line. Horizontal notches at the top and bottom of each line limit its length. Then cut out triangular stripes to the right and left of the center line.
A V-shaped notch is formed in the workpiece for coloring. The first notch marks the center line. Before the second cut, make horizontal notches at the top and bottom of the center line. The second cut should be slightly to the right of the center line and at an angle to it - so as to eventually remove the triangular sliver. The third cut should be slightly to the left of the center line and at an angle to it.
Thus, a V-shaped groove appears in the tree. Diagonal lines should be cut in the same way, mostly from left to right. Coloring is done by applying paint to the groove using a cocktail stick.
When all twenty-four runes have been cut and painted, all you have to do is apply the last coat of varnish, which will protect them from dirt and give the work a complete look.

The order of the consecration of the runes
It is necessary not only for your rune set, but also for preparing your knife for runic carving if you decide to make runes from wood. Consecration can only be done in a calm environment. Before starting work, you will need to light the candle again.
For this you will need:
incense stick (incense), incense or sandalwood is better, but you can also smell any pleasant to you.
candle (preferably wax, you can take a church one)
bowl of salt
saucer or cup of clean water
Mood, calm atmosphere and concentration of attention are very important. The more clearly you formulate your goals, intentions and desires, the better and faster the rune set will work.
Consecration is carried out in four stages.
First step- this is sanctification by the power of Air (Mind) and Smoke (Spirit). This process is called fumigation. It is produced by the smoke of smoldering herbs or incense. You can buy smoking sticks at the store.
Before blessing a rune or knife, direct some smoke with your palm in your direction. This will be a gesture of your own need for cleansing. Inhale the smoke gently and focus on the sensation of being immersed in its purifying qualities. Then take a rune or a knife and hold it over the smoke several times, slowly turning, so that the smoke washes over them from all sides.
Say: "I sanctify you with the powers of Air!"
Second phase- consecration by the Earth Release. For this ritual, salt is often used, symbolizing the essence of the Earth due to its conserving and. preservative qualities. It should not be sea salt, but rock salt originating from the earth. Put some rock salt in a shallow bowl or bowl and sprinkle some salt on the fleece or knife blade.
Say: "I sanctify you with the powers of the Earth!"
Third stage- consecration by the Release of Water. Take another shallow bowl and pour some water into it. It is best to take spring water, but if you cannot get it, ordinary tap water, previously boiled and cooled, will do. Submerge the rune or blade completely in the water and focus again on your intention.
Say: "I sanctify you with the powers of Water!"
Fourth stage- consecration by the Release of Fire. To do this, you can use a candle flame. To consecrate a knife or rune, simply run it through the flame several times.
Say: "I sanctify you with the powers of Fire!"
Runes activation procedure.
To activate the runes you have made, place each of them on the palm of your left hand and bend the fingers of your right hand into a tube, through which exhale the air with force.
With each exhalation, you must focus your intention on drawing out life energy. Pressing your lips to your hand, hold your breath for a short while, focus on the name of the rune, and then breathe life into it. This action is repeated three times for all twenty-five runes. Your rune set is now ready to use.

Pouch for a rune set.
You will need a special pouch in which you can store your rune set and carry it with you. Runic shamans traditionally kept their runes in a pouch made of natural material such as leather or linen.
Choose a soft, natural fabric or suede for this purpose. The pouch can be simple, or you can decorate it with embroidery or beading and should have a string to tie.
|
Runes |
Basic questions about how to make runes.
1 - Who?2 - How exactly? By asking the question "how exactly" I mean a sacrament, a kind of ritual in direct production.
2 - Material and shape.
Who should make the runes?
Well, everything is simple here. I will speak without vehemence and categoricalness. It's better to make runes yourself. The overwhelming majority thinks so. But this, in my opinion, is the main trap. Runes don't have to be made very easy. It would seem that he took a piece of cardboard, scissors and a pencil, and even with crooked hands in 15 minutes you have a ready-made set. Will it work? I doubt it very much. The utmost respect should be shown to the creation of such a tool. You can't cheat. The runes must be done with great care and diligence. And, in my firm belief, such a thing must be beautiful.Is it possible? It all depends on the point of view. There is no definite answer. And not because I am an interested person. It's just that logic dictates that the runes could be obtained in several ways in antiquity. I don't think buying runes was "taboo". You can also look from which side: for example, you buy expensive and well-made runes. But in this case, you spend your money, and you did not find this money on the road, you worked for them, which means that in the runes that you buy, there is a lot of your labor. Just please don't waste your money on poorly done hack, this is often found and is worth a penny. It's not a pity for money in this case, intentions will suffer.
How exactly to make runes?
Runes are undoubtedly a potentially magical thing. Do the runes carry a magical charge when they are just created? Do not know. But it may well be. Will the runes be flooded with magical energy to the brim if you swing a hammer while creating them, calling it the hammer of Thor? I doubt.I am writing this to the fact that in this case, as in any other case, it is necessary to include common sense. No need to blindly follow some kind of "rituals" described (invented) in many forums. Be critical. Nobody knows exactly what the rituals were. And those that were, I think, have undergone significant changes in different areas or over time. If someone describes such a ritual in detail, then most likely he invented it himself. But what I'm absolutely sure of is that in the rune business, the most important thing is personal feelings. The fundamental point is your personal feelings. Your feelings are a guiding thread, a beacon in the night, a pointing finger. Listen carefully to yourself, your feelings, to your inner voice and, I am sure, you will succeed without waving a hammer and dancing with a tambourine. Blind adherence to fictitious rituals has never been successful. The same applies to the initiation of purchased runes for yourself. The same rules work. Just listen to yourself.
So what are the runes made of?
Anyone who is interested in the topic of runes can find a lot of information on the Internet. There are a huge number of options. Starting with a tree and ending with dough. Usually the first thing that comes to mind is to make them out of ash, with a knife dipped in your blood. By analogy - Odin - spear - blood - Yggdrasil. This is the mythological side.I invite you to look at the issue of material from the historical point of view. And from what the runes were made in those distant times. The options are actually the same as now. With the exception of some modern materials, such as plastics, I will write about it a little later.
So, from the point of view of historical reliability, the material for the runes is primarily a tree. Which one exactly? This is already a matter of personal preference. For example, I really like working with hard woods - oak, beech. Now you can buy any tree that your soul desires. From simple larch and birch to exotic African species. Wood itself is a very pleasant material. Warm, as if he remembers the hands that worked him.
Drawing runes on wood in terms of historical accuracy, in my opinion, is primarily wood carving and my own blood. There are very simple methods, for example, burning out, or complex ones, for example, inlay. I will not talk about the mass of other methods. For this there are books on needlework and craftsmanship.
The second material is bone. Many objects were made of bone. Runes, I'm sure, are no exception. The bones of a strong wild beast, which to kill is a feat, excellent material for runes. And what could be better than the bones of marine animals, the horns of a narwhal or the fang of a walrus? For people whose life is closely related to the sea, this is the ideal material. And sea water cannot spoil such runes. Real runes of the sea people.
Runes can be made from a variety of other materials. Clay? Probably. Metal? It may well be. But most likely not iron. Rather copper, bronze. For the rich, silver.
I am very skeptical about stone as a material from which runes can be made. It's my personal opinion. If you like this option, please, everything is in your hands. The stone is a rather laborious material for processing. If you search, as advised, for 24 or 25 identical pebbles, then you will find them, not immediately, of course. Inscriptions on stones made with paint, blood, or varnish will not last. And the stone is cold, not living material.
Now, let's move away from historical realities and touch slightly on modernity. Literally two words. Runes can be made from plastic. There is such material. It is also called polymer clay. Very popular among needlewomen of all stripes. When you buy something made of clay and possibly stone, it may very well be made of plastic. Why is this material good? It's easy to work with and easy to buy. And yet, an important point, plastic easily imitates different materials. Clay, stone such as marble and amber. They make very beautiful things "like amber" from plastic. No special knowledge is required for work, basic techniques are enough.
Two words about form. I don't think it should be round or square. In addition to aesthetics, here is another point: when fortune-telling in rune layouts, the position of the rune is important for correct reading: direct or reverse. In the case of round or square runes, difficulties can arise.
Hello, friends!
In this master class, we will learn how to make runes from wood. I am often asked what tools are used to carve Runes, how the process itself takes place, what paint is better to paint the symbols with and how to process an already finished set so that it will serve for many years. And in general - is it possible to make runes yourself and how difficult it is.
Therefore, I decided to answer all your questions in this master class.
Material for making runes
What can you to make runes? I believe that wood is an ideal material for making Runes, so if you don't want to buy a ready-made set of wooden Runes, you can make the runes yourself. Technically, at home, this is quite possible, although such work requires attention and concentration.
Which tree is best for carving runes? You can choose the right type of wood by reading this one. Listen to your intuition and choose a tree for your tasks in runic practice.
If you want to make a universal rune set that will be your advisor in any situation, then it is better to choose a tree that is consonant with you, i.e. suitable for you in energy and character.
What blanks to choose for making runes
In my opinion, the optimal size of the blanks is 2x3 cm. Firstly, this size is optimal for fortune-telling, because it is convenient to hold such runes in your hands, secondly, the rune symbols are clearly visible, thirdly, the bag with the set does not take up much space. In our workshop you can buy 2x3 wood blanks and - according to your taste.
However, we also have blanks of other sizes - and (also rectangular and rounded). Blanks 1.5x2 cm are ideal for making a travel set of Runes, they do not take up much space. Blanks 3x4 cm are suitable for everyone who, for one reason or another, is more comfortable working with larger Runes.
Rune making is an energetic process
Before proceeding directly to the description of how to make the runes yourself, I would like to say a few words about the fact that Runes making is not only a technical process, but also an energetic one.... Therefore, you should not start making them if you are sick, upset or under stress. It is necessary to wait until your health stabilizes.
In order for the runes to work, it is necessary to make them in a state of calm and tranquility. In order to constantly maintain myself in a state of mental harmony, I, for example, use various techniques: meditation with concentration on the breath, working with images (associative cards), breathing exercises and gymnastics, nature walks, aromatherapy and art therapy.
You can find and choose something that gives you strength and peace. It can even be a normal dream, which perfectly restores energy. If you are in a state of chronic fatigue, then I would recommend that you first go to rest, preferably in a place where there will be sun, water, clean air.
And another important point. In the manufacture of fortune-telling Runes, it is very important not to chase after the result, but to immerse yourself as much as possible in the process itself. There is no rush, because haste causes anxiety, vanity, anxiety. And this is not conducive to productive work, as I said above. In addition, in this work, the utmost accuracy is important, in a nervous state it is very difficult to achieve it.
The environment is also very significant... When making runes, I usually listen to pleasant, calm music or recordings with sounds of nature. Of course, in the room where the work is taking place, there should be no other people and no extraneous noise.
In this master class, I deliberately will not touch on the spiritual side of the issue, i.e. the issue of initiation and activation of Runes. I am convinced that everyone has the right to decide for himself exactly how to interact with the Runes and how to build relationships with them.
You can learn a lot about the initiation rites of the Runes in books and on the Internet. As for me, I believe that the connection with the Runes is maintained primarily due to constant interaction with them: they can often be held in your hands, put under the pillow at night, address them in various situations and even talk with them. Thanks to this, contact is established at a subtle level and energies merge.
The Scandinavian Runes that I make have a neutral calm energy, and the one who acquires them interacts with them and then activates them at their own discretion. It can be either an initiation rite or just communication, touching.
Each Rune carries its own special meaning and its own energy. It is important in the manufacturing process to reflect on this meaning, about each specific Rune. This will enhance its effect.
And most importantly: in you should like what you do. You should enjoy carving Runes and enjoy the process! Otherwise, it is not worth taking on manufacturing. I hope that my recommendations will help you to approach this difficult process consciously.
What tools are needed to make Runes
First of all, you need to understand the tools. To carve Runes with our own hands, we need: pencil, stencil, wood cutters and a couple of chisels.
I have a woodcutting kit, but it will be enough to purchase a couple of cutters, a couple of chisels of different widths and two collets (so that you do not have to change the cutters during operation).
I also highly recommend preparing a stencil for the blank (see photo): thick cardboard about 20 × 20 cm, in the center of which there is a hole exactly the size of a wooden plate. Such a stencil will greatly facilitate your work: holding a small workpiece with your hands and at the same time cutting (and even more so knocking out a symbol with a chisel if the tree is hard) is extremely inconvenient and sometimes impracticable.
Of course, the cutters must be sharpened. You can buy cutters in the online store, I recommend contacting online stores that are engaged in ship modeling. The cutter (or chisel) should be of sufficient thickness and should not bend easily. Cutters that are too thin are not suitable for cutting hard wood (ash, oak, beech).

So, we have everything you need for work - a tool, wooden blanks - you can start making Runes. I will describe everything step by step.
Getting Started
We outline the contour lines of the rune on the plate with a pencil. We go through the entire length of the lines with a chisel, making indentations of 0.5-1 mm (depending on how deep you want to get future symbols). This operation is needed in order to get an even hole (it will be seen further in the photo).


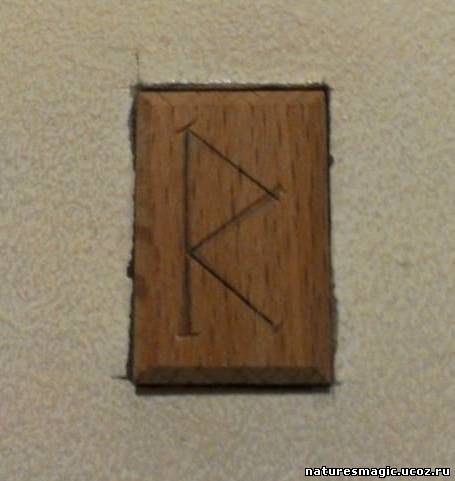
Here's what we get:

Please note that serifs must be made at the ends of the lines, otherwise, when making holes, chips will form at the ends of the symbol, and the Rune will have to be redone.


Holding the chisel at an angle, we cut along the line to its center, retreating some distance from the line itself. As far as you go from the line, the symbols will be larger. I try to keep the chisel at a 45 ° angle so the hole is deep and beautiful.

Then we cut on the other side of the line, and this is what we get: 
And here is the Rune blank, already completely cut out by the chisel:


Due to the fact that we initially ran a chisel along the contours of the symbol, the center of the holes turned out to be even. So, we got a raw, preliminary symbol, which we modify with a cutter, removing irregularities, roughness, burrs, aligning the lines:

After that (if necessary), you can grind the rune and the workpiece itself with a fine sandpaper.
For clarity, I will show the process of cutting out a few more Runes.
The same process. We make a notch of the lines of the Rune using a chisel:

Do not forget to make notches around the edges to avoid chipping:

Holding the chisel or cutter at an angle, we make holes. We trim the workpiece with a cutter:

More examples of the execution of the contours of Runes and notches:

And so gradually we cut out all the Futhark Runes.

On this you can become. The runes are ready. However, I am often asked to color the Runes.
Coloring Runes
I use acrylic paint for this.

Pay attention to the brush. It should be very thin, the smallest size you can find. The Runes staining stage is rather complicated and time-consuming. The paint must be diluted from time to time with a few drops of water, because it dries quickly and becomes difficult to apply.

Apply the paint sequentially, in thin lines, make sure that the brush does not inadvertently go beyond the wells.

Acrylic paint dries quickly, does not peel off the wood, and due to the accidental brushstroke outside the symbol, Rune will have to be redone.
However, the results of the work are worth it!

Rune oil treatment is an important step
So the Runes are colored. The final step is to oil them. This is done so that the runes do not dry out over time, in addition, the oil will protect them from pollution and make them more resistant to environmental influences. I use tung oil (you can also buy it online):

After processing with oil, the wood changes color slightly: it darkens slightly. And it takes on a scent with a tinge of tung oil. The oil is absorbed from several hours to a day (depending on the type of wood).

And here is an example of rounded Runes:

Now a few words about one more important thing - the Runes' house.
Rune Pouch
It is best made from natural materials - canvas, burlap, leather, cotton or linen. The dimensions of the bag should be such that a hand can freely pass into it and you can interfere, sort out the Runes inside.
Take the time to sew a good-quality bag, securely fasten the seams, pick up a strong drawstring - then it will serve you a long and loyal service, and the Runes will feel comfortable in it.
After you have sewn the bag, you can assume that your own set of Runes is ready.

You can start working with Runes. I wish you success!
The publication of materials from this site is possible only with the consent of the author and with a link to the source.
People who are interested in fortune telling and predicting the fate of a person know that the instrument that is made by hand works best in the hands of a practitioner. He gives more accurate and truthful answers to exciting questions and reveals situations as they are. Therefore, many are interested in the question of how to make runes, which can become an excellent tool for fortune telling.
Do-it-yourself runes most accurately answer important questions.
It is quite simple to create fortune-telling runes with your own hands, the main thing is to be as concentrated as possible on this activity and take it seriously and responsibly.
What material is suitable for creating runes
The manufacture of runes begins with the choice of the material from which the instrument will be created, which, in skillful hands, will tell the whole truth. Practitioners recommend applying runic signs to a surface that is of natural origin. The source material can be used:
- wood;
- stone;
- metal;
- clay;
- salty dough;
- fruit pits.
If a person decides to make runes from a tree, you should pay attention to what kind of tree species is associated with his sign. This will strengthen the connection between the runes and its owner for greater efficiency of predictions. The same applies to the decision to create runes from stone with your own hands.
The use of materials that are completely artificial is strictly contraindicated. Mages also do not recommend using paper as the main material for making runes. This advice is motivated by the fact that, due to chemical treatments, the connection between paper and nature is severely disrupted, and such runes will not accurately show answers and advice.
Making blanks for runes
After a person has decided on the material for his personal runes, you can start making blanks. They should all be the same size. The most practical are the runes, the dimensions of which are 4x3x1 cm.
During the process of creating blanks, a person should be surrounded by silence, and he himself should be focused on the result of his work. Before you draw the next rune sign on the blank, you need to pronounce the name that the rune possesses and realize your personal attitude towards it. In order to do this, it is important to clearly know both the name and the meaning that the rune carries.
Many people who are interested in making runes wonder whether it is worth covering the runes with paint after all the signs have been drawn. This step is optional. However, some practitioners claim that signs that are clear and vivid will provide more accurate information when used.
If a person nevertheless decided to paint their runes, it is best to choose natural paint. The red color of the pigment will be the best color scheme for the runes. It is also believed that the runes written in the blood of the owner are the most powerful.
While searching, be guided not only by the breed, but also by the inner feelings. Trust your intuition, and it will lead to that tree, the branch of which will be the perfect material for strong runes.
Before cutting a branch, you should ask the tree for permission and explain why the person decided to cut the branch. Many sorcerers established a mental-emotional connection with trees before using their bark or branches for their magical purposes.
While metal is also suitable as a material, forging runes is much less common than carving them on wood or creating a rune set from stones.
How to store runes correctly
A do-it-yourself set of runes must not only be made correctly, but also saved. Compliance with a number of simple recommendations will allow the owner not to lose touch with the runes and always receive accurate and truthful answers, turning to his predictive tool. The rules for storing the rune set are as follows:
- It is best to keep finished products out of the eyes of strangers. Therefore, they are usually kept in pouches.
- Never let anyone use your runes. This will maintain the fragile energy connection between the owner and the set.
- Try to contact the runes not only at the moments of fortune-telling, but also at others. Going about your business, take the runes, sort them. This will maintain a strong energy charge of the kit, which was put into it when it was created.
Summing up
Runes are quite a powerful tool in the hands of the mystic. Making your own runes is quite simple, it is important to choose the right material for the blanks and correctly draw the rune signs on the surface of the runes.
In order for the set to be strong, it is best to make it from natural materials that will match the owner's energy. Therefore, when choosing a basis for a rune set, you should not rush and trust your inner feelings.
The most widespread are rune sets made of wood. Their manufacture does not require much human effort.
Runes made of wood are the most popular
In order for the runes to always tell the truth and help the owner, it is important to store them correctly and constantly maintain connection, feeding it and restoring the original energy charge.
The creation process should bring pleasure and pleasant emotions, so if a person is dissatisfied with the created rune, it is better to destroy it and make a new one.
Read also ...