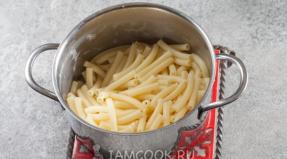
Recipe: Sour cream jelly "Zebra" - a very tasty jelly with cocoa. Sour cream jelly - recipe for making milk jelly with cocoa
Sour cream jelly is very tasty, and chocolate jelly is doubly delicious! Today I propose to try the dessert of my childhood - striped sour cream and chocolate jelly with gelatin. Tender, airy, moderately sweet: be sure to prepare this dessert for your children.
The fat content of sour cream does not play a special role in this recipe (except for the calorie content). Any gelatin will do: I used instant gelatin - it needs to be immediately dissolved in hot water. If you have gelatin that needs to be soaked, fill it with cold water in advance and leave for 30 minutes. When the gelatin swells, heat until completely dissolved, without bringing to a boil.
Ingredients:
Sour cream jelly:
Chocolate jelly:
Cooking the dish step by step with photos:

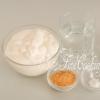
To prepare sour cream and chocolate jelly, we need the following ingredients: sour cream, water, sugar, gelatin, cocoa powder and vanillin. I advise you to choose not very fatty sour cream - 20% is best (this is the fat content used in this recipe). Adjust the amount of granulated sugar to your taste, and you can replace vanillin with vanilla sugar or not add it at all.

I wrote above about choosing gelatin, so carefully read the instructions on the package. So, take one teaspoon of instant gelatin, put it in two separate bowls and pour 50 milliliters of very hot (80-90 degrees) water into each.

Mix thoroughly until all the grains are completely dispersed. If the liquid is cooling and the gelatin has not yet completely dissolved, you can warm everything up a little in the microwave. Important: gelatin cannot be boiled, otherwise it will lose its gelling properties! If the crystals still do not completely dissolve, it’s okay, because there will be very few of them.


All ingredients need to be turned into a completely homogeneous mass, for which it is most convenient to use a submersible blender (this way the sugar will dissolve faster). If you want, you can replace the granulated sugar with powdered sugar - then it will be enough to just mix everything. You can prepare sour cream bases in this way before dissolving the gelatin - it’s not at all important.

Pour one part of the hot gelatin into the sour cream mixture (I decided to start with the chocolate base first, and you can start with the white one). To make sure there are no undissolved gelatin crystals left, it is best to use a strainer.


The future jelly can be formed either in one common bowl or in portions. In my case, I use small ice cream bowls. Pour half of the entire chocolate mixture into them. We leave the remaining mass on the table for now, and put the bowls in the freezer for 5-7 minutes so that the layer sets, that is, freezes.

We move on to the white workpiece: we also pour hot gelatin into it through a sieve. Stir until smooth.

Many housewives have recently completely undeservedly ignored cocoa and sour cream. Let's name a few reasons why you should cook it. Firstly, the dish does not require the use of expensive ingredients, secondly, it is not particularly high in calories, thirdly, the jelly is simply delicious and appetizing, fourthly, it is very healthy for children. And one more argument - the product will not contain any harmful additives or dyes, because you will prepare the jelly yourself from cocoa and sour cream. The recipe with a photo of the finished dish is presented in our article.
Required Ingredients
As we already said, there is no need to buy anything expensive for the dish. You just need to purchase:
- Sour cream (1 liter). Many people mistakenly believe that it is best to take a homemade fatty product. Although store-bought sour cream with a fat content of 21% or even 15% is also great.
- Powdered sugar. You will need approximately 150 grams of product.
- Gelatin. 20 grams will be enough.
- Cocoa. You need very little powder - literally 2-3 tablespoons.
As you can see, the recipe for cocoa and sour cream jelly does not involve the use of a large number of ingredients. Using the presented list of products, you will end up with four servings. If you are cooking with cocoa and sour cream for a children's party where there will be many guests, then calculate the amount of ingredients accordingly.

Let's start the process
The first step is to soak the gelatin in water at room temperature (you need very little liquid - 100 ml). Now you should set the product aside for further swelling, and in the meantime it is advisable to mix powdered sugar with sour cream. Next, you need to put the resulting mass on the stove and turn on very low heat. Now carefully monitor the product, stir constantly. It is necessary that the sweet ingredient is completely dissolved, but under no circumstances should the mixture be allowed to boil. Otherwise, the dairy product will simply curdle and everything will be ruined. When the sugar has completely dissolved, you need to remove the mass from the heat and pour gelatin into it in a thin stream. Now you should mix everything thoroughly to obtain a homogeneous mass. After this, you need to take another container and divide the mixture into two equal parts. A recipe for jelly from cocoa and sour cream allows you to prepare a dessert very simply and quickly, but it is better to make it overnight so that the product cools completely and acquires the desired consistency.

What do we do next?
So, we have sour cream in two containers. Add the specified amount of cocoa to one of them and mix well. Now you need to wait for the mass to cool slightly and reach room temperature.
How to fill the molds?
It’s not enough to know how to make cocoa and sour cream; you also need to decorate everything beautifully to make the dish look appetizing. Now is the time to take the molds and pour the first layer onto the bottom. Note that you must decide for yourself whether it will be white or brown. Next, you need to put the containers with the first layer in the refrigerator for about 10 minutes. After the specified time has passed, you need to take them out and fill the second layer. Now we place them in a cold place, only for a few hours. This way you will get 2 layers. If you want to make a larger number, then each new layer should be left in the refrigerator for 10 minutes until partially hardened.

Recipe for jelly with cocoa, sour cream, cottage cheese and fruit
This dessert is also very tasty and beautiful. It will definitely appeal not only to kids, but also to adults. You need the following ingredients:
- sour cream of any fat content - 250 g;
- fresh cottage cheese - 400 g;
- sugar - 1 glass;
- instant gelatin - 1 sachet;
- water - approximately 1 glass;
- cocoa - 2-3 tablespoons;
- peach - can be fresh, can be canned - 2-3 pcs.
How to prepare dessert?
We talked about the one made from cocoa and sour cream above. There is nothing complicated here either, you just need to add a few ingredients. So, first you need to dissolve gelatin in the specified amount of water, place the container on the fire, heat it thoroughly (but do not boil), then remove from the stove and cool. In order not to waste time, you can still cut the peaches into cubes (or slices). Now you need to take another container, mix cottage cheese, sour cream, sugar in it, and then pour in the cooled gelatin. You need to mix everything well.

Filling out the forms
Next, you need to take the containers that you have chosen to fill, put fruit on the bottom, and fill the first layer. As a result of this manipulation, you should be left with 50% of the mixture, to which you need to add cocoa and mix. The containers with the first layer should be placed in the refrigerator for 15 minutes, and then taken out and poured over the chocolate layer. That's all. Leave the molds in a cool place until completely hardened.
Tricks and secrets
In this article we have presented you with a recipe for jelly made from cocoa and sour cream, as well as another option with the addition of other ingredients. In order for everything to work out perfectly the first time, you need to know some tricks.
- The lower the fat content of the sour cream used to prepare the dessert, the faster the dish will harden.
- Be sure to wait until the gelatin is completely swollen. If you rush, the mass will not harden well, and you will not get jelly, but an incomprehensible mixture. The lumps of gelatin should increase at least 3-4 times.
- You can and should use almost any fruit, but do not take pineapples and kiwis. They secrete a lot of juice, which makes the mass not dense, but watery. It is also advisable to clean such products not only from seeds, but also from crusts and peels.
Not one sweet tooth or child will refuse such a tasty delicacy as sour cream jelly. With a little creativity you can turn simple jelly into a real culinary masterpiece. Multi-layer jelly desserts made from multi-colored layers of fruit and cream jelly look very beautiful. Jelly cakes look truly festive and pretentious, in the cut of which you can see fresh fruits or berries. Remember also about the jelly in the form of a mosaic, known to everyone under the name “Broken Glass”.
And what can we say about rainbow jelly in tall glasses. Today I want to bring to your attention a recipe for jelly based on the Zebra recipe. Actually, for me, as probably for many of you, this dessert evokes nostalgia for childhood. I constantly remember how my mother cooked it on the eve of the holidays, and how much temptation there was to “half it” without really allowing it to thicken. I am sure that both adults and children will enjoy this delicious dessert.
Ingredients for cooking:
- Cocoa – 2 tbsp. spoons,
- Hot water – 50 ml.,
- Vanillin or vanilla sugar – 1 sachet,
- Gelatin (it is best to use instant) – 1 sachet or 20 g.,
- Sour cream 20% – 500 ml.,
- Granulated sugar or powdered sugar – 150 gr.,
- Grated chocolate – 10-20 g.,
- Mint for decoration
Sour cream jelly with cocoa - recipe
Pour hot water over gelatin.


Stir it with a teaspoon and let it swell. It will take about 10 minutes for instant gelatin to swell, while large-caliber gelatin (and this is what I’ve seen these days) needs to sit for more than 30 minutes. Place sour cream in another bowl.

Add sugar and vanilla.

Mix everything well with a whisk.

After this, divide the sour cream into two equal portions.

Add half of the gelatin to one of them.

Stir.

Pour sour cream jelly into silicone molds and place them in the freezer for 10 minutes.

After the sour cream layer has hardened, remove the molds from the freezer. Now let's prepare the chocolate layer. Add cocoa to the second portion of sour cream.

Stir so that there are no lumps.

Pour in the gelatin.

Stir the chocolate mixture well again.

Pour it into molds.

Place back in the freezer for about 10 minutes. In the photo you can see that I overcooked it a little, and it had already begun to turn into ice cream. But it's okay.

So, all that remains is to turn it over onto a plate. Surprisingly, it fell out of the silicone molds without any problems. If you cook this sour cream jelly in tin muffin tins, to make it easy to remove, simply dip the tins in hot water for 2-3 seconds.
Hello, dear readers. The holidays have passed, and now I want to try light desserts after the festive variety. I really love jelly desserts. And today I will tell and show you how we will make sour cream jelly with cocoa. We wanted something with chocolate flavor. Regular readers already know that we show all our recipes with photographs. Today there will be a step-by-step and detailed recipe. True, we wanted to make a cake with sour cream and gelatin, and it will be two-color. With the taste of chocolate and vanilla.
Ingredients

Sour cream and cocoa jelly recipe
Let's start cooking by dissolving the gelatin. To do this, I pour about 100 grams of hot boiled water into a stainless bowl. After this, add gelatin. It is recommended to dissolve gelatin in hot water at about 80 degrees. Mix everything well with a spoon and leave for 5 minutes.

Meanwhile, pour sour cream into a second bowl, add sugar and cocoa. Mix all this well until the sugar is completely dissolved. From time to time I return to the gelatin and use a spoon in a circular motion to help it dissolve completely.
If the gelatin comes in lumps and does not want to dissolve, then put it on a very low heat or water bath. And thus we dissolve the gelatin.
When we have no lumps left, we add our sour cream mixture with cocoa to the gelatin. Since our sour cream will be cold or at room temperature, we will not be able to mix until smooth without heating.

I send our mixture to low heat and stir continuously with a spoon until all the lumps are completely dissolved. They were formed again by mixing gelatin and sour cream. They dissolve in literally a minute. Just don’t bring the gelatin to a boil. Otherwise, it will lose its gelling properties and subsequently will not harden. As soon as the mass becomes homogeneous, without lumps, immediately remove from the stove. You can even do this a little earlier, and continue to stir to dissolve all the gelatin.
Now we can pour it into the prepared container and leave it until it hardens completely. These can be either bowls or just plates or bowls. We usually use enamel bowls for this. In my opinion, the frozen jelly then lags behind them well. We can also do it in a stainless steel baking tray or in a glass container.
After hardening, you can already eat the jelly. Or you can use it for a cake.
Cake with sour cream and gelatin
Today we will prepare a cake with sour cream and gelatin, using our chocolate jelly for filling.

To do this, we repeat the entire recipe for jelly made from sour cream and cocoa. Only now instead of cocoa we will add vanillin. You need very little vanilla, literally on the tip of a knife. If you add more, the jelly may even taste bitter.
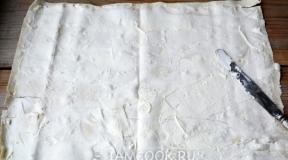
We cut chocolate jelly into pieces and fill it with white sour cream jelly. We send it to freeze. It hardens quickly. It literally froze within an hour. And here is the result of our actions.

We took it out with a knife, separating it from the bowl. That's why we ended up with such scratches on the cake. To make the jelly cake even, you can simply heat the plate by putting it in boiling water for 10 seconds. Just don’t put it on the fire, the bottom will melt and the jelly cake won’t be beautiful.
When cutting the brown jelly, I cut it into a 6 shape and then used other pieces to decorate our cake. It’s just that January 10th is our son’s birthday. And he just turns 6 years old. Of course, this cake did not wait for the guests, just like the birthday itself. We've already eaten it. And for my birthday, I already made preparations for another jelly cake. Children prefer jelly cake * *. Not only is it more beautiful, but it also has more flavors. We have already prepared jelly with strawberry, cherry, lemon and kiwi flavors.
A few tips for the gelatin cake recipe
You can use more sour cream. We did it with 500 grams, and everything turned out well. Also using these proportions we made with less gelatin. Instead of 20 grams, they took 15 grams. Everything froze well and did not melt at room temperature.
We used 15% sour cream, but you can use more fat. You can use less cocoa. For example, with two spoons of cocoa the taste is rich. I just like dark chocolate more, so I added more. One heaping spoonful of cocoa will be enough.
When heating, do not overheat the gelatin mixture. Then the gelatin will not harden. You can add less sugar, but not less than 3 tablespoons. We just like sweet cake. But for my taste, 5 spoons is the perfect combination.
You can use vanilla sugar instead of vanilla.
Now even a child can make jelly from sour cream and cocoa. We have the recipe with photographs and described in detail. If you have any questions, ask them in the comments. We try to answer all questions.
If you want to make a spectacular and low-calorie dessert, then sour cream jelly with fruit - exactly what you need. On our website you will find delicious sour cream recipes that are very easy to prepare.
Ingredients:
- Sour cream – 500 ml;
- Gelatin – 20 gr.;
- Water – 100 ml;
- Sugar – 1 glass;
- Vanillin;
- Fruits and berries as desired - cherries, raspberries, strawberries, peach, banana, etc. are perfect.
Recipe:
- Pour gelatin with water and let it swell for an hour.
- Beat the sour cream and sugar well with a mixer. Add vanillin there at the tip of a knife.
- Heat the gelatin with water over the fire until it completely dissolves.
- Cool the gelatin in water to room temperature and pour into the sour cream and sugar. Mix everything.
- Wash fruits and berries and cut them into arbitrary pieces. Small berries may remain intact. Read more: .
- Pour the fruit-sour cream mixture into several or one mold and place in the refrigerator for three hours. The dessert should be served on a large platter garnished with mint leaves.
Bon appetit!

Ingredients:
- sour cream - 450-500 g
- sugar - 80-100 g
- gelatin - 15 g instant
- cocoa - 2 tbsp.
- chocolate - a couple of squares
Step-by-step cooking recipe:
- Pour the gelatin packet into a cup and pour 100 ml of hot, but not boiling, water. Stir the gelatin very thoroughly until it is completely dissolved.
- Sour cream should be at room temperature. Beat sour cream with sugar until sugar grains dissolve.
- Add gelatin to sour cream and sugar, beat again.
- Pour half of the mixture into bowls, and if desired, you can add 1-2 tablespoons of cocoa to the rest - then we will get chocolate jelly. Place the bowls in the refrigerator until completely frozen (3-4 hours).
- Sprinkle the already frozen delicacy with grated chocolate and decorate with nuts if desired. Yield: 5-6 standard bowls.

Ingredients:
- Low-fat sour cream – 200 g;
- vanillin – 2 pinches;
- fine sugar - approximately 2/3 of a faceted glass;
- natural cocoa powder without sugar - 3 tbsp. l;
- water – 125 ml (0.5 cups);
- instant gelatin powder - 1.5 tbsp. l;
- warm water – 60 ml (3 tbsp);
- butter – 10 g.
Preparation:
- Take cocoa powder and a third of a glass of sugar. Mix. This is to prevent lumps from forming - kneading them is a long and tedious task, and with them the jelly will not turn out homogeneous. Boil half a glass of water, pour into the mixture in parts, little by little, stirring at once. Place on the stove over low heat and cook, stirring, until the thick drink boils. After a couple of minutes, turn off the heat, add butter, it will make the chocolate layer shiny. To cool faster, pour into a wide bowl.
- As soon as the cocoa is cooked, prepare the gelatin. Pour the powder into a bowl or porcelain or metal bowl and add water. Stir. Leave for 10 minutes to soften. Then we put it in a water bath. We heat, as it heats up the mass will begin to soften and become liquid. Without bringing to a boil, remove the bowl of gelatin. Pour about a third into the hot cocoa and whisk immediately. We set the remaining one aside. Well, everything is ready for the first layer.
- We take silicone molds or small cups, coffee cups - whatever you can find. Distribute the cocoa by pouring first a spoonful into each mold, then another one, and so on until it’s gone. Place in the refrigerator for half an hour.
- After 30 minutes, mix sour cream, vanillin and sugar, whisking. Don't try to achieve airiness and turn everything into cream - we don't need that. We stirred the sugar, dissolved it, filled the entire volume with air bubbles - that’s all.
- We heat the gelatin that remains after the chocolate layer again to a liquid state in a water bath. Pour into sour cream and sugar, whisking vigorously.
- We take out the molds with our dessert. Pour the sour cream mixture onto the dark layer, filling almost to the brim. Put it back in the cold. Let it harden for at least three hours, but it’s better to leave it for the whole day or until tomorrow.
- You can get jelly out of silicone molds without any problems, you just need to bend the edges and press on the bottom. If you suddenly don’t want to come out, put it in warm water for a couple of seconds and immediately turn it over onto a plate.
- As you can see, it turns out to be a very cute dessert, also delicious and easy to prepare. The recipe will come in handy when you need to prepare all sorts of different treats, but don’t have much time, and when you just don’t want to cook something complicated.

You will need:
- cottage cheese and sour cream - 250 g each;
- sugar - 100 g;
- vanilla sugar - 30 g;
- milk (can be replaced with water) - 200 ml;
- gelatin - 15 g.
Preparation:
- Soak gelatin in milk (water) for 1 hour and dissolve.
- Add regular and vanilla sugar to the hot gelatin mass and stir until smooth.
- Mix sour cream with gelatin mass.
- Grind the cottage cheese (wipe through a sieve or chop with a blender), mix with sour cream and gelatin mass.
- Transfer to a mold or bowl and leave in the refrigerator until hardened.

You will need:
- sour cream - 400 ml;
- sugar - 120 g (or 4 tablespoons);
- gelatin - 45 g;
- strawberries - 200 g.
Preparation:
- Pour gelatin with water, let it swell and dissolve.
- Beat sour cream with sugar, add gelatin.
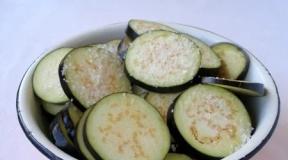
- Wash, peel, dry, and cut large strawberries into pieces.
- Place in layers in bowls: strawberries, sour cream, strawberries, sour cream.
- Leave to harden in the refrigerator, garnish with berries.

Ingredients:
- 2 cups sour cream;
- 2 tablespoons cocoa powder;
- Partial glass of sugar;
- 40 g gelatin;
- Glass of water.
Preparation:
- According to the instructions on the package of gelatin, fill it with cold boiled water and leave to swell. This usually takes from ten to forty minutes. However, you will see when it swells: it will become translucent and increase in volume three to four times. Now we put the gelatin in a water bath and dissolve it until it is completely dissolved. The main thing is to never let the gelatin boil! Let the gelatin cool.
- Meanwhile, combine the sour cream with granulated sugar and stir until the sugar is completely dissolved: it will definitely dissolve, it will just take a little time. After this, add the cooled gelatin to the sweet sour cream and mix everything well again. Divide the mixture into two equal parts, put cocoa powder in one of them and mix the sour cream and cocoa thoroughly.
- We prepare portioned dishes for jelly (cream bowls, bowls) or use a baking dish with split sides for this. In the second case, we will simply have to transfer the dessert to a plate and cut into pieces, like a cake. So, we begin to pour the jelly into the prepared dishes: alternately pour in two tablespoons of white and chocolate jelly. Pour it exactly in the center, pour contrasting jelly also in the center, directly on the bottom layer. Under the weight of the upper layers, the jelly will begin to spread across the mold, forming a characteristic striped pattern, and the stripes will go in a circle.
- Now take a toothpick and draw rays: from the center to the edge, after which we put the sweetness in the refrigerator. After an hour and a half or two, you can serve it to the table. Read more: .
Ingredients:
- 2 cups sour cream;
- Half a can of condensed milk;
- 2 very ripe bananas;
- 3 sachets of gelatin.
Preparation:
- Prepare the jelly mold in advance. We dilute the gelatin with cold boiled water and let it swell.
- Then dissolve the gelatin in a water bath so that it completely dissolves. Important! Do not allow gelatin to boil!
- Mix sour cream with condensed milk and lightly beat with a mixer or whisk.
- Peel the bananas, cut them into small pieces, grind them into puree and mix with sour cream.
- We do everything quickly so that the bananas do not have time to darken.
- Pour gelatin (cooled) into sour cream, mix and pour this mixture into the mold.
- Place the jelly in the refrigerator until the dessert has completely hardened.
As you can see, each recipe is very simple, and the taste of desserts will be a real discovery for you!