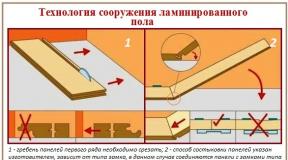
Sketch study of the basic version of the nightgown. Creative project. Nightshirt. Sewing a nightgown
Show picture
Girls, I will share the wonderful easiest way to build a drawing of a nightgown!
So, my dear mothers and grandmothers, we wake up to learn how to sew a nightgown for daughters, granddaughters and for ourselves!
We need only six measurements (Fig. 1) and as an aid I will present an auxiliary card "Name of measurements and how to remove them correctly" (Fig. 2)
Fig. 1 Table of measurements for a nightgown
Fig. 2 Name of measurements and how to take them correctly 
P.S.
Girls, everyone will have their own measurements, individual.
Fig. 3 Construction of a drawing, a shoulder product with one-piece sleeves 
Now, my dears, the easiest calculation begins to build a drawing for our future nightgown:
1) VN = Di = 90 (cm);
2) BB1 = (Pog + Pg): 2 = (35 + 7): 2 = 21 (cm);
3) HH1 = BB1;
4) BB2 = (Posh: 3) + Psh = (20: 3) + 1 = 7.6 (cm);
5) BB3 = BB2: 3 = 7.6: 3 = 2.5 (cm);
6) BB4 = BB2 + 1 = 8.6 (cm);
7) B1G = (Op: 2) + Pn = 25: 2 + 6 = 18.5 (cm);
8) B1B5 = 6 cm;
9) ГГ1 = В1В5 = 6 cm;
10) ГГ2 = ГГ1 = 6 cm;
11) G4 = G1G2: 2;
12) Г3 = from point Г4 upwards 1.5 cm;
13) H2H3 = 1.5 cm;
14) H1H2 = HH1: 2 = 11.5 (cm).
That's the whole calculation as easy and simple as two and two!
Open the nightgown on the fabric
Rice. 4 Cutting the nightgown on the fabric
My drawing was completely folded across the width of the fabric folded along the linear thread, so I decided that the nightgown would be without shoulder seams. To do this, I folded the fabric in four, that is, first in two along the transverse thread, then again along the shared thread. I will clearly show you a drawing of the structure of the fabric, so that it is clear to you.
Fig. 5 Tissue structure
Cutting and sewing
For sewing a shirt with short one-piece sleeves, the consumption of fabric with a width of 75-80 cm is planned based on the calculation: two shirt lengths plus 5-7 cm.
The pattern is placed on the fabric folded along the right side inward, with the middle to its fold and outlined. Girls, don't forget about the seam allowances. I fasten the paper pattern with needles to the fabric and immediately cut it out with allowances for seams along the side cut, sleeves and bottom of the shirt; I do not make a seam allowance on the neckline, because I process the neckline with an oblique inlay or, as it is also called, an oblique facing. If the neck is trimmed with a cut trim, then a seam allowance is needed. The sleeves and the bottom of the shirt can be sewn with a bias tape.
Allowance for seams: bottom and sleeves - 2-3 cm; side seams - 0.5-0.7 cm; neckline - 0.8-1 cm.
Girls, very important so that the allowance for the side seam is 0.5-0.7 cm, no more! Otherwise, after you turn the nightgown to the right side, the side seam will gather and pull together!
When opening my shirt, I cheated and saved time. I have one drawing both in front and back, I did not cut the neckline for the front on paper. Immediately put the drawing on the folded fabric, cut it out with allowances for the seams, the neck of the back (without gaps for the seams), then laid out the cut shirt as in Fig. 4, marked point B4 with a pencil, connected the marked point with the neckline on the back with a smooth line, only then cut out the neck of the front of the shirt. It remains to process the cuts and the nightgown is ready!
I talked about the bias tape and how to cut it here, so I will tell you about the trimming.
So, first, let's understand the definitions of sprout and neck.
Sprout- cutout for the neck from the shoulder cuts to the middle of the back.
Neck- Neck cut from shoulder cuts to mid-front.
Neck and sprout processing. On a sheet of paper, circle the neck and sprout exactly according to the pattern. From the marked lines, lay 3.5-5 cm - the width of the facing and cut out a pattern. The trims cut from the fabric are folded with the front sides inward, creased and grinded in place of the shoulder sections with a seam 0.5-0.7 cm wide. The seams are ironed out.
The finished facing is placed with the front side on the seamy side of the product so that their midpoints are aligned. The shoulder seams of the facing are cleaved with pins with the shoulder seams of the product. The edging is taken in, then attached to the product, the basting is removed. The facing is folded back to the front side, swept out with sweeping stitches to form an edging and ironed on. The second cut of the facing is bent to the side of the wrong side by 0.5 cm, basted and stitched onto the product.
Girls, I will look forward to your brags, an album for you, my dears

1. Conduct research and develop a sketch of my design product. 2. Organize a workplace. 3. Select tools and devices for various operations. 4. Make a pattern for a garment. 5. Choose the fabric for the product. 6. Cut the fabrics.

History of origin European women until the 14th century slept in the same clothes in which they wore during the day, or completely without clothes. Clothes specially made for sleeping have appeared since about the 15th century, in the Czech Republic, and they were called “bedroom skirt”. The nightgowns of that time were significantly different from those that are known to girls today. They were large, both in width and length. They were worn only by rich people, since such shirts were expensive.

In the 19th century, nightgowns became available to any woman and became ubiquitous. By this time, women could already have several nightgowns designed for different purposes: daily - usually made of cotton, classic cut; for travel - sports shirts; decorative - long or short nightgowns for plump, made of natural silk. In the 19th century, sexy night gowns also appeared - open, with a lot of ruffles and lace, similar in some way to evening dresses.

1. Manufacturing technology corresponds to the 7th grade program. 2. Economical consumption of fabric. 3. Simple construction. 4. Speed of production. 5. Comfortable to wear. 6. Fashionable. 7. Inexpensive fabric. 8. Beautiful colors. 9. Does not harm your health. 10. Not difficult to care for.


My measurements Semi girth of goody Cg 37 Semi girth of waist St 35 Semi girth of hips Sat 43 Conclusion: my Russian size, my European size -41


For my product you will need: 1. Threads in fabric color 40 (50.60 - by model); 2. Scissors for paper, ruler, pencil - to build a pattern; 3. Tailor's chalk, pins, tailor's scissors for cutting; 4. Sewing machine, iron, ironing board, hand needle, pins - for sewing;

To find out the cost of the product, I calculated what materials and in what quantity I would need. Output; since my mother gave me the fabric, I will have the cost only for the thread. Name of material Conditional price per unit of measurement, rub. Material consumption for the product Material costs, rub. 1.Cotton threads 6p for 1 reel 1 reel 6p Total: 6p


I make a plan of my work: 1. Draw a pattern. 2. Cut out the details of the product with allowances for the seams, along the cuts of 1.5 cm and for the hem of the bottom 3.0 cm. 3. Cut out the trimming hem with a width of 4.0 cm. 4. Sweep the product in the following sequence: - side cuts; - sweep the hem of the bottom. 5. Try on the product


I was asked to sew a nightgown. I have to learn how to sew it and get a good grade.
2. Purpose of the project
Design and sew a nightgown.
3. Tasks
1) Conduct research and develop a sketch of my design product.
2) Organize a workplace.
3) Pick up tools and devices for various operations.
4) Make a pattern for a garment.
5) Pick up fabric for the product.
6) Cut the fabric.
7) Prepare the product for fitting and try it on.
8) Process the product after trying on.
9) Control the quality of your work.
10) Assess the quality of the finished item.
4. Research
Model 1 ... Nightgown of a straight silhouette, knee-length, with a short one-piece sleeves. The back and front are solid, without darts, medium seams and fasteners. Sections of the neckline, armholes, bottom line and cuts in the side seams are finished with trimming from the finishing fabric.
Model 2 ... Sleeveless nightgown. Back with waist and shoulder darts, without middle seam. One-piece front, with darts at the waist and chest.
Model 3 ... The back and anterior are solid, strongly widened downwards. The bottom line is asymmetrical.
Model 4 ... Sleeveless nightgown. Back with waist and shoulder darts, without middle seam. Wrap-around shelves with darts at the waistline.
5. Criteria for choosing a product idea
1) Manufacturing technology corresponds to the 7th grade program.
2) Economical consumption of fabric.
3) Simple design.
4) Fast production.
5) Comfortable (does not restrict movement)
6) Inexpensive fabric with an admixture of chemical fibers.
7) Beautiful, bright colors.
8) Does not harm health.
9) Easy to clean.
6. Choosing the best idea
I have analyzed all the models for compliance with the selection criteria.
Solution: model 1 won - a nightgown of a straight silhouette, knee-length, with a short one-piece sleeves. The back and front are solid, without darts, medium seams and fasteners. Sections of the neckline, armholes, bottom line and cuts in the side seams are finished with trimming from the finishing fabric.
7. Measurements required to make my model
My measurements
|
Us |
18cm |
|
Sgp |
37.5cm |
|
Sat |
42cm |
|
Pg |
8cm |
|
Op |
25cm |
|
Dst |
37cm |
|
Di |
74cm |
|
Pop |
8cm |
9. Choosing the right fabric
Textile
Cotton
Overcoat
Flannel
Silk
Solution : I choose cotton fabric.
Fabric color
10. Choice of fabric color
Red
Green
Lilac
Yellow
Solution : choose white. Coloring of fabric - yellow flowers on a red background.
11. Calculation of tissue consumption
Solution : I need 2m 90cm fabric
12. The cost of materials for the manufacture of the product
To find out the costs of manufacturing a product, I calculated what materials and in what quantity I would need.
Calculation of material costs (conditional prices)
|
No. n / n |
Material name |
Conditional unit price per item |
Material consumption for the product |
Material costs, rub. |
|
Cotton fabric |
75 for 1m |
2m 90cm |
217,5 |
|
|
Cotton threads |
5 for 1 coil |
1 coil |
Total: 246.9
13. Product manufacturing plan
1) Draw on a Whatman paper and cut out a pattern.
2) Cut out details of the product with allowances for shoulder and side seams of 15mm, necks and armholes, hem hem - 6mm each.
3) Cut out bias inlays 4.5 - 5cm wide.
4) Sweep the products in the following sequence:
a) shoulder sections;
b) side slices;
c) to sweep the hem of the bottom.
5) Try on the product.
6) Eliminate defects after trying on
7) Fold bias tape in half lengthwise, right side out, and iron.
8) Baste and stitch folded bias tape separately to the neck of the front and back with a 6mm seam. unscrew the inlay to the wrong side, sweep and machine-stitch with silk threads at a distance of 7mm from the fold (using the "clean cut" method).
9) Sew the shoulder seams with a padded seam.
10) Sew on the ends of the seam allowances at the neckline.
11) Trim the armhole with a bias tape in the same way as the neckline.
12) Run the side seams with a stitching seam in a shirt.
13) Sew on the ends of the seam allowances at the armhole.
14) Neaten hem allowance, iron to wrong side and topstitch with 4mm seam width.
15. Manufacturing the product and checking its quality.
I will sew the product in accordance with the drawn up production plan (I use the materials of the textbook), I will perform each operation, check the quality of the work, if something does not work out, I will redo it.
16. Self-assessment
I evaluate my nightgown according to the criteria for choosing a product idea.
- The manufacture of the product corresponds to the technology program for the 7th grade, we studied all processing methods in the classroom.
- The fabric consumption is high, but the fabric is not very wide, so its cost is low.
- The design of the nightgown is very simple, the fitting went without comment.
- There is not much time for sewing my product.
- The nightgown is comfortable, does not restrict movement, and is pleasant on the body.
- It will not be difficult to take care of the product, since the fabric is well washed and easy to iron.
In my opinion, I coped with the task. Now let the teacher evaluate my product and the work on the project as a whole.
- Problem situation ………………………………… .2
- Purpose of the project …………………………………………… 2
- Tasks ………………………………………………… ... 3
- Research ………………………………………… ... 4
- Criteria for choosing a product idea ……………………… .5
- Choosing the Best Idea …………………………………… 6
- Measurements required for my model ……………… 7
- Choosing the right fabric ………………………………… .8
- Choice of fabric color …………………………………… .9
- Calculation of tissue consumption ………………………………… .10
- The cost of materials for the manufacture of the product ... ..11
- Product manufacturing plan ………………………… ... 12
- Manufacturing the product and checking its quality …… ..12
- Self-assessment and assessment ………………………………… .13
Akbulak secondary school №1
Project
Making a garment "Nightgown"
Performed by Tatiana Zhuravleva, student of grade 7. Director Zhuravleva M.A. technology teacher
Akbulak 2007
Introduction …………………………………………………… ... ……… .............… .3
Main part …………………………………………………… .... ………… ... 4
1 Researching the problem …………………………………………………. ….4
2 Bank of ideas and proposals ………………………………………… .....… ... 6
3 Technological sequence ... …………………………………… ..8
4 Economic assessment ……. ……………………………………………… .9
5 Environmental Assessment …………………………………………………… .9
Conclusion ...... ……………………………………………………………… .10
List of used literature ………………………………… ... …… ... 11
Introduction
As the theme of my project, I chose the manufacture of a garment - a nightgown, since I need this product! At night I like to sleep in my nightgown. Of course, you can buy it in a store, but you can also sew it yourself, especially since we learn to sew in technology lessons. If I sew the product myself, firstly, I will gain experience in sewing products, and secondly, I will win in monetary terms, that is, I will save a little the family budget.
My nightgown should be comfortable, light, washable and ironable, and so that I can sleep soundly in it. Therefore, I need to choose the right fabric for sewing.
In the process of performing project work, I set myself the following tasks:
To study what a shirt is, as it was called before;
Investigate when patterns appeared;
Investigate the types of fabrics from which the product can be sewn;
Describe the process of making a nightgown;
Sew a neat nightgown.
Main part
Researching the problem
Shoulder clothing originates from primitive cloak-skins. Through the millennia, clothes have changed and began to represent several pieces of fabric that were not sewn, but draped on the human figure. The costume consisted of two parts: a lower shirt - a chiton, and an upper cape - a himation. This cape was thrown over the left shoulder over the back and chest.
In Russia, the first information about clothing dates back to the period between the 8th - 12th centuries. Women of that time wore a long canvas shirt - a shirt, wide straight cut, belted at the hips and embroidered at the edges.
In the 15th - 16th centuries, nightgowns and pantaloons appeared, which for a long time were the property of the toilet only for the privileged strata of the population. Nowadays, nightgowns are used by everyone, regardless of their position in society.
VI Dal in his explanatory dictionary of the Russian language gives definitions to the words "shirt" and "shirt".
“Shirt - shirt, shirt; female muslin shirt-front, to the waist; blouse, round, outerwear, top shirt, work, hunting and so on. "
"Shirts, a kind of white shirt with scarlet shields, which the peasant women wear over their shirt and sundress."
“Shirt, shirt - shirt, koshulya, she-lady; clothes from underwear, put on under the bottom, on the body. "
From such definitions of VI Dal it follows that the name "shirt" is more suitable for the nightgown of our time.
And yet why "shirt", and not somehow else? Probably, in ancient times, a piece of fabric was just “cut off”, hence the “shirt”. As a rule, shirts were wide, cut from straight panels. There is even a proverb: “Babi
shirts are the same sacks: tie up your sleeves and put anything you want. "
Pattern Is a piece of a fabric cut out of paper. But how long has it been around? It turns out that a very long time ago - from the X century. Then the patterns were the property of the members of the tailor shops and they were carefully protected from copying. The tailors kept their secrets.
Paper patterns, about the same as we use now, appeared in the 19th century, first in England and then in France. They began to be published in magazines only in 1850 as an appendix, and until that time there was only a description and skillfully executed engravings. In 1860, the industrial production of paper patterns began. The founder of the company producing patterns is considered the Italian E. Batteriko.
Nightgowns can be sewn from various fabrics, for example: silk, linen, knitted fabric, cotton fabric.
Linen fabrics have a smooth, shiny surface, differ
great strength and low elongation. They easily absorb moisture, wash well. Their disadvantage is that they wrinkle quickly, but just as quickly and smooth out. These fabrics are tough to the touch.
Silk fabrics soft and smooth to the touch, have a pleasant shine, are hygroscopic and breathable, but they stretch strongly, crumble, and have significant shrinkage. It is very difficult to sew from such fabrics without skills and experience.
Knitted fabric soft, hygroscopic, but in the process of sewing it requires special machines or a special needle, since the knitted fabric is highly stretched.
According to historians and archaeologists, fabrics from cotton were produced in distant India as early as the XI century BC.
During the campaign of Alexander the Great, the Greeks were delighted with the art of the Hindus, who know how to obtain fabrics from "wool obtained from nuts."
(as they called cotton). Until the end of the 13th century, only finished cotton products were imported into Europe. In 1772, the production of cotton fabric began in England. It was distinguished by its peculiar texture and color.
Name " chintz"Came to us in such a way that it is difficult even to immediately understand its original source. The Bengali name for the colorful cotton fabric "cheats" was altered by the Dutch to "sitz", and in our country it began to be called chintz.
Cotton fabrics have significant strength and hygroscopicity, quickly get wet and dry. They are comfortable to wear, wash and iron well.
Bank of ideas and suggestions
Model No. 2
Nightgown made of silk fabric
with one-piece sleeves,
with a "corner" neckline.
Ruffle at the bottom of the shirt.
 Model No. 3
Night shirt
from knitted fabric
with one-piece sleeves,
with a round neckline,
with a rounded yoke.
 |
Model No. 4
Night shirt
cotton fabric
with one-piece sleeves,
with a round neckline.
The length of the shirt is short.
Justification for the choice of the model.
A wide variety of nightgowns can be modeled on the basis of one pattern. Of all the ideas, I choose model no. 4, as this model is made of cotton fabric, which is easy to wash and iron well, unlike fabrics made from chemical fibers and linen. The cotton fabric will not give me any difficulties in my work.
Prioksky district
Creative project
"Nightshirt"
The project was prepared by: Zubova Anna, student of grade 8 A
MBOU "School number 174"
Nizhny Novgorod
Teacher: Gomoyunova Larisa Vladimirovna
2015 g.
Content
Women's clothing of Ancient Russia
Types of fabrics for sewing a nightdress
Study
Safety engineering
Economic justification
Product testing
Self-esteem
Justification of the problem and need
At school, in labor lessons, we learn to design, sew, model, etc. In order to consolidate the theory and the material we learned, our labor teacher gave us a task: to make a nightgown.
Definition of a specific task and its formulation
To make it easier for me to work on the project, I presented all the questions in the form of a thinking diagram:
Problem, need
Practicality
Model
Textile
Tools, fixture, equipment
Design, modeling
Manufacturing technology
When I substantiated the problem and need, I immediately realized that my task was to sew a practical and comfortable nightgown.


Identification of basic requirements for the product
The shirt should be:
Practical when wearing
Convenient
Sewn from fine fabric
Easy to care for.
Developing ideas, options and choosing the best
This was the first time I sewed a nightgown, so I had to decide on a model. You could choose absolutely any. I liked the following 2 models:
I choose model # 2. I want to sew a pink chemise, and therefore I will feel like the queen of the flower fairies.
Women's clothing of Ancient Russia
One of the components of women's clothing in Ancient Russia was a shirt or shirt. The shirt provided underwear, it was made of coarse and thick fabric. The shirt was sewn from light and thin materials, it was mostly only for rich women. Girls in Russia also wore canvas clothes called "zapona"; it looked like a piece of fabric bent in half with a cutout for the head.
The zapona was worn over a shirt, always belted. Women also wore such top ornate clothing as a "pommel". It was usually made from an expensive fabric using embroidery and looked like a tunic. Depending on the design options, the pommel was with or without sleeves of different lengths, besides, it was not belted.
In winter, residents of Ancient Rus wore jackets with fur, and in summer they wore a shirt just like that. For the holidays, they put on special shirts called long sleeves. In addition, women in Russia wrapped around their hips with woolen cloth, intercepting it with a belt at the waist. This piece of clothing was called "poneva" and was most often in a cage. It is worth noting that different tribes had their own colors of poneva.
For example, for the Vyatichi tribes, a blue cell was characteristic, and for the Radimichi, a red one. Poneva was very common in Ancient Rus. Later in Russia there also appeared clothes called "sayan" or "feryaz", which consisted of two panels intercepted with straps on the shoulders.


Types of fabrics for sewing nightgowns
In sewing shirts for hot summer nights, different types of fabrics are used, the most important requirement for which is the ability to let air through. Most often, models consist of the following matters:
Chintz ... This fabric is categorized as cotton. It is created by means of plain weave and has a delicate and delicate texture.
Calico - hygienic, lightweight and durable material. Unlike chintz, calico is highly durable.
Satin very resistant to abrasion, so it is quite durable. According to its properties, satin hardly differs from silk - natural or artificial. This fabric can consist of both natural and synthetic fibers.
Batiste - translucent material, absolutely safe for allergy sufferers. It is very thin and hygroscopic, and is used for sewing sophisticated nightgowns.
I chose chintz because it is moderately thin, practical and inexpensive material. Coarse calico is denser and coarser for underwear.
Selection of fabric, tools, fixtures, equipment
Mom and I went to the store to buy fabric. We decided to choose the fabric in a delicate color, with a small pattern. We opted for a white chintz with pale green, pale blue and pale pink small patterns in the form of butterflies and flowers. All the equipment necessary for sewing is in our school, and we can freely use it in technology lessons. I easily got the tailor's chalk and pins in the store. Large quantities of millimeter paper were inherited from my mother.
Women's shirts in XIX century
Spacious women's shirtsXIXcentury were cut from white linen or cotton cloth. Their characteristic features were short sleeves, ankle-length, oval or rectangular neck. If a ball gown was worn over the shirt, the neckline could be very deep. In the 1870s, the women's undershirt was shortened to fit more closely to the body. By the end of the century, it turned into a very simple cut with lace and sewing on narrow shoulders with a variety of neck designs - the neckline could be round, rectangular or triangular. Cotton and linen remained popular fabrics, silk was used less often. In the 1890s, the first prototypes of the modern bra appeared, which supported the chest and were worn over a corset.

The sequence of manufacturing a product
Designing a shirt (measuring a person's figure, building a drawing, modeling);
Modeling according to the main drawing, making a pattern for a shirt;
Fabric preparation for cutting, cutting;
Processing of shoulder cuts;
Yoke processing;
Neck processing;
Processing of shoulder cuts;
Side slicing processing;
Processing the bottom of the shirt.
Instructional and technical card
Processing the bottom section of the nightgownBend the allowance by 1 cm and sweep it along the marked line by 0.1 - 0.2 cm from the fold.
Expand the part so that the hem to be hem is directed away from you. Tack.
Machine stitch from right side.
Remove annotation. Press on the hem of the hem.
Processing cuts with bias tape
Cut off the allowances of the processed cuts up to 6 mm.
Place the prepared bias tape on the product (right sides inward) and pin it to the cut of the neck so that it protrudes 1 cm beyond the edges of the cut (in the upper part of the middle seam of the back).
Sew the inlay with a 6 mm seam (fig. 88 a).
Unscrew the inlay to the wrong side of the product (first the protruding ends, and then the entire inlay) and, wrapping the cuts with it, pin them to the seam allowance (Fig. 88 b).
Tack.
Sew the tape by hand from the wrong side with hemming stitching or machine stitch from the front of the garment to the hem, grabbing the inside of the tape.
Side slicing
Stitch side cuts from front from armhole to bottom line. At the beginning and at the end of the stitching, make bartacks.
Press the seam allowance towards the front. Remove basting stitches after wet heat treatment. Seam allowances
overcast. (Fig. 59 c)
Shoulder cuts
Stitch shoulder sections from the neckline to the armhole from the side of the shelf along the seam line.
Press the seam allowances towards the backrest. Sweep the seams of the allowances. (fig. 58)
Tucks
Safety engineering
When working with needles, pins, knitting needles and crochet1. Work with a thimble.2. Store needles and pins in a certain place (special box, pillow, etc.), do not leave them in the workplace, in no case take needles, pins in your mouth and do not stick them into clothes.3. Do not use a rusty needle for sewing.4. Attach the patterns to the fabric with the sharp ends of the pins away from you.5. Store needles and pins in a special box, at the end of work, put them away in a place inaccessible to small children.6. Collect the pieces of broken needles or pins and give them to the teacher.- when working on a sewing machine1. Before work, remove the hair under a kerchief.2. Sit on the entire surface of the chair, slightly tilting the body and head forward, in front of the needle.3. The distance from the worker to the machine should be 10-15 cm.4. Before work, remove needles and pins from the product.5. There must be no foreign objects on the machine platform.6. Hands during work should be at a safe distance from the moving parts of the machine.7. Connect the sewing machine to the mains and disconnect with the permission of the teacher.8. When connecting, first connect the pedal to the machine, and then the machine to the network. When disconnected - vice versa (first from the network, then from the machine)9. Make sure that there are no bags or bags near the pedal. Take your foot off the pedal if work is temporarily suspended.10. It is forbidden to change the moving parts of the machine when the equipment is connected to the mains.11. Keep your foot on the pedal so that the machine works at the same speed.
Economic justification
I made the calculation of the cost of materials in the form of a table.
Price
Material consumption for the product
Material costs, rub.
Textile
RUB 80 per m
3m
240
Safety pins
RUB 25
Tailor's chalk
RUB 10 per piece
1 PC.
Decoration
RUB 50 per m
1m
Beika
RUB 25 per m
3m
Total: 400 rubles.
Comparing with the price of the finished purchased product, we can conclude that a self-made shirt is also worth it. But she has her own style, jewelry, color, which is not in the ready-made ones.
Product testing
A completely sewn shirt had to be tried on. Having put on the outfit of the queen of the flower fairies, I realized that the goal had been achieved.
The work was rated "excellent".
Self-esteem
In my opinion, I got a very decent product. The shirt was sewn exactly as intended and met all expectations. It was very comfortable for me to sleep in it in the summer, especially in the heat.