How to equip a small bath. Secrets. Bathhouse in the country (45 photos): design and choice of location. Construction of a bath from a bar, brick or blocks How to equip a bath in the country inside
They have been talking about the benefits of the bath for a long time - it is believed that the human body is subjected to steam treatment here, and not just cleansed, as a result of which the body gets rid of toxins and toxins through perspiration. In addition, a visit to the bath ensures good health and significantly improves immunity.
In addition, if the bathhouse is located outside the city, near a lake or forest, then it will become not only a means for quenching and washing, but also an excellent place to relax. And today we want to tell you a little about how to arrange a bath with your own hands, which is very interesting and informative.
Furnace requirements
A bathhouse can be considered a bathhouse only when there is a stove in it. The “heart” of the steam room is often called a stove. It is needed for intensive heating of stones, which will subsequently retain heat in your steam room. And if you splash some water on the heated stones, you will get dry steam. Also, such a stove will heat the water that you will use when visiting the bath.
Usually, stoves in baths run on coal or wood, and birch is the best choice for firewood, since they are the most high-calorie in terms of heat output. Of course, in some cases, when arranging a bath, stoves are used on gaseous and liquid fuels. In addition, electrically heated stoves are increasingly being used, especially in saunas.
Steam room insulation technology
If you want your sauna to be warm, we recommend that you insulate it from the inside. Often for this, in a steam room made of wood, they use insulation (expanded polystyrene, mineral wool), paper, plastic wrap or foil.
The so-called "cake" is usually created on the walls of the steam room. For this, a wooden crate is initially built, after which a foil is attached to it with nails or a stapler. This layer will reflect heat well and create a "thermos effect".
The next layer is to put a film or foil, which will protect the insulation from condensation and prevent the appearance of mold. Lay the third layer of paper, which will filter the air, then synthetic insulation and a wooden frame.
Ceiling insulation
If you want to make a high-quality arrangement of the bath from the inside, we recommend insulating the ceiling of the steam room from the attic side. To do this, you need to upholster the wood sheathing with film or foil, and then cover the entire ceiling area of expanded polystyrene, mineral wool or expanded clay no more than 3 cm thick. After that, the insulation is covered with roofing material or foil.
When arranging the bath yourself, it is also important to insulate the floor by placing a heat insulator between the sub-base and the finished floor. Often for this, they are used which are laid on waterproofing, covered and poured with concrete.
In the steam room, lattice racks made of wood are used to cover the floor. The floors themselves should have a slight slope so that water can drain freely to the drain. The floors are made in the same way in the shower.
Installation of electrical wiring
It is very important, when making the arrangement of a bath made of wood, it is good to protect the electrical wiring from heat, steam and moisture. Initially, you need to calculate taking into account all the lighting devices used. Make sure that the cross-section of the cable used is fully consistent with the power, its insulation is double, and the wires must be laid in closed boxes.
Features of interior decoration
The arrangement of a bath is impossible without taking into account the purpose of each room, since in most cases it is divided into 4 zones: a rest room, a washing room, a steam room and a dressing room. For finishing the dressing room, a lining or board is used, the thickness of which will be about 2 cm.Among the tree, they choose cedar, birch, aspen, fir, spruce and pine, since it is these species that have a pleasant aroma, do not emit resins and tolerate moisture well.
Steam room materials
The best material for finishing this area is linden, but in some cases, boards from a different tree can be used. It is important that the vapors that are released under the influence of temperature do not contain a variety of chemical impurities. Therefore, you cannot use wood with antiseptic treatment.
Arrangement of the washing department
You can talk about the finished arrangement of the bath when the washing department is completely built, which can be finished with tiles, natural stone or wood. Keep in mind that the wood must have good moisture-resistant qualities, resistance to decay, and any tile can be used: ceramic, marble or granite. Often in the bath there are metal surfaces and elements that need to be sunk into the wood as much as possible in order to avoid burns.

In a good steam room, an important attribute is the pool, which helps to quickly freshen up and cool down after being in a good steam room for a long time, which is very beneficial for health. After all, a sharp drop in temperature, which is facilitated by chilled water, can be an excellent workout for capillaries and blood vessels. Also, the water will close the pores after taking a hot bath.
As you can see, it is rather difficult to arrange a bath. You can look at the photos in our article, and then make your own. But, you must admit, it is very pleasant to relax in the bathhouse, where everything is done by hand!
The arrangement of a bath requires a careful selection of materials for construction. The interior decoration of the premises is especially important, because the comfort of operation depends on it. This task can be accomplished with the help of a variety of materials and finishes, each of which has its own characteristics.
Bath interior decoration: purpose and features
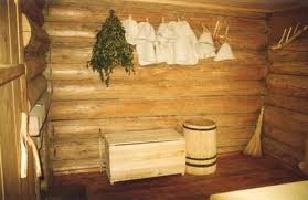
The classic Russian bath includes three main rooms: a steam room, a washing room and a vestibule. Additionally, there may be a recreation room, billiard room and other rooms. In any case, interior decoration is needed, which not only creates coziness, but is also needed to create an optimal atmosphere and keep warm.
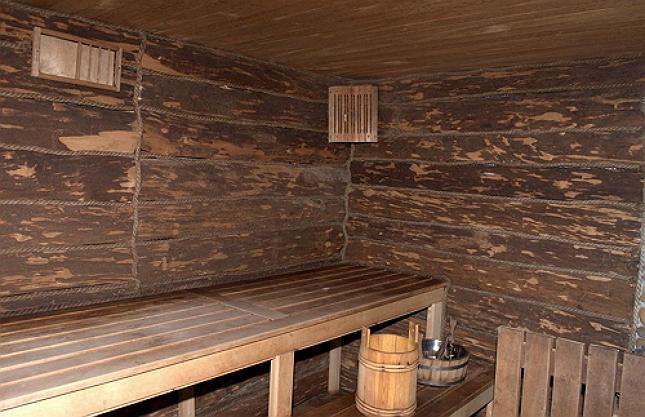
The bath building can be built from a bar or another type of wood. This material is available, in demand and effective. Log structures for summer use do not need complicated finishing. A bathhouse on a log house should have well-poured lower rims; from the inside, the walls do not require additional materials. This is due to the fact that wood is able to "breathe", removing moisture and steam outside. The use of synthetic insulation will disrupt this process. However, for a winter bath, thermal insulation is necessary, clapboard finishing is appropriate. Log walls look aesthetically pleasing without additional finishing.
The construction of foam blocks is reliable, it is used at any time of the year, but it needs interior decoration. Indoors, steam rooms almost always use lining, under which layers of hydro and thermal insulation are placed. In the recreation room and dressing room, it is appropriate to use ceramic tiles, PVC panels, lining. Walls made of foam blocks are pretreated with antiseptic compounds. The floor is often tiled with anti-slip ceramic tiles to provide comfort.
Brick for the construction of baths is rarely used, but such structures are reliable, very durable, and environmentally friendly. Brick structures do not need external finishing, but inside you can use porcelain stoneware for the floor, ceramic tiles, lining. In the locker room, the walls are often trimmed with PVC panels, but they are not suitable for the steam room due to the high temperature in the room.
Wooden larch paneling is a universal solution for interior decoration of a bath. This material is affordable, practical and durable. If a more reliable wall or floor covering is required, then use porcelain stoneware or ceramic tiles. A bathhouse made of any building material requires interior decoration, which will provide comfort, aesthetics and protect the main walls from moisture.
Interior finishing options
All bath rooms are exposed to high humidity, which requires careful selection of materials for interior decoration. There are several basic options, each of which has certain properties. The advantages, disadvantages, purpose and features of operation must be taken into account when choosing an option for interior decoration of a bath from any material.
Table: advantages and disadvantages of materials
| Material | Advantages | Flaws | Optimal use |
| Lining made of wood | Environmentally friendly, pleasant texture, the possibility of combining with other materials, variety of wood species | Complex installation and maintenance when operation, fragility, fire hazard | For walls in any room of the bath, built from any material |
| Ceramic tile, porcelain stoneware | Durability and reliability, resistance to mechanical and chemical influences, wide selection, durability, environmental friendliness, fire safety | It's important to follow the rules installation, high cost, uncomfortable texture | Baths in any room for finishing the floor, walls, firebox |
| PVC panels | Affordable price, variety of colors, easy installation, easy maintenance during operation | Fragility, low resistance to high temperatures, fragility | For changing rooms, lounges, shower rooms |
Photo gallery: clapboard finishing options
Log walls make the bath cozy and do not require additional finishing  The combination of lining and ceramic tiles is a practical solution
  All surfaces inside the steam room can be finished with clapboard
  The lining is easy to mount both on the ceiling and on the walls
  Clapboard trim is convenient for a small steam room
  The lining is easily combined with stone and tiles
  The relaxation room is easy to arrange luxuriously
The choice of the type of finish
The interior decoration of the bath fulfills not only an aesthetic function, but also provides comfort, an optimal atmosphere in the premises. Therefore, materials for arranging a steam room, shower room, rest room or other space must meet the following requirements:
- environmental friendliness, non-toxicity, safety for human health when the material is heated;
- resistance to mechanical, temperature loads;
- easy care during operation;
- simple installation technology.
Popular materials such as wood and ceramic tiles meet these requirements. They are easily combined with each other, allowing you to create a comfortable and safe environment inside any room of the bath.
When choosing a material, its purpose is taken into account. The tile is appropriate for the floor and walls, and the ceiling is decorated with planed boards and clapboard. This combination is optimal for a shower room, and in a steam room, all surfaces are often made of wood. This allows you to create the comfort and spectacular atmosphere of a Russian bath. For a drier room, stretch ceilings are suitable, but you should not make plasterboard structures. This is due to high humidity in all rooms of the bath, and drywall is unstable to moisture.
Wood and lining made of different types of wood are in demand materials for the interior decoration of the bath. This is due to the fact that wood is affordable, environmentally friendly, and the installation of elements does not require special preparation. For a bath, such types of wood as larch, aspen, abasha, alder are optimal. They are durable, resistant to humidity and temperature extremes.
Preparation: calculating the working area
Before starting work, you should calculate the area of surfaces that need finishing. The lining is used for walls and ceilings, and the floor is built from planks. For a quality finish, high quality wood is needed, with the lowest resin content. Therefore, pine is rarely a material for the arrangement, as it emits resin.
The decoration of each room consists of several stages. First, the installation of the floor covering is carried out, which is a flooring of boards with a thickness of 50 mm or more. The elements are laid on logs with a height of 300 mm, which are installed on a sand cushion, equipped on the ground. After that, they calculate the area of the walls and ceiling, which they plan to trim with clapboard. To do this, you need to calculate the areas of each wall, ceiling and add up the data obtained.
Selection and calculation of material
Larch lining is the optimal solution for decorating a steam room or washing room. Under the influence of time and humidity, its wood becomes harder, which makes a durable interior decoration. When choosing a lining, you should pay attention to the following features:
- lining for finishing the steam room, washing room must be marked "Extra class" or "A class". Such material is devoid of large knots, has a homogeneous structure, an even surface;
- wooden elements should not show signs of decay, cracks, deformation. Smooth and dense lining is easy to assemble and looks aesthetically pleasing;
- for finishing you need not only lining, but also steam and heat insulation materials. Finishing is carried out only after the installation of these layers;
- the thickness of the board must be at least 12.5 mm, a spike of 8 mm corresponds to the depth of the groove. Material moisture - no more than 12%;
- quality material has a flat, smooth surface.
It is also important to correctly calculate the amount of material. Lining is often calculated in square meters. In this case, its quantity is equal to the area of the working surfaces. This indicator needs to be increased by 5%, since material damage is possible during operation, therefore, the lining is purchased with a margin.
Bars or thin slats are required for work. If the thermal insulation of the bath was carried out outside, then only the installation of vapor barrier and decoration is carried out inside. Therefore, you need to purchase a vapor barrier film that will ensure indoor comfort. Otherwise, the insulation is carried out from the inside and you will need insulation, a waterproofing film and bars for the lathing.
Video: how to choose a lining
Tools and supplies
The construction and arrangement of any facility requires the use of reliable tools. The quality of fastening materials is of particular importance in the construction of a bath, because the durability of the finish depends on it.
List of tools and consumables:
- construction stapler with staples;
- roulette;
- pencil;
- building level;
- nails;
- self-tapping screws with anti-corrosion coating;
- screwdriver;
- a hammer;
- hacksaw.
The tools must be prepared in advance, and the fasteners must be purchased with a margin. This makes it possible to securely fix all materials and elements.
Step-by-step instructions for interior decoration of the bath
Wall decoration is carried out after the installation of heat and vapor insulation. To do this, you need to attach vertical or horizontal bars to the wall, the distance between which is equal to the width of the insulation used. On top of the racks, a waterproofing film is fixed with staples, and then the insulation is also fixed on the staples or glue. After that, a vapor barrier layer is attached, which protects the supporting structures from condensation.
The cladding of the walls of the bath from the inside involves the following actions:
- On top of the vapor barrier film, slats are attached, the distance between which should be 50 cm. A gap of 3 cm should be left between the vertical slats of the frame and the ceiling and the same distance from the floor. This is necessary for the shrinkage of the structure.
- The slats are attached to a wooden surface without internal insulation with self-tapping screws, and to a brick base - with dowels. In this case, it is important to control the verticality of the rails using a plumb line, and check the plane with cords stretched between the extreme bars. Clamps are installed on the back side of the lining board, after which the panel is attached to the crate with nails.
- Next, a sheet is collected from the lining, inserting one element into the groove of the other. On the back wall of each panel, a clamp is attached, with the help of which the lining is fixed to the crate. You can also fix the parts simply on nails, deepening their heads into the wood. The spacing between the fasteners is about 60 cm. It is important to connect the parts tightly, but leave a gap of about 2 mm, as the wood swells with moisture.
Lathing when cladding walls with clapboard is necessary for walls made of any materials. The bars allow you to create a ventilation gap, and the vapor barrier film ensures moisture removal. This preserves the quality of the supporting structures and the appearance of the finish. The ceiling is sheathed with clapboard according to the same technology, having previously fixed the vapor barrier film.
Video: preparing the ceiling for clapboard sheathing
Decorating a bath with clapboard is a popular method of arrangement. At the same time, wood is successfully combined with ceramic tiles, stone. Therefore, the interior decoration of the bath can be varied, but it is important to choose the installation technology of a suitable material.
Self-construction and arrangement of a bath is a difficult, but quite doable event. First of all, the owner must choose a suitable material for the construction of a bath.


Start by choosing a suitable location for your building. The following guidelines will help you with this:

Before starting any construction activities, prepare a bath project.

Determine the optimal size for the structure. One vacationer must have at least 5 m2 of the total area of the building. For example, if you are building a bathhouse for 4 people, its area should be at least 20 m2.

As a standard, the bath consists of a steam room, a washing section, a dressing room and a rest room. Set the dimensions and features of the spatial arrangement of the listed premises convenient for you.

Prepare the following drawings:

You can make all these drawings yourself or find them in an open source. In general, the projects of baths from a bar remain practically the same. If you have a desire and a sufficient budget, order the preparation of drawings by a professional.

Materials for building a bath
To build a bath from a bar, you will need a whole set of different materials and devices, namely:
- timber. Traditionally, a material with a cross section of 150x150 mm is used;

- floor boards. The best option is a four-meter edged board 15x5 cm;

- boards for the ceiling. Usually, lining is used with a width of 10 cm and a thickness of 2 cm;

- materials for interior decoration. Lining is perfect;

- vapor barrier material. The best option is modern vapor barrier films;

- waterproofing material. Use penofol whenever possible. Plastic wrap will also work;

- insulation for the ceiling. Mineral wool materials are well suited;

- sheet asbestos. With its help, you insulate the wooden elements of the building from high temperatures. Insulation sheets should be fixed to the walls near the sauna stove. Also, wooden elements installed in the immediate vicinity of the chimney need insulation;

- bulk materials for the arrangement. Standard set: cement, sand and gravel;

- material for finishing the roof. Focus on your preferences. The main thing is that the roof of the bath looks good surrounded by the roofs of other buildings on the site;


- insulation for mezhventsovoy space. Use jute. Tow and moss are also suitable.

It is best to start building a bath in the spring, because after the completion of the main activities, the wood will need to be left for a six-month "wintering". During this time, the material will dry and give the required shrinkage.
Buy cement immediately before starting construction.
Bath Construction Guide
The work is carried out in stages - from the preparation of the construction site to equipping the bath with various accessories.
First stage - Site preparation
Clear the building site from all sorts of debris, shrubs, large roots and, in general, anything that can interfere with the construction of the foundation.


Second stage - pouring the foundation


Attach the sheathing boards to the rafters. Lay hydro-, heat- and vapor barrier materials, bath insulation is one of the most important elements of its construction, the quality of the built bath will directly depend on it. Fit the selected roof finish.
Fourth stage - Interior fittings
Start by arranging the necessary communications.

You must take care of the installation even at the stage of creating the foundation. To do this, outside the boundaries of the bath, create a pit or a drainage well connected to the bath with a pipe laid with a slope.

After completing the arrangement of the sewage system, make the floor. It can be concrete or wood. Concrete floors are usually tiled. This coating is more durable.
The wooden floor is traditionally made leaky. The technology is extremely simple: logs are installed, floor boards are nailed to them with a certain gap. You can also create a small drainage hatch and close it with a perforated grill. In this case, the floor should be made with some bias. As a result, moisture from the floor will enter the hatch, and from there it will be discharged through a pipe into a drainage well or sump.


To make the wood last as long as possible, thoroughly ventilate the bath after each visit.
Insulate the ceiling and walls of the building using suitable moisture, heat and vapor barrier materials. Install doors and glass units. Bring running water and electricity to the bath. Install the necessary electrical appliances.


Stage 5 - Oven and Shelves
Select the design of the shelves at your discretion. They are built in the same order: first, a support frame from a strong bar is mounted, after which boards are nailed to the supports.
Also choose the stove at your discretion. You can lay out a traditional one, install a convenient metal unit or a modern electric heater.

Heavy furnaces require the obligatory arrangement of an individual foundation. In this moment, everything is also determined in a separate order, taking into account the characteristics of a particular furnace.
Sixth step - Optional accessories


In conclusion, you will only have to add all sorts of accessories to your summer cottage bath, namely:
- brooms;
- a wooden mug for adding water;
- buckets;
- all kinds of wooden bars, etc.
The interior arrangement of the additional premises of the bath is at your discretion.

Happy work!
Video - Do-it-yourself bath in the country
The most serious should be taken to the issue of interior decoration of the bath. While the room may look quite unremarkable, there are several important aspects to be aware of when it comes to finishing.
Of course, such a room must easily withstand high temperatures. In the bath, the air temperature can reach 120 degrees Celsius. Thus, you need to responsibly carry out all construction work, as well as choose materials that are suitable in terms of quality and scope of use.
At the same time, the finishing materials must "breathe", otherwise moisture will accumulate in the bath, which also negatively affects the state of the entire room. On sale you can find many interesting options for finishing materials that can be freely used during the construction of a bath.
In this article, we will dwell in detail on each issue related to the decoration of bath rooms. Moreover, we will carefully analyze all the materials that are used in this process.
Materials for interior decoration of the bath
Many experts in the construction industry have recognized that the best finishing material available in stores today is clapboard (or sheathing panels). Despite the general simplicity of the material, it is really capable of "breathing", but at the same time the lining perfectly maintains the optimal temperature inside the room. The lining shows itself especially effectively together with heat-insulating materials.
Another positive side of the classic lining is the ease of installation. Accordingly, for these works it is not necessary to involve specialists who usually ask for a lot of money. A beginner will also cope with all the tasks, but first it is worthwhile to study in detail all the subtleties of the process.
Clapboard can be used to decorate all walls and ceilings without any problems. As a result, we get an excellent sauna room suitable for a park. In this case, the material will not lose its initial properties. However, it is still necessary to carry out periodic maintenance of the wood, otherwise you may encounter numerous problems (cracking, deterioration of thermal insulation).
It is important to know that varnishes and stains cannot be used as protective coatings for cladding panels. Practice shows that these materials have a detrimental effect on human health. We are talking about those cases when the finishing material is exposed to high temperatures.
The choice of wood for finishing the bath
First of all, you need to know that the quality of the finish directly depends on the quality of the wood. When buying a lining, you need to pay attention to the condition of the material. If there are any notches, scratches or other damage, it is better not to even look in the direction of such cladding panels. Gradually, they will deteriorate and eventually the lining will have to be replaced.
In addition, the surface of the lining should not be wet. This suggests that the technology for the production of this material has been violated. If the lining still has a little moisture, you should dry the wood.
In such construction work, deciduous lining is often used. As a result, we will have a high-quality finish that will not heat up along with the entire room, but at the same time the wood will retain heat in the bath when necessary. In this case, you still have to monitor the condition of the material so that it does not become unusable for various reasons.
Often, linden panels are chosen as finishing. This is an excellent wood, but gradually the surface of such panels begins to darken. After some time, the appearance of the material will create a not very pleasant atmosphere. To avoid this characteristic change in wood, the surface should be treated with special coatings. They are often sold in hardware stores. In this situation, the linden material will always have the same attractive shade. Linden is also good because it heats up very slowly, and for a bath this is a very important aspect.
Birch is rarely used as a finishing material. The point is that birch often dries out a lot, so after a while it loses its initial appearance. You cannot do without protective coatings here.
Sometimes builders call aspen the best finishing wood. It is most optimal to use aspen lining as a finishing material for the ceiling. With the right approach, this type of wood becomes incredibly strong and durable. Of course, similar results are achieved by pre-treatment as well as proper drying. Done correctly, aspen can be freely used as a ceiling covering. Many builders claim that often aspen is so strong wood that it is almost impossible to hammer a nail into it. Accordingly, it will not work to damage the tree either.

Wall arrangement process
Let's dwell on the finishing of the floor and walls of the bath in more detail. As we have already said, in the overwhelming majority of cases, lining is used as a finishing material. Accordingly, the finishing process consists of several stages, which are given below.
- At the very beginning, a full-fledged project is drawn up. If all is well, then in the end we will be able to roughly estimate the required volumes of finishing material. To do this, you need to measure the dimensions of all the necessary surfaces and make elementary calculations.
- Next, the lining is selected. It should be borne in mind that there are many options for this material on sale, so the dimensions of the panels should be taken into account even during the calculations of the project. In this case, the dimensions of the lining should be well combined with the dimensions of the bath room.
- Now on the surface where the lining will be located, the vapor barrier is attached. This is necessary in order to retain steam and prevent it from entering the already equipped thermal insulation. The vapor barrier is attached to surfaces with construction tape. Any damage to the material, as well as gaps between the insulation strips, must not be allowed.
- Next, the crate is equipped, on the basis of which the lining will be fastened. Accordingly, wooden blocks that can withstand the weight of the finish are attached along the entire perimeter. Cleamers are used directly for fixing the lining. They will make it possible not only to quickly install the finishing material, but also to quickly dismantle it, if there is such a need in the future.
- Well, at the very end, the final processing of the wood finish takes place. The essence of this stage of work is that you can often find untreated wood on sale. In order to obtain the highest quality result, the final processing takes place after the installation of the lining, since the wood can be damaged during fastening. After the lining has settled on the walls, you can easily apply all the necessary protective layers. This is not only convenient, but also as efficient as possible: each panel is visible, and the light source will allow you to view the entire surface with high quality.

There are tons of finishes on the internet that can be used in a variety of spaces. This gives a certain freedom of choice, allowing you to create your own original bath. Of course, when choosing options, one should proceed from the fact that the bath room has a number of features that should be considered when choosing a tree species, as well as building resources.
At the same time, based on the selected wood, you can create some other objects inside the bath. For example, it can be shelves, tables or chairs. Accordingly, in such conditions, we can create a single style of the room, from which everyone will definitely be delighted. It is also worth understanding that you cannot save on the bath. This is the room that should be distinguished by a warm atmosphere and coziness, despite the fact that they only come to the bathhouse to take a steam bath.
Features of floor finishing
Floor finishing is an equally important aspect that should be paid special attention to. The point is that a high-quality surface should provide an even more comfortable atmosphere, which will emphasize the quality and durability of the entire bath room.
However, the process of finishing the floor itself can be quite simple. Considering the fact that we have a relatively low temperature at the floor level, here you can use wood, tiles, and many other materials. Of course, it is advisable to make sure that all the components of the room are well combined, because the bath is a special space.
It should be noted right away that the floor surface created on the basis of the tile has some peculiarities. In the event that the temperature in the bathhouse has risen too high, touching the tiles can burn you a little. This happens extremely rarely, but such cases do happen. Accordingly, if you like to steam at too high temperatures, it is better not to use the tiles. But at the same time, this finishing material will be a good choice if there is high humidity in the bath (or just water can get on the floor). This is not uncommon in the sauna room, and many people also like to pour water directly from the bucket. Consequently, a huge amount of water falls on the floor.
Wood is not well suited to the above scenario, which can also become a floor covering. Under the influence of water (or moisture), the tree will gradually deteriorate and darken. Over time, the surface will become too loose and unreliable. However, wood flooring has many advantages. The point is that the wood will never overheat, it is a natural building material that visitors to the bath will be pleased to feel with their feet.
As for the fact that wood gradually deteriorates when used in a bath, then this issue can be approached wisely. Often, wooden panels used for arranging the floor are carefully sanded, and also treated with protective compounds. Of course, this will not make wood an almost eternal option for flooring, but it will significantly extend the service life. It should be borne in mind that the wood must be constantly looked after, since at a certain moment the process of decay of the tree can begin too rapidly.
If the choice is made in favor of the tile, then here you should only periodically take care of it. It does not take a lot of time, the surface will look attractive despite the combination with wooden walls and ceilings. If you are concerned that the surface of the tile may be too hot, keep in mind that some kind of fabric-based material can be placed on top of the tile. Accordingly, the woven product can be easily replaced (while spending only a little money), and the high temperature of the tile will not be able to affect the bath visitors in any way.

Materials that cannot be used to decorate the bath room
Many people who really want to become the owners of their own bath, do everything possible to make their dream come true. In such conditions, the owners can save on the most important things, which can later do a lot of harm. Of course, the most important thing is the choice of finishing materials.
Often, this process uses those building materials that were mentioned earlier in this material.
However, sometimes, due to savings, people use completely unsuitable finishing products. Linoleum, plastic are the most unsuccessful materials that can be used in a bath. In such conditions, plastic and linoleum will begin to deteriorate rapidly, while, it is likely, emitting unsafe substances (this primarily applies to plastic).
In any case, when choosing materials in hardware stores, it still makes sense to ask the consultants all your questions. This will definitely avoid many problems.
With a free area on the land, you can build a strong and very functional bath. Moreover, the last factor is due to the competent design of the premises, their decoration and furnishings. Regardless of the size of the building, premises such as a steam room and a hallway with a wardrobe should be equipped inside.

But such an economy option can hardly be called comfortable enough, therefore, among the rooms recommended for design, decoration and equipment with all the necessary rooms, the following can be distinguished:
- shower, washing or washing. Here, basic hygiene procedures will be performed in the form of a shower. The room can be equipped with a small font and a bucket-waterfall for pouring;

- separate bathroom. It is unnecessary to talk about the purpose of this room. It is especially important to allocate a room for a toilet in two-story bath houses with a kitchen and a sleeping place;

- relaxation area with dining room. This room is intended for relaxation after the procedure of vaping, drinking tea. The zone can be supplemented with a fireplace, a seating area and other furniture and decorations;
- kitchen area. Relevant for large baths, which are often used by large companies. The kitchen area can be small and consist of an electric hob, kettle and microwave. Sometimes the kitchen is supplemented with a phytobar, equipping a rack with high chairs and a cabinet for storing packages with elite varieties of teas and medicinal herbs;

- pantry. A small room with shelves and cabinets should be allocated for storing bath sheets, towels, hats, shoes, etc. Here it is worth storing household chemicals for cleaning, so as not to litter the shower room with it;
- sleeping area. For example, the second floor can be allocated for a separate bedroom. It will be pleasant for arriving guests to settle here if there is not enough space in the house;
- boiler room for boiler equipment;

- billiard room;
- solarium;
- pool;

- laundry. It is recommended to design next to the shower room for ease of installation of water supply and sewerage wiring. The laundry room can be equipped with a washing machine, drying cabinet or conventional floor / wall dryer, ironing board for bath linen;
- veranda or terrace;

- a small vestibule (important for baths, which are used all year round).

Depending on the available budget, it is possible to equip only some of the proposed premises, for example, a bathroom, a shower and a recreation area. If the plans include the construction of a truly luxurious health-improving complex, and it is not difficult to pay a "tidy sum" for comfort, you should think about including all the aforementioned premises in the estimate.
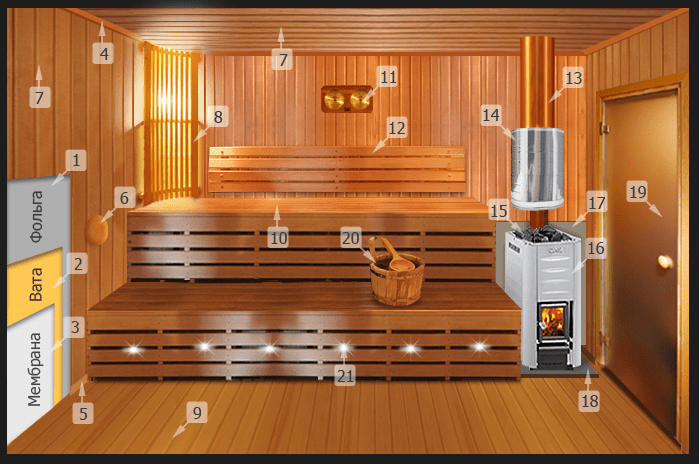
Steam room arrangement. 1 - foil. 2-insulation. 3-membrane. 4-plinth ceiling made of wood. 5-plinth floor wooden. 6-vent valve. 7-ceiling made of wooden lining. 8-light. 9-floor made of wood. 10 shelves. 11 thermometer and hygrometer. 12-back shelf. 13-chimney. 14-water tank. 15-heater. 16-oven bath. 17-protective shield. 18-non-combustible base under the oven. 19-door to the steam room. 20-bath accessories. 21-light therapy or diode illumination.
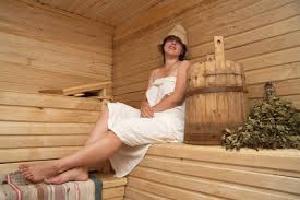
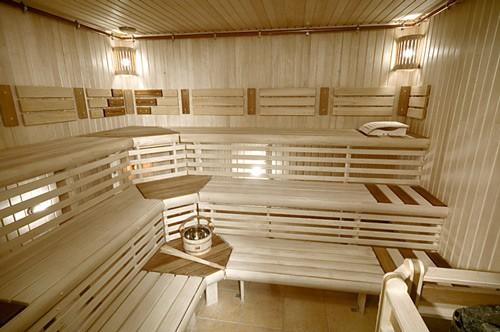
It is customary to equip the steam room on the first floor of the building. The entrance to the steam room can be from the shower room or dressing room. The door to the steam room is installed from tempered glass or wood, strictly without metal decorations, inserts and fittings (except for hinges), because the metal can heat up and burn the visitor. For one steaming person, it is customary to allot 1-2 meters of square floor space. The stove will take about a meter more. Accordingly, the comfortable dimensions of the steam room are 3-5 sq.m. Too large a steam room with high ceilings is not worth doing - it will take a lot of time and fuel to warm up the room, and the air will dry out from a hot stove.


Video - The optimal size of the bath and steam room
The height of the ceilings is arranged from 2.2 to 2.6 m, depending on the height of the owners of the bath and the height of the shelves, which in turn can be 1-3 tiered. The shelves themselves are made so that it is comfortable to sit, lie on them, and a bather with a broom could stand nearby and perform bath procedures. The upper shelf is made the widest, and the recommended height of each tier is 35 cm. It is better to sew up the space under the shelves in order to reduce fuel consumption for heating the unused area of the room.
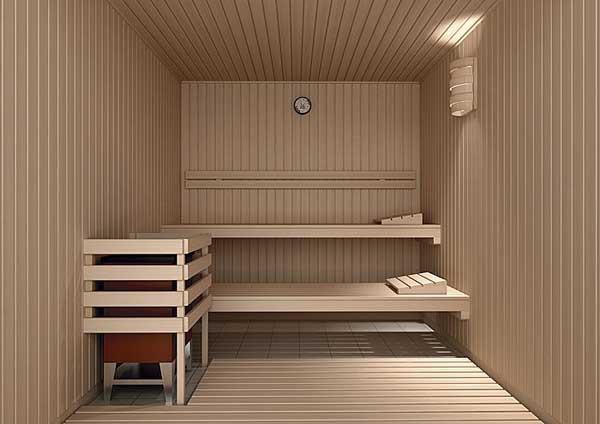
It is advisable to make the shelves from hardwood, the use of cedar / larch is permissible. Wood can be combined, but it must be of good quality - dry, free of knots, resin pockets, traces of rot and mold, carefully sanded. For convenience, it is worth buying or making do-it-yourself headrests made of aspen or linden, as well as a tub and a bucket with a long handle. It is imperative to hang a bath thermometer with a hygrometer in the steam room to regulate the degree of heating and air humidity.
 In the photo - a pointer thermohygrometer and an hourglass

The lighting in the bath is rarely made bright. Basically, ceiling and wall lamps are covered with wooden shades / lampshades, so that a soft twilight reigns in the steam room. Additionally, a diode tape can be used for color therapy, as well as an optical fiber to create the effect of a starry sky.


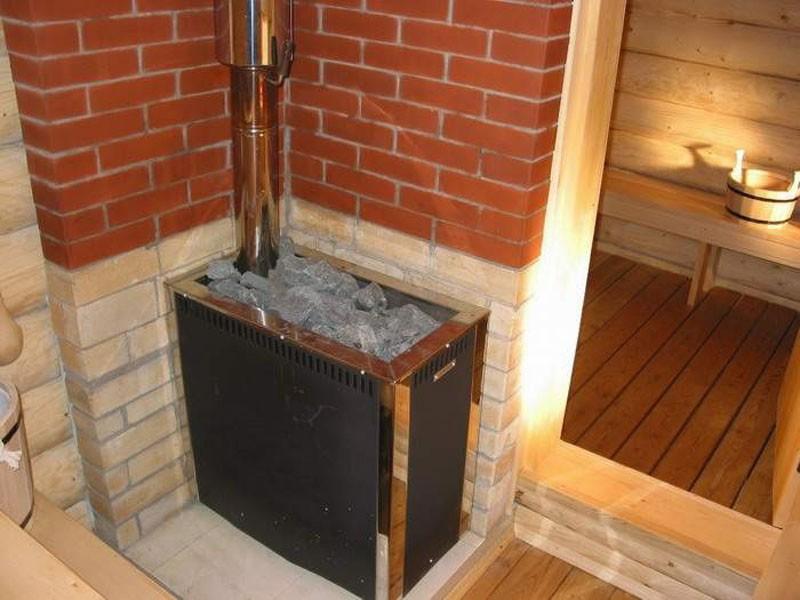
The stove is usually located closer to the door. Moreover, the stove can be made of bricks or made of steel (wood, electric).
 Sauna stove at the entrance to the steam room
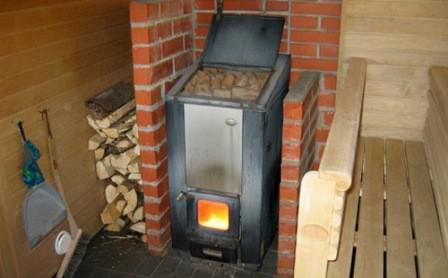
 Sauna heater installed on ceramic tiles
It is extremely important when installing the stove to properly insulate the wall, floor, as well as overlap in the place of its contact with the outgoing chimney. The stove is placed at a distance of at least 10-15 cm from the wall, if the firebox door goes into the steam room, if the sauna stove is located simultaneously in two adjacent rooms and the fire door is brought out to the dressing room, a recess is cut in the interior partition that exceeds the dimensions of the stove by 10 -15 cm on each side of heating surfaces. Insulation is carried out by means of asbestos cardboard, bricks, ceramic tiles, stainless steel sheets.

Separately, it is worth considering the options for finishing the walls, ceiling and floor. In addition to the standard lining and wood flooring, there are some interesting ideas.
Table. Steam room wall decoration
| Material | Advantages | Peculiarities | Mounting method |
|---|---|---|---|
| Salt crystals or halotherapy blocks in your own steam bath / sauna | They have a pronounced therapeutic effect on the body as a whole, the respiratory system and the skin in particular. | Salt crystals are installed in dry steam saunas. The maximum evaporation of trace elements occurs at 60 degrees, but already at 75 degrees the blocks turn into a salt solution. Do not allow salt bricks to come into contact with water, because the salt dissolves in it. | Salt crystals are used to make spectacular rectangular wall inserts; it is also possible to decorate one or more walls from floor to ceiling. Facing with salt blocks is combined with diode or other illumination; two-component quick-setting glue is used to fix the masonry (curing time from 10 minutes). |
| Wild stone or decorative brick | The uniqueness of the interior, the unusual combination of stone with wooden surfaces. Improved fire safety. When using medicinal rocks, for example, soapstone or jadeite, additionally - a healing effect. | The stone can be used to revet both a part of the wall behind the stove and the entire wall behind the heating device. Sometimes stones are attached instead of plinths to the floor and ceiling. It is worth remembering that the stones in the bath are very hot, so they should not even be allowed to accidentally come into contact with the skin of the visitors of the steam room. | If a wooden wall is faced with a stone, you will need to fix construction waterproofing paper on it (overlaps on all sides 4-8 cm). On top of the waterproofing layer with galvanized staples or nails, a paint net should be fixed (the spacing of the fasteners vertically up to 15 cm, horizontally - up to 40 cm, at the corners the mesh is laid in two layers). The mesh is plastered, and after drying 1-1.5 plaster layer, facing stones are laid out on a cement-sand mortar. It is recommended that the stones be laid out on the floor first and numbered for convenience. It is better not to use stones that are too heavy for facing. |
| Ceramic tiles, porcelain stoneware, polished natural stone tiles | Fire safety, aesthetics, steam room interior decoration, durability. | All of these tiles are laid on the wall behind the stove (all or only part of the wall). Tiles with a thickness of more than 10 mm are installed using metal fasteners and pouring cement-sand mortar / glue / mastic into the joints. | The tiles are fastened to the plastered wall surface. For fixing the tiles, highly specialized adhesives are used, for marble - on a latex or polyurethane base (anhydrous). Laying is carried out from the bottom up, the seams are laid with crosses or wedges to maintain the same thickness. |
| Cork moisture resistant coating | Suitable for both additional wall insulation and finishing. | Plates are used with a thickness of 20-40 mm. | Installation of panels on the wall is carried out using a specialized adhesive for cork coverings. It is permissible to use a cork skirting board for arranging a steam room. |
Table. Materials for arranging flooring in a steam room
| Material | Advantages | Peculiarities |
|---|---|---|
| Beautiful, durable, noble looks. | Cold enough, it is desirable to install underfloor heating systems under the porcelain stoneware coating. Must be non-slip. Seams are treated with moisture resistant grout to prevent the spread of mold and mildew. | |
| Shock absorbing, warm to the touch, blends perfectly with wood surfaces. Not slippery. | Suitable for use in a steam room, because the floor temperature rarely exceeds 30-40 degrees. | |
| Wooden boards and wood rugs | Such coatings can be laid on concrete or porcelain stoneware. | Treatment with moisture-proof impregnations and periodic air drying is required. |
Note! It is unacceptable to use any plastic, rubber coatings, linoleum, PVC tiles and panels for arranging a steam room. Finishing materials and furniture, when heated, should not emit a chemical odor, resin.
The ceiling in the Russian bath has long been made of timber, lining, boards. It is wooden surfaces that tolerate high temperatures well, fill the bath with a pleasant aroma and do not contribute to the accumulation of condensation - wood tends to "breathe".
There is no point in painting the ceiling, covering it with plywood, chipboard, or plastering - high humidity and temperature will quickly ruin such a finish. In Turkish baths, mosaics are often used to decorate the ceiling, but it is worth remembering that the humidity and temperature in hammams are much lower than in Finnish and Russian steam rooms. It is possible to use a cork covering Termokork with a thickness of 100 mm, specially designed for the ceilings of baths (cost 3900-4000 rubles per 1 sq. M).

It is advisable to equip the steam room with one window. A particularly eccentric option is a panoramic full-wall blind window. Such a window allows you to admire nature from your own steam room, while the mirror coating on the outside will not allow the curious to look inside. But remember that the larger the window, the more heat loss.
The most common option is a single opening window 60x60 cm or 40x60 cm. The window is not placed on the wall behind the stove or sun loungers. The height from the floor to the bottom sash cannot be less than 170 cm - this is the height that implies effective ventilation of the room (natural air circulation). The frame can be made of wood or high-quality plastic that can withstand temperatures up to 120 degrees.


Sometimes glass blocks are inserted instead of a window. They allow you to save on lighting the steam room during the day.
Arrangement of a shower or washroom
The shower room can be organized as a separate room or adjacent to the steam room, for example, separated only by a glass damper or a glass block partition. A cabin can be installed here or a shower tray with a drain for water drainage can be organized. If a large number of visitors are planned, then it is recommended to install two or three showers.
Directly in the shower, in addition to the shower itself, there should be a bench, a mirror, as well as hooks and non-traumatic shelves for toiletries.
Often, the washroom is completed with a douche bucket and a bathtub made of acrylic or cast iron. Also, fonts are installed in the washing room, especially if there is not enough space for arranging a full-fledged pool.
The temperature in the shower room should be higher than in the dressing room, but significantly lower than in the steam room.
Hot water supply is organized by connecting to a central water supply, installing a boiler or installing a heat exchanger and a remote water tank (from 80 to 120 liters).
The diversion of water is organized into a central sewerage system, a septic tank or a drainage well. A drain is installed in the shower room (the floor is poured or laid with a slope towards the drain funnel), from which waste fluid is drained through a pipe with a diameter of 110 mm. One person needs about 50 liters of water to take a shower, respectively, using this figure, you can calculate the volume of a septic tank or a storage cesspool for a bath. By the way, treatment and storage installations should not be located near the walls of the bathhouse or underground - an unpleasant smell will penetrate the room. It is recommended to mount a local installation 5-10 m from the walls of the bath.
Coating options for wall, floor and ceiling cladding are shown in the following table.
Table. Arrangement of a shower in a bath
| Material | Peculiarities | Finishing example, photo |
|---|---|---|
| Wood | Showers adjacent to the steam room are often trimmed with wood so as not to violate the general style of the premises. Wood does not tolerate constant moisture - fungus develops, rot appears. It is worth considering the possibility of installing a shower tray or cabin in order to minimize the effect of moisture on the wall and floor material, as well as regularly dry the boards, and carry out treatment with antiseptics. | |
| Wood Ceramic tile, porcelain stoneware, mosaic | These materials are most appropriate in the shower, but it is important to choose products with a non-slip surface, and trowel the seams with compounds that prevent mold. It is recommended to install wooden or rubber mats on the tile floor. | |
| PVC panels | This material can be used for walls and ceilings only in showers, not adjacent to the steam room. Plastic does not tolerate exposure to high temperatures, but high humidity is not afraid of it. The panels are easy enough to install, wash, but the strength of the material leaves much to be desired. | |
| Natural stone | This solution is not to everyone's liking due to the extraordinary interior and the coldness of the coating. However, the stone tolerates high humidity well and is quite suitable for cladding the walls of the shower room. |
Video - An example of finishing shower ceramic tiles
Don't forget about ventilation in the shower room. A hood with an electric fan should be located under the ceiling. For natural ventilation, it is worth placing a small opening window closer to the ceiling, this is especially true for wooden baths and showers with timber trim, clapboard.
Advice! So that less heat escapes from the shower, it is recommended to equip a threshold at the entrance to the room, as well as install a door of a small height (from the standard 2.37 m, 2.07 m, 2 m and 1.87 m, the smallest is chosen, and this value should be reduced further 10 cm). The justified width of the doorway is 75-80 cm.
Bathroom
The bathroom can be a separate room or be combined with a shower. In the first case, in addition to a toilet or dry closet, it is recommended to install a washbasin with a mirror, a cabinet, a shelf, a paper holder in the room. The decoration of a separate bathroom can be absolutely any, from the classic cladding with tiles and plastic panels to cork, linoleum, a combination of various materials.


Toilet ventilation is very important. According to the rules, up to 50 cubic meters of fresh air should be supplied to a toilet room with 1 toilet bowl every hour.
Often a heating radiator is installed in the toilet so that it is comfortable in the cold season. It is also worth placing a boiler here so as not to spoil the interior of the washing room.
In the case when it is planned to install a toilet bowl in the shower room, it is worth equipping two forced draft hoods. One will not allow moisture to accumulate under the ceiling, the second will ventilate the space above the toilet.

The decoration of the shower room with a toilet is made in the same style; for convenience, the toilet is installed in the far corner of the washing room and is fenced off with a partition, curtain, screen. It is unacceptable to use materials like linoleum in the shower room. Standard options for finishing with tiles, clapboard, mosaic, stone, plastic, etc. are used.
The drainage of water from the toilet can only be carried out into a local treatment plant or a central sewerage system. If floors of a leaky type are arranged in the bath, a sewer network must be provided separately for the toilet (or an independent mobile dry closet is installed, for example, of a composting or liquid type).

Of course, every private developer designs a bathhouse, relying on their own capabilities and preferences, but it is worth familiarizing yourself with federal regulations prescribing the rules for arranging baths in general and latrines in particular:
- SanPiN 983-72, 2.1.2.2645-10 and 42-128-4690-88;
- SNiP 30-02-97;
- SNiP 31-05-2003;
- and for the organization of a shower and toilet for a disabled person, it is worth paying attention to the second edition of the manual on integrated design of the environment for persons with disabilities (from 1997, prepared by the Moscow Committee for Architecture).
Files to download:
Plumbing dimensions
Dressing room and wardrobe
The dressing room is the last room that must be on the first floor. This room can be large and spacious or very tiny. In any case, there must be an entrance to the shower room from the dressing room. Dressing rooms are most often made of wood to emphasize the style of the bath. It is advisable to arrange wooden furniture.
The recommended air temperature in the dressing room is 26-28 degrees. Ventilation can be natural, for which they install opening windows, which in turn are also a source of additional light during the daytime. Artificial lighting should be made quite saturated (chandelier and wall sconces), but not harsh.
The dressing room can be combined with a dressing room if the entire bathhouse is small. In this case, you should be guided by the following recommendations:
the height of the ceiling should be greater than the height of the person, taking into account the raised hands. Optimally - 2.4-2.6 m;
- the number of seats, hooks and shelves for clothes should correspond to the expected number of visitors to the bath;
- the floor in the dressing room and dressing room should be warm and non-slip so that it is comfortable to walk barefoot. For example, you can install a "warm floor" or lay a carpet;
- it is worth providing one or more electrical outlets;
- it is recommended to equip the dressing room with a mirror.
By the way, the dressing room can be combined with the kitchen area by installing a corner kitchen set with household appliances. If you plan not only brewing tea in the kitchen, but also full-fledged cooking, you need to install a separate hood, as well as plan the laying of water and sewer pipes to connect the sink.
Advice! Do not install kitchen cabinets under the stairs to prevent dust from falling from the steps onto the dishes.
Video - Dressing room design
Second floor
In the photo - a cozy bedroom in the attic of the bath
Everyone decides on their own how to equip the second floor. Whether upstairs there will be a bedroom, a billiard room, a solarium or a simple storage room depends on the size of the bath and the budget of its owner. However, we strongly recommend installing a safe staircase with wide steps between the floors, and supplementing the residential floor with a small balcony.
Equip the bath so that you feel cozy and comfortable in it.
Video - Sauna project with billiards
Video - Building a bath with a font